الأربعاء، 20 نوفمبر 2013

Eggless Vanilla Sponge Cake Recipe

 
Eggless sponge cake recipe

Eggless sponge cake recipe was in my try list for long time.I had planned to try this cake recipe during Christmas.But i was forced to make it yesterday.I had a packet of fresh cream which was about to expire and i wanted to use it without wasting.When i was thinking of what to do with it,two recipes flashed in my mind. One was methi mutter malai and the other one was cake using fresh cream.I made both and somehow i finished the whole packet on the same day Tongue out.For this cake,i google searched and got this recipe from Parita’s blog.I followed that recipe to the ‘T’ but i followed an easy method to make the cake batter.The result was awesome.The cake came out very soft and spongy.Raksha loved it to the core and she finished all the cake herself in two days.We got only one piece to tasteEye-rolling.

Check out this link if u wish to try the same using pressure cooker.You can just follow the same method.Hope u will get it right.Try n let me know how it turned out for you.

Eggless sponge cake recipe using fresh cream


Eggless vanilla sponge cake recipe


Eggless vanilla sponge cake recipe Easy to make eggless vanilla flavoured sponge cake recipe using fresh cream.Kids would be pleased with this cake recipe :)
Cuisine: Indian Category: Sweet Yields: 8-10 pieces
Prep Time: 5 Minutes Cook Time: 40 Minutes Total Time: 45 Minutes


INGREDIENTS

1 cup=200ml
To make the cake batter
  • Powdered Sugar - 1 cup
  • Fresh cream - 3/4 cup ( i used amul)
  • All purpose flour /Maida - 1 1/3 cup
  • Baking powder - 1 tsp
  • Cooking soda - 1/2 tsp
  • Milk – 3/4 cup
  • Vanilla essence - 1 tsp
METHOD

  • In a big mixie jar,take the sugar and powder it nicely.Add fresh cream to it and beat twice or thrice to make a smooth paste. OR take a bowl and beat the sugar & cream with a hand whisk.To this add the maida mixture as mentioned below.Do not beat the batter.mix gently.Follow this method if you don't want to use mixie.
eggless sponge cake step by step recipe
  • Then add the maida,baking powder,cooking soda,vanilla essence and beat twice.U’ll get a thick paste.Wipe the sides.Now add the milk and run the mixie in low speed.Do not over beat the mixture.U’ll get the batter in flowing consistency like a ribbon.
eggless sponge cake step by step
eggless sponge cake recipe step by step
  • Grease a baking pan with oil & sprinkle maida all over the pan and pour the cake batter.Pat the bottom of pan to break the air bubbles.
  • Pre heat the oven at 180c or 10 minutes in convection mode.Keep the baking pan and bake for 35-40 minutes and bake in convection mode at 180 c.Please keep an eye after 25 minutes and check with a toothpick.Check with a skewer/toothpick or knife for doneness.If it comes out clean,cake is done.
  • Cool completely.Run the knife through the sides of the pan and then invert it on a plate.Cake will come out easily.
eggless sponge cake recipe step by step

Cut into pieces.Serve n Enjoy !


Note

  • I am unable to say the shelf life of this cake because it got over by two days.
  • If u don’t want to use mixie jar , u can mix the powdered sugar and fresh cream together in a bowl to make a smooth paste.In another bowl, mix maida, baking powder, soda and add this to the fresh cream mixture in one direction.Add essence and milk.Make a batter and proceed as above.
  • Preheating is essential.Use Convection mode at 180c.

Wanna biteWinking smile 
eggless sponge cake piece

eggless vanilla sponge cake recipe piece


الاثنين، 18 نوفمبر 2013

Brinjal Curry|Kathirikai Poriyal - Poriyal Recipes


kathirikai poriyal recipe
Kathirikai poriyal recipe is one of my favourite poriyal recipes. I love to have it with hot sambar sadam and more kuzhambu.This is my mil’s version.Before marriage , i used to enjoy my mom’s kathirikai podi curry with rasam.This is very easy & flavourful poriyal.We make potato poriyal using the same method which i’ll post soon.
Brinjal curry

Kathirikai poriyal recipe


Kathirikai poriyal recipe Flavourful Brinjal curry recipe - A best side dish for sambar and curd rice!
Cuisine: Indian Category: Curries Yields: Serves 2
Prep Time: 10 Minutes Cook Time: 20 Minutes Total Time: 30 Minutes


INGREDIENTS

  • Brinjal - 5 nos (medium sized)
  • Sambar powder - 1.5 tsp
  • Tamarind -Berry size(soak in little water)
  • Turmeric powder - 1/4 tsp
  • Salt & water - as needed
To grind
  • Grated coconut - 3 tbsp
  • Big onion -1 no
  • Cumin seeds/jeera - 1/2 tsp
To temper
  • Cooking oil - 2 tbsp
  • Mustard seeds - 1/2 tsp
  • Urad dal - 1tsp
  • Curry leaves - few
METHOD

  • Cut brinjal into two vertically.Again cut this into two cubes.Soak in water till use to prevent color change.
kathrikai poriyal step by step
  • Cook brinjal adding the required water,salt , tamarind extract and sambar powder.Make sure the brinjal is not over cooked.It should retain its shape.After the brinjal is cooked well, remove and drain the excess water.U can use this water for making sambar.(I usually pressure cook the brinjal along with dal by keeping it in a separate bowl inside the cooker.I keep it after the cooker starts steaming so that by the time it whistles, brinjal will be cooked properly without losing its shape)
kathrikai poriyal step by step 1
  • In the mean time, grind the grated coconut in the mixie without adding water.Then add the cubed big onions and jeera.Run the mixie twice so that onions will be coarsely ground.Do not over grind to make a paste.This is most important for this poriyal to give a nice flavour.
kathrikai poriyal step by step 3
  • Now mix this paste with the cooked brinjal.Add turmeric powder and pinched curry leaves.In a kadai , heat oil and temper all the ingredients given under”to temper”.
kathrikai poriyal step by step 2
    • Add the brinjal mixture and mix it well. Make sure brinjal doesn’t break.Simmer the flame and allow it to roast in oil till all the moisture leaves it.It gives a nice masala smell.Takes nearly 10-12 mins in low flame to get ready.Flip every now and then to avoid burning in the bottom.

kathrikai poriyal step by step 4

Enjoy !

Note
  • U can replace brinjal by pumpkin or potato and make this poriyal.
  • Make sure masala coats the brinjal well.Leave the masala in low flame for 10-15 minutes to get a nice flavour.

kathirikai poriyal

Sweet Potato Hummus Soup with Carrots

hummus soup

Why I've never thought to add hummus to a soup before is a mystery to me considering how much I adore it, but after seeing Janet's carrot ginger lime soup with sweet potato hummus, I was sold. Chickpeas in soups and stews are always a comfort, and adding hummus with a spicy kick certainly imparted a silky and creamy texture that resulted in spoonfuls of pure bliss.

One the most attractive features of this recipe is that you won't need all of the hummus that you make for the soup itself, leaving you free to indulge in a wonderfully fresh tasting sweet and spicy hummus to be served with crackers, chopped vegetables or little toasted breads. I'm not one to complain about having hummus around for a few days!


sweet potato hummus
Spicy Sweet Potato Hummus


Sweet Potato Hummus Soup with CarrotsSweet Potato Hummus Soup with Carrots
Recipe by
Adapted from The Taste Space
Published on November 18, 2013

Creamy, colorful, hearty and nourishing soup made with a fresh-tasting and spicy sweet potato hummus

Print this recipePrint this recipe

Hummus:
  • 1 1/4 cup dried chickpeas (3 3/4 cups cooked)
  • 1 large sweet potato, roasted in a 400 degree oven for 30 - 40 minutes until fork tender and peeled and chopped when cool enough to handle
  • 2 to 3 garlic cloves, finely chopped
  • 1 1/2 inch piece fresh ginger, finely chopped
  • 2 to 3 green chilies or jalapeños, seeded and chopped
  • 4 tablespoons tahini
  • 1 teaspoon turmeric
  • 1 teaspoon cumin powder
  • 1 teaspoon Kashmiri or other chili powder
  • 1 teaspoon ground coriander
  • 1/2 teaspoon paprika
  • 1/2 teaspoon dried chives
  • juice from 1 lemon (3 tablespoons)
  • 3 tablespoons olive oil
  • 1 to 2 teaspoons sea salt, to taste
Soup:
  • 2 teaspoons olive oil
  • 1 small onion or shallot, finely chopped
  • 2 large carrots, sliced
  • 2 to 3 cups unsweetened almond milk
  • 1 tomato, finely chopped
  • 1 teaspoon curry powder
  • 1/4 teaspoon cayenne
  • juice from 1 lime (2 tablespoons)
  • 1 teaspoon sea salt, or to taste
Instructions:
  • Rinse the chickpeas and soak for 8 hours or overnight in several inches of water. Drain and rinse, then transfer to a large saucepan and cover with several inches of fresh water. Bring to a boil, reduce heat to low, cover, and simmer for 1 hour or until the chickpeas are tender. Drain and add to a food processor.

  • Meanwhile, pierce the skin of the sweet potato and roast in a 400° oven for 30 to 40 minutes or until fork tender. Remove from heat. When cool enough to handle, peel and chop, then add to the food processor.

  • Add the remaining hummus ingredients to the food processor and process until the hummus is smooth, adding more olive oil as needed. This yields about 4 cups of hummus.

  • To make the soup, heat the oil in a large saucepan or soup pot over medium heat. Add the onion or shallot and stir for 2 to 3 minutes to soften. Add the carrots, 2 cups of almond milk, tomato, curry powder and cayenne. Simmer for 20 minutes or until the carrots are tender.

  • Stir in 2 cups of the hummus, adding more almond milk if desired to reach your desired consistency. Simmer for another few minutes and then stir in the lime juice and salt. Using a hand bender or in batches in a countertop blender, process the soup until you reach your desired consistency. I left my soup rather chunky, but blend more thoroughly if you prefer a smooth soup. Serve hot.

Makes 6 servings

sweet potato hummus soup with carrots

More delightful soups you may enjoy from Lisa's Kitchen:
Chickpea Vindaloo
Pumpkin and Carrot Split Lentil Soup
Urad Dal and Tomato Soup (Urad Tamatar Dal)
Cranberry Wild Rice Soup

On the top of the reading stack: the newspaper

Audio Accompaniment: A person disguised as people

السبت، 16 نوفمبر 2013

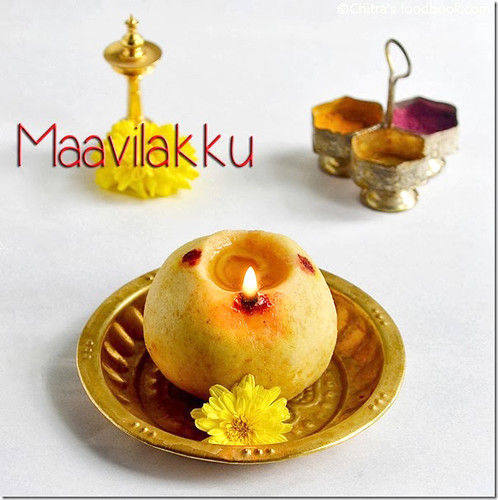
MAAVILAKKU–MAAVILAKKU MAAVU RECIPE | KARTHIGAI DEEPAM RECIPES

Maa vilakku

Maavilakku is a must and should neivedyam recipe in all our households for karthigai deepam.My mom and mil makes different offerings to God for karthigai deepam but offering maavilakku maavu is a common practice for both of them.Not only for karthigai deepam , we make it during tamil month aadi ,thai and purattasi sani.Actually maavilakku maavu(Edible rice flour lamp) has to be  made by mixing  jaggery with home made wet rice flour. My MIL follows this procedure. But my mom makes it very simple using store bought rice flour. It can be done in minutes.Though i follow my mil’s procedure, i thought of sharing my mom’s easy version first in my blog.I have shared some tips and tricks from my mom to make a perfectly shaped maavilakku without losing its shape.For people who are not able to soak and grind the raw rice, this version would be useful.Do try this easy maavilakku maavu recipe and let me know ur feedback.
I wish u all a very happy karthigai deepam, enjoy the festival of lights Smile

Maa vilakku

Maavilakku recipe


Maavilakku recipe Maavilakku maavu recipe using store bought rice flour for karthigai deepam.It can be done in minutes.
Cuisine: Indian Category: Sweet Yields: Serves 2
Prep Time: 5 Minutes Cook Time: 5 Minutes Total Time: 10 Minutes


INGREDIENTS
1 cup - 200ml
To make the flour/maavu
  • Store bought rice flour - 1/2 cup
  • Grated jaggery – 1/3- 1/2 cup
  • Ghee – 4 -5 tsp (unmelted,thick ghee)
  • Cardamom powder - 1/2 tsp
To make lamp
  • Thread/thirinool - 1 no
  • Ghee - 2 tsp(melted)
  • Kumkum and turmeric - little
METHOD

  • Take the rice flour and grated jaggery in a mixie jar.Pulse it 3-4 times.Do not grind continuously.But make sure,they are mixed well without any lumps. ( I got this tip from sharmi’s blog, thank u sharmi .)As the rice flour is dry , it will absorb all the water from jaggery.
maavilakku maavu step by step
  • Remove in a plate. Make a dent and add the thick,unmelted ghee.(The key here is if u use melted ghee,u can shape it easily but later on as the ghee hardens, maavilakku will also become hard.So if u use unmelted ghee, maavilakku will stay soft without losing its shape and taste)Initially add 2 tsp and mix well.Again add one more tsp ,mix well and try to make a ball.If it cracks,add one more tsp.
maavilakku maavu step by step 1
  • Make a smooth ball without cracks.Make a small dent in the center for pouring ghee.Seal if any crack appears.( I used overall 4 tsp unmelted ghee)
maavilakku maavu step by step 2
  • Apply turmeric and kumkum on all the sides .Put the thread and lit the lamp.Keep a flower nearby and offer to God.
Note
  • Maavilakku stays good for  a week in room temperature.I have seen people keeping it for months by freezing it. When u freeze the dough, bring it to room temperature before u consume.
  • My mom never use water to make the dough as it reduces the shelf life.If u are concerned about adding ghee , u can add water or milk to make the dough.
  • Using unmelted ,paste like ghee is more important for maavilakku to hold its shape for long time.
  • If u add more jaggery , it may leave water and maavilakku will lose its shape.
  • For making home made wet rice flour,wash and soak the raw rice for 30 minutes.Drain the water and spread it on a paper for few minutes. Remove and powder it nicely.Sieve the flour and proceed as mentioned above.To see the step by step pictures , please click this link.

Maavilakku

Enjoy maavilakku with chopped coconut pieces.Tastes heavenly Smile

Maavilakku recipe


الخميس، 14 نوفمبر 2013

PORI URUNDAI RECIPE WITH VIDEO–KARTHIGAI DEEPAM RECIPES

Pori urundai recipe

Last year i posted Pori urundai recipe with poha/aval for karthigai deepam. This year i wanted to make  pori urundai using puffed rice. As i don’t get nel pori here , i used arisi pori.Procedure for making pori urundai is similar. It may be  aval , nel or arisi.So i wanted to share this recipe in my space with step by step pictures and a video.Hope it will be useful for beginners. As my mil usually says , the ratio of pori and jaggery is 8:1. I follow the same every year and it comes out very well.Over to recipe with a picture and my latest video recipe !


Pori urundai

Pori urundai recipe for Karthigai deepam


Pori urundai recipe for Karthigai deepam Pori urundai recipe using arisi pori/puffed rice for karthigai deepam
Cuisine: Indian Category: Sweet Yields: 15 nos
Prep Time: 10 Minutes Cook Time: 10 Minutes Total Time: 20 Minutes


INGREDIENTS
1 cup = 200ml
For jaggery syrup
  • Paagu vellam/Jaggery - 1/2 cup (grated,heaped)
  • Water - 1/4 cup
For balls
  • Puffed rice/Arisi pori -  4 cups ( Use 3.5 cups for sweet urundai)
  • Cardamom powder – 1/4tsp
  • Coconut bits - 1 tbsp (Roast in 1/2 tsp ghee)
  • Black sesame seeds - 1 tsp
  • Fried gram dal - 1 tbsp (optional)
  • Ghee or rice flour - to grease hands
METHOD

  • Dry roast sesame seeds in a kadai till it crackles. 
  • Measure 3.5 to 4 cups of puffed rice and take in a bowl. Add the roasted sesame seeds to it.Chop coconut into small pieces. Heat 1 tsp ghee in a pan. Roast coconut pieces till it turns golden in color. Add to the measured puffed rice.
  • In a wide kadai , take the grated jaggery. Add water to it. Make sure jaggery should be immersed completely. I used 1/4 cup of water for 1/2 cup of jaggery.Measure the puffed rice and keep it ready.Keep ready a small plate with water.Melt the jaggery completely and strain it to remove impurities.
pori urundai with step by step pictures
  • Boil the syrup till it becomes frothy and thick. Take the syrup in the ladle and drop it . The syrup will drop slowly  and the last drop will make a string . At this time , simmer the flame and pour little syrup in a plate of water.Try to gather all the syrup and remove it.It will be non-sticky and u’ll be able to make a ball. This is the right stage.Switch off the flame.Suppose if u miss this stage, add little water to the syrup and boil again. Check the consistency and proceed.
pori urundai with step by step pictures
  • Add the puffed rice mixture along with roasted sesame seeds, coconut pieces, fried gram dal immediately. Mix well. All should be done within few seconds.Take care.
pori urundai step by step pictures
  • Mix the puffed rice well in the syrup till the bottom of kadai.All the rice should be coated well with the syrup. Grease ur hands with rice flour or ghee and make balls tightly when the mixture is slightly warm.If the mixture cools down,u can't shape it.So do it fast.U’ll be able to make a perfect round. If u r a beginner , make balls roughly first .Complete making balls before the mixture cools down. Then shape it well. I usually follow this for aval pori.
pori urundai step by step pictures
  • If the mixture cools down before making balls, heat the kadai slightly. The syrup will melt and helps u to make balls . Make round balls. Give a setting time of 10 minutes and enjoy !U can store these balls and use it for 2 weeks. If the mixture cools down,u can't shape it.So do it fast.
  • HERE IS THE FULL RECIPE VIDEO FOR UR REFERENCE. Please check my latest video recipe in the beginning of the post.
    Pori urundai recipe for karthigai deepam
Note

  • Jaggery consistency is very important here. Please have a look after the jaggery syrup becomes froth. It takes hardly 2-3 minutes in high flame to reach the consistency.
  • Make balls when the mixture is with bearable heat.When it cools down , u can’t make it. So u have to reheat again for few seconds.
  • Adding coconut bits , sesame seeds and fried gram dal are optional.I have seen my neighbours making pori urundai without all these. But we add sesame seeds for sure as we keep it for neivedyam.

Wish u all a very happy karthigai deepam. Enjoy the festival of lights Smile

pori urundai recipe for karthigai deepam

Pappadums with Avocado Pomegranate Salsa

pappadums with avocado pomegranate dip

When I heard a while back about Raghavan Iyer's new cookbook Indian Cooking Unfolded: A Master Class in Indian Cooking with 100 Easy Recipes Using 10 Ingredients or Less, I was bursting with anticipation. For those unfamiliar with Mr. Iyer's offerings, he is also the author of one of my absolute favorite cookbooks, 660 Curries. I have cooked from and written about his books on many occasions and they all come highly recommended from my kitchen. One of the first dishes I have tried and shared from his most recent book was a wonderful chana chaat (tangy and tart chickpea salad).

pappadums avocado salsa

Now I am offering up yet another beautiful creation from Mr. Iyer. Look no further if you want a unique and slightly spicy appetizer to wow your dining companions. Or if you please, keep it all to yourself. Have a nibble and see if you have second thoughts about sharing this creamy Indian-style "salsa" adorned with sweet pomegranate pearls. Crispy lentil pappadums complete the experience. Thoughts of decadence are quickly whisked away when you realize that everything on the platter is wholesome and nutritious. Of course, most importantly, it's a palette pleaser, with a layering of textures and zesty and tangy flavors that you may perhaps have not considered before.

pappadums


Pappadums with Avocado Pomegranate SalsaPappadums with Avocado Pomegranate Salsa
Recipe by
Adapted from Indian Cooking Unfolded: A Master Class in Indian Cooking, with 100 Easy Recipes Using 10 Ingredients or Less
Cuisine: Indian
Published on November 14, 2013

Crispy lentil pappadums served with a creamy and zesty avocado, lime and cilantro salsa with pomegranate seeds — great for a snack or as an appetizer

Print this recipePrint this recipe

Ingredients:
  • 10 to 12 lentil pappadums
  • 2 teaspoons coriander seeds
  • 1 teaspoon cumin seeds
  • 1/4 cup fresh cilantro, roughly chopped
  • juice from 1 fresh lime
  • 1 teaspoon sea salt
  • 1 small onion or large shallot, chopped
  • 1 clove garlic, minced
  • 3 green or serrano chilies, seeded and chopped
  • 1 firm tomato, chopped
  • 3 ripe avocados, peeled, pitted and chopped
  • 1/2 cup pomegranate seeds
  • sprinkle of chat masala (optional)
Instructions:
  • Heat a small saucepan or frying pan over medium heat. When hot, toss in the coriander seeds and cumin seeds and stir until the seeds darken a few shades — about 1 minute. Remove from heat and grind to a powder in a spice grinder or with a mortar and pestle. Transfer to a food processor and add the cilantro, lime juice, salt, onion or shallot, garlic and chilies. Pulse until the mixture is minced. Transfer to a medium bowl.

  • Add the tomato, avocado, pomegranate seeds and chat masala if using, and gently stir until well combined. Cover with plastic wrap and keep in the refrigerator until the pappadums are ready.

  • To prepare the pappadums, preheat the broiler and move the rack directly under the element. Toast the pappadums for about 1 minute or until they are crisp and lightly browned. With this method, you don't need to turn them. Remove and let cool.

  • Serve the papadums with the salsa on the side. I spooned some of salsa over top of the pappadums, but you can break off bits of the lentil wafers and dip them into the serving bowl.

Makes 5 to 6 servings

pappadums with avocado salsa

More Indian dips and salsas that you are sure to enjoy from my kitchen:
Avocado Chickpea Hummus
Tomato and Eggplant Caponata
Fresh Tomato Chutney
Spicy Indian-Style Hummus

On the top of the reading stack: Couture Chocolate: A Masterclass in Chocolate

Audio Accompaniment: Hallucinator - Landlocked