‏إظهار الرسائل ذات التسميات root samsung. إظهار كافة الرسائل

السبت، 23 ديسمبر 2017

Guide To Root Samsung Galaxy A5 SM-A500F Running On Android 4.4.4 Kitkat.

Guide To Root Samsung Galaxy A5 SM-A500F Running On Android 4.4.4 Kitkat.


Root Samsung Galaxy A5 SM-A500F . This device was released on 2014, November, and Today's guidebelajar will share about guide how to Root Samsung Galaxy A5 SM-A500F. Beware that root process on your android phone will void your waranty. And guidebelajar not responsible for bricked devices, bootloop, broken SD cards, because your failed root process.

Samsung Galaxy A5 SM-A500F Android is a smartphone with a 5-inch LCD screen works on Android OS, v4.4.4 (KitKat) and powered Quad-core 1.2 GHz Cortex-A53 CPU and Adreno 306 as the engine, and combined with 2 GB RAM, and 13 MP on primary camera, 5 MP on secondary camera.

you need to know about this guide How to Root Samsung Galaxy A5 SM-A500F  is only applicable to the current type SM-A500F Kitkat, But, If you use Samsung Galaxy A5 SM-A500F for the other variant, You still can follow this guide. And you can find for specific type of file according your device.
Warning : Before you following this guide How to Root Samsung Galaxy 
A5 SM-A500F, make sure you understand the benefits and risks of Root processes are going to do. We can not be responsible if there is damage in the your hardware or software caused to follow this guide How to Root Samsung Galaxy A5 SM-A500F .

Preparation Root Samsung Galaxy A5 SM-A500F .

  1. Make sure your Samsung Galaxy A5 SM-A500F battery is not in a state of low battery, a minimum of 80%. If the battery runs out in the middle of the Root, it can lead to failure
  2. Always perform backup your important data before Root process, Although this process does not remove or delete the data in memory, Preferably in case if there is a failure and you have to Flash your phone.
  3. Make sure you have installed a Latest of Driver Samsung  that support with your Smartphone, If you don't have, please download here 
    http://developer.samsung.com/technical-doc/view.do?v=T000000117
    or can also use the default application Samsung KIES. Download Samsung KIES 
  4. http://click.xda-developers.com/api/click?format=go&jsonp=vglnk_143904674253812&key=f0a7f91912ae2b52e0700f73990eb321&libId=id36ie9t01000n4o000DA3hol1uzq&loc=http%3A%2F%2Fforum.xda-developers.com%2Fandroid%2Fgeneral%2Froot-galaxy-grand-neo-plus-gt-i9060i-ds-t3070302&v=1&out=http%3A%2F%2Fdownloadcenter.samsung.com%2Fcontent%2FSW%2F201503%2F20150302113623434%2FKies3Setup.exe&ref=https%3A%2F%2Fwww.google.co.id%2F&title=Root%20for%20Galaxy%20Grand%20Neo%20Plus%20GT-I9060i%2FDS%20%E2%80%A6%20%7C%20Android%20Development%20and%20Hacking%20%7C%20XDA%20Forums&txt=Download%20Kies3
  5. Original USB cable driver for your Samsung Galaxy A5 SM-A500F.
  6. Download root file for Samsung Galaxy A5 SM-A500F, Here 
  7. http://sh.st/hdg39
  8. Download the latest ODIN, here 
    http://www.google.com/url?sa=t&rct=j&q=&esrc=s&source=web&cd=1&cad=rja&uact=8&ved=0CBwQFjAA&url=http%3A%2F%2Fforum.xda-developers.com%2Fattachment.php%3Fattachmentid%3D1168421&ei=E5YYVe6JB8aOuAT1j4DoAw&usg=AFQjCNEdxqAS5QWImOPDJboTA_V3D5S9eA&sig2=-4eKph1ntHlqhUFui5mPXg&bvm=bv.89381419,d.c2E
    or Here.
    http://www.mediafire.com/download/kewx7q183938j3d/SM-E500H-4.4.4.zip
     (This is an alternative way, usually ODIN files are in a folder that was extracted)

Guide Root Samsung Galaxy A5 SM-A500F.

  1. Connect phone to KIES3 on PC by USB 
  2. After identifying your phone , disconnect USB.
  3. Activate your USB Debugging on your Samsung Galaxy A5 SM-A500F.  see this guide (link 1 and link 2)
  4. Turn Off your Samsung Galaxy A5 SM-A500F.
  5. Enter download mode by pressing and hold Volume Down Button + Home Button + Power Button. Hold and press all button until your phone vibrate and LCD show menu.
    Root Samsung Galaxy A5 SM-A500F
    Root Samsung Galaxy A5 SM-A500F

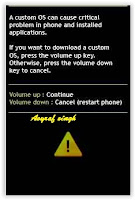
  6. And wait until you see notification like this picture.
    Root Samsung Galaxy A5 SM-A500F
    Root Samsung Galaxy A5 SM-A500F
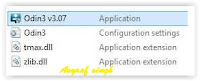
  7. Open your ODIN software that you download before.
    Root Samsung Galaxy A5 SM-A500F
    Root Samsung Galaxy A5 SM-A500F
  8. Connect your Samsung Galaxy A5 SM-A500F to your PC / laptop using a USB cable. 
  9. After your phone connected, you will see a message appear that show your device added and there is info on the ID: COM at top left corner. Keep in mind for this COM vary depending on the PC / Laptop. Just Ignore all

    Root Samsung Galaxy A5 SM-A500F
    Root Samsung Galaxy A5 SM-A500F
  10. At ODIN, click PDA then navigate to the location where you saved the Root extension file boot.tar.md5 already you download before.

    Root Samsung Galaxy A5 SM-A500F
    Root Samsung Galaxy A5 SM-A500F
  11. Make sure the Re-Partition is not checked, then click Start. 
  12. Just wait for the process to run about 2-5 minutes, and make sure there is no interference in this process. 
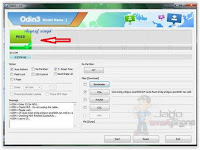
  13. When complete it will display a notification PASS and your smartphone Samsung Galaxy A5 SM-A500F will restart.
    Root Samsung Galaxy A5 SM-A500F
    Root Samsung Galaxy A5 SM-A500F
  14. To make sure you have succeeded Root your Samsung Galaxy A5 SM-A500F, you can open App drawer. and you must have SuperSU installed on your system.

    Root Samsung Galaxy A5 SM-A500F
    Root Samsung Galaxy A5 SM-A500F
  15. Congratulations you've been successful ROOT your Samsung Galaxy A5 SM-A500F Smartphone.

    السبت، 9 ديسمبر 2017

    Guide How To Root Samsung Galaxy A3 SM-A300H.

    Guide How To Root Samsung Galaxy A3 SM-A300H.


    Root Samsung Galaxy A3 SM-A300H. Today's guidebelajar will share about guide how to Root Samsung Galaxy A3 SM-A300H. Beware that root process on your android phone will void your waranty. And guidebelajar not responsible for bricked devices, bootloop, broken SD cards, because your failed root process.

    please being your note if all file available in this guide How to Root Samsung Galaxy A3 SM-A300H is only applicable to the current type SM-A300H Kitkat, But, If you use Samsung Galaxy A3 SM-A300H for the other variant, You still can follow this guide. And you can find for specific type of file according your device. For other Samsung Galaxy A3 SM-A300H variant file you can find download link at the end of this guide.
    Root Samsung Galaxy A3 SM-A300H.
    Root Samsung Galaxy A3 SM-A300H.
    Warning : Before you following this guide How to Root Samsung Galaxy A3 SM-A300H, make sure you understand the benefits and risks of Root processes are going to do. We can not be responsible if there is damage in the your hardware or software caused to follow this guide How to Root Samsung Galaxy A3 SM-A300H.

    Preparation Root Samsung Galaxy A3 SM-A300H.

    1. Make sure your Samsung Galaxy A3 SM-A300H battery is not in a state of low battery, a minimum of 80%. If the battery runs out in the middle of the Root, it can lead to failure
    2. Always perform backup your important data before Root process, Although this process does not remove or delete the data in memory, Preferably in case if there is a failure and you have to Flash your phone.
    3. Make sure you have installed a Latest of Driver Samsung  that support with your Smartphone, If you don't have, please download here or can also use the default application Samsung KIES.
    4. http://developer.samsung.com/technical-doc/view.do?v=T000000117
    5. Original USB cable driver for your Samsung Galaxy A3 SM-A300H
    6. Download and then Unzip root file for Samsung Galaxy A3 SM-A300H HERE. To Unzip this file.      
      http://www.mediafire.com/download/81thvl5zra6frrk/SM-A3000-4.4.4.zip
      you can use the application like Winrar, Winzip or other applications that support the Zip format.

    Guide Root Samsung Galaxy A3 SM-A300H.

    1. Activate your USB Debugging on your Samsung Galaxy A3 SM-A300H.  see this guide (link 1 and link 2)
    2. Turn Off your Samsung Galaxy A3 SM-A300H.
    3. Enter download mode by pressing and hold Volume Down Button + Home Button + Power Button. Hold and press all button until your phone vibrate and LCD show menu.
      Root Samsung Galaxy A3 SM-A300H.
      Root Samsung Galaxy A3 SM-A300H.

    4. And wait until you see notification like this picture.
      Root Samsung Galaxy A3 SM-A300H.
      Root Samsung Galaxy A3 SM-A300H.
    5. Open your ODIN software that you download before.
    6. Connect your Samsung Galaxy A3 SM-A300H to your PC / laptop using a USB cable. 
    7. After your phone connected, you will see a message appear that show your device added and there is info on the ID: COM at top left corner. Keep in mind for this COM vary depending on the PC / Laptop. Just Ignore all
      Root Samsung Galaxy A3 SM-A300H.
      Root Samsung Galaxy A3 SM-A300H.
    8. At ODIN, click PDA then navigate to the location where you saved the Root extension file CF-Auto-Root.tar already you download before on extracted folder.
      Root Samsung Galaxy A3 SM-A300H.
      Root Samsung Galaxy A3 SM-A300H.
    9. Make sure the Re-Partition is not checked, then click Start
    10. Just wait for the process to run about 2-5 minutes, and make sure there is no interference in this process. 
    11. When complete it will display a notification PASS and your smartphone Samsung Galaxy A3 SM-A300H will restart.
      Root Samsung Galaxy A3 SM-A300H.
      Root Samsung Galaxy A3 SM-A300H.
    12. After Restart check whether Icon SuperUser already exists. If the there, you have successfully follow this guide How to Root Samsung Galaxy A3 SM-A300H correctly. Congratulations you've been successful ROOT your Smartphone.

      الجمعة، 8 ديسمبر 2017

      Guide How To Root Samsung Galaxy S6 Active SM G-890 Android V5.0.2 Lollipop.

      Guide How To Root Samsung Galaxy S6 Active SM G-890 Android V5.0.2 Lollipop.


      Root Samsung Galaxy S6 Active SM G-890. Today's guidebelajar will share about guide how to Root Samsung Galaxy S6 ACTIVE SM G-890. Beware that root process on your android phone will void your waranty. And guidebelajar not responsible for bricked devices, bootloop, broken SD cards, because your failed root process.
      please being your note if all file available in this guide How to Root Samsung Galaxy S6 ACTIVE SM G-890 is only applicable to the current type SM G-890 Kitkat, But, If you use Samsung Galaxy S6 ACTIVE SM G-890 for the other variant, You still can follow this guide. And you can find for specific type of file according your device. For other Samsung Galaxy S6 ACTIVE SM G-890 variant file you can find download link at the end of this guide.
      Warning : Before you following this guide How to Root Samsung Galaxy S6 ACTIVE SM G-890, make sure you understand the benefits and risks of Root processes are going to do. We can not be responsible if there is damage in the your hardware or software caused to follow this guide How to Root Samsung Galaxy S6 ACTIVE SM G-890.

      Preparation Root Samsung Galaxy S6 ACTIVE SM G-890.

      1. Make sure your Samsung Galaxy S6 ACTIVE SM G-890 battery is not in a state of low battery, a minimum of 80%. If the battery runs out in the middle of the Root, it can lead to failure
      2. Always perform backup your important data before Root process, Although this process does not remove or delete the data in memory, Preferably in case if there is a failure and you have to Flash your phone.
      3. Make sure you have installed a Latest of Driver Samsung  that support with your Smartphone, If you don't have, please download here or can also use the default application Samsung KIES.
      4. http://developer.samsung.com/technical-doc/view.do?v=T000000117
      5. Original USB cable driver for your Samsung Galaxy S6 ACTIVE SM G-890
      6. Download and then Unzip root file (CF Auto ROOT) for :
        • Samsung Galaxy S6 Active SM G-890  HERE.
        • http://download.chainfire.eu/733/CF-Root/CF-Auto-Root/CF-Auto-Root-zeroflte-zerofltexx-smg920f.zip
        • Samsung Galaxy S6 SM G-920 HERE. 
        • http://download.chainfire.eu/733/CF-Root/CF-Auto-Root/CF-Auto-Root-zeroflte-zerofltexx-smg920f.zip
        • To Unzip this file you can use the application like Winrar, Winzip or other applications that support the Zip format.
        • Download the latest ODIN, here .
          http://axeetech.com/2014/09/05/download-odin-3-07-3-09-odin-multi-downloader-for-all-samsung-smartphones/
           

      Guide Root Samsung Galaxy S6 ACTIVE SM G-890.

      1. Activate your USB Debugging on your Samsung Galaxy S6 ACTIVE SM G-890.  see this guide (link 1 and link 2)
      2. Turn Off your Samsung Galaxy S6 ACTIVE SM G-890.
      3. Enter download mode by pressing and hold Volume Down Button + Home Button + Power Button. Hold and press all button until your phone vibrate and LCD show menu.
      4. And wait until you see notification like this picture.
        Root Samsung Galaxy S6 ACTIVE SM G-890.
        Root Samsung Galaxy S6 ACTIVE SM G-890.
      5. Open your ODIN software that you download before.
      6. Connect your Samsung Galaxy S6 ACTIVE SM G-890 to your PC / laptop using a USB cable. 
      7. After your phone connected, you will see a message appear that show your device added and there is info on the ID: COM at top left corner. Keep in mind for this COM vary depending on the PC / Laptop. Just Ignore all.
      8. Root Samsung Galaxy S6 ACTIVE SM G-890.
        Root Samsung Galaxy S6 ACTIVE SM G-890.
      9. At ODIN, click PDA then navigate to the location where you saved the Root extension file .md5 already you download before.
        Root Samsung Galaxy S6 ACTIVE SM G-890.
        Root Samsung Galaxy S6 ACTIVE SM G-890.
      10. Make sure the Re-Partition is not checked, then click Start. 
      11. Just wait for the process to run about 2-5 minutes, and make sure there is no interference in this process. 
      12. When complete it will display a notification PASS and your smartphone Samsung Galaxy S6 ACTIVE SM G-890 will restart.
        Root Samsung Galaxy S6 ACTIVE SM G-890.
        Root Samsung Galaxy S6 ACTIVE SM G-890.
      13. After Restart check whether Icon SuperUser already exists. If the there, you have successfully follow this guide How to Root Samsung Galaxy S6 ACTIVE SM G-890 correctly.
        Root Samsung Galaxy S6 ACTIVE SM G-890.
        Root Samsung Galaxy S6 ACTIVE SM G-890.
        Congratulations you've been successful ROOT your Smartphone.
      Attention :  I am not responsible if you fail to follow this guide and brick your device. Don't attempt to do this if you not sure with root file. BE CAREFULL. DO With Your Own RIsk (DWYOR)

        Guide How To Root Samsung Galaxy J1 J100H Android V4.4.4 Kitkat.

        Guide How To Root Samsung Galaxy J1 J100H Android V4.4.4 Kitkat.


        Root Samsung Galaxy J1 J100H. Today's guidebelajar will share about guide how to Root Samsung Galaxy J1 J100H. Beware that root process on your android phone will void your waranty. And guidebelajar not responsible for bricked devices, bootloop, broken SD cards, because your failed root process.
        please being your note if all file available in this guide How to Root Samsung Galaxy J1 J100H is only applicable to the current type J1 J100H Kitkat, But, If you use Samsung Galaxy J1 J100H for the other variant, You still can follow this guide. And you can find for specific type of file according your device. For other Samsung Galaxy J1 J100H variant file you can find download link at the end of this guide.
        Root Samsung Galaxy J1 J100H
        Root Samsung Galaxy J1 J100H
        Warning : Before you following this guide How to Root Samsung Galaxy J1 J100H, make sure you understand the benefits and risks of Root processes are going to do. We can not be responsible if there is damage in the your hardware or software caused to follow this guide How to Root Samsung Galaxy J1 J100H.

        Preparation Root Samsung Galaxy J1 J100H.

        1. Make sure your Samsung Galaxy J1 J100H battery is not in a low battery state, a minimum of 80%. If the battery runs out in the middle of the Root, it can lead to failure
        2. Always perform backup your important data before Root process, Although this process does not remove or delete the data in memory, Preferably in case if there is a failure and you have to Flash your phone.
        3. Make sure you have installed a Latest of Driver Samsung  that support with your Smartphone, If you don't have, please download here 
        4. http://androidxda.com/download-samsung-usb-drivers
        5. Original USB cable driver for your Samsung Galaxy J1 J100H.
        6. Download and then Unzip root file for Samsung Galaxy J1 J100H HERE.  
          http://www.mediafire.com/download/yh829993731c9th/SM-J100H.zip
           To Unzip this file you can use the application like Winrar, Winzip or other applications that support the Zip format, And you will see on extracted root file.

        Step 1#. Guide Root Samsung Galaxy J1 J100H.

        1. Turn Off your Samsung Galaxy J1 J100H, by long pressing Power Button until you see picture like this, then you select power off.
          Root Samsung Galaxy J1 J100H
          Root Samsung Galaxy J1 J100H
        2. Activate your USB Debugging on your Samsung Galaxy J1 J100H.  see this guide (link 1 and link 2)
        3. Enter download mode by pressing and hold Volume Down Button + Home Button + Power Button. Hold and press all button until your phone vibrate and LCD show menu.
        4. Root Samsung Galaxy J1 J100H
          Root Samsung Galaxy J1 J100H
        5. And wait until you see notification like this picture.
        6. Root Samsung Galaxy J1 J100H.
          Root Samsung Galaxy J1 J100H.
        7. Open your ODIN software that you download before.
        8. Connect your Samsung Galaxy J1 J100H to your PC / laptop using a USB cable. 
        9. After your phone connected, you will see a message appear that show your device added and there is info on the ID: COM at top left corner. Keep in mind for this COM vary depending on the PC / Laptop. Just Ignore all
          Root Samsung Galaxy J1 J100H.
          Root Samsung Galaxy J1 J100H.
        10. At ODIN, click PDA then navigate to the location where you saved the Root extension file boot.tar.md5 already you download before on step 5 (Preparation Root Samsung Galaxy J1 J100H.)
          Root Samsung Galaxy J1 J100H.
          Root Samsung Galaxy J1 J100H.
        11. Make sure the Re-Partition is not checked, then click Start. 
        12. Just wait for the process to run about 2-5 minutes, and make sure there is no interference in this process. 
        13. When complete it will display a notification PASS and your smartphone Samsung Galaxy J1 J100H will restart.
          Root Samsung Galaxy J1 J100H.
          Root Samsung Galaxy J1 J100H.

        Step 2#. Guide Root Samsung Galaxy J1 J100H.

        After your Samsung Galaxy J1 J100H is boot up and ready to use, you must continoue this step to finish root process;
        1. Download and install iRoot on your computer.
        2. http://i5.androidxda.com/main/samsung/Odin3.07-Flash-Completed-for-Samsung-Galaxy.png
        3. When your install finish, now open this program
        4. Then re-Connect your Samsung Galaxy J1 J100H to your computer again. And iRoot will automatically detect this devices.
          Root Samsung Galaxy J1 J100H.
          Root Samsung Galaxy J1 J100H.
        5. Now, you can click root button with green color at right bottom.
          Root Samsung Galaxy J1 J100H.
          Root Samsung Galaxy J1 J100H.
        6. Then, iRoot will automatically reboot your Samsung Galaxy J1 J100H and install new application on your phone that called KingUSer.
        7. Now, Your Samsung Galaxy J1 J100H is rooted, to make sure your rooted is successfully, you can open your device menu and find new application installed, that is KingUser
        8. Root Samsung Galaxy A7 SM-A700F.
          Root Samsung Galaxy A7 SM-A700F.

        9. You can verify your device is rooted successfully or not success by installing rootchecker.
        10. https://play.google.com/store/apps/details?id=com.androidxda.rootstatus&source=androidxda.com
        11. Finish.

          How To Root Samsung Galaxy Ace 4 G316 Kitkat 4.4.2

          How To Root Samsung Galaxy Ace 4 G316 Kitkat 4.4.2


          Root Samsung Galaxy Ace 4 G316 . Today's guidebelajar will share about guide how to Root Samsung Galaxy Ace 4 G316. Beware that root process on your android phone will void your waranty. And guidebelajar not responsible for bricked devices, bootloop, broken SD cards, because your failed root process.
          please being your note if all file available in this guide How to Root Samsung Galaxy Ace 4 G316  is only applicable to the current type G316 Kitkat, But, If you use Samsung Galaxy Ace 4 G316 for the other variant, You still can follow this guide. And you can find for specific type of file according your device. For other Samsung Galaxy Ace 4 G316  variant file you can find download link at the end of this guide.
          Root Samsung Galaxy Ace 4
          Root Samsung Galaxy Ace 4

          Warning
          : Before you following this guide How to Root Samsung Galaxy 
          Ace 4 G316, make sure you understand the benefits and risks of Root processes are going to do. We can not be responsible if there is damage in the your hardware or software caused to follow this guide How to Root Samsung Galaxy Ace 4 G316 .

          Preparation Root Samsung Galaxy Ace 4 G316 .

          1. Make sure your Samsung Galaxy Ace 4 G316 battery is not in a state of low battery, a minimum of 80%. If the battery runs out in the middle of the Root, it can lead to failure
          2. Always perform backup your important data before Root process, Although this process does not remove or delete the data in memory, Preferably in case if there is a failure and you have to Flash your phone.
          3. Make sure you have installed a Latest of Driver Samsung  that support with your Smartphone, If you don't have, please download here 
            http://developer.samsung.com/technical-doc/view.do?v=T000000117
            or can also use the default application Samsung KIES. Download Samsung KIES 
          4. http://click.xda-developers.com/api/click?format=go&jsonp=vglnk_143904674253812&key=f0a7f91912ae2b52e0700f73990eb321&libId=id36ie9t01000n4o000DA3hol1uzq&loc=http%3A%2F%2Fforum.xda-developers.com%2Fandroid%2Fgeneral%2Froot-galaxy-grand-neo-plus-gt-i9060i-ds-t3070302&v=1&out=http%3A%2F%2Fdownloadcenter.samsung.com%2Fcontent%2FSW%2F201503%2F20150302113623434%2FKies3Setup.exe&ref=https%3A%2F%2Fwww.google.co.id%2F&title=Root%20for%20Galaxy%20Grand%20Neo%20Plus%20GT-I9060i%2FDS%20%E2%80%A6%20%7C%20Android%20Development%20and%20Hacking%20%7C%20XDA%20Forums&txt=Download%20Kies3
          5. Original USB cable driver for your Samsung Galaxy Ace 4 G316 .
          6.  Download and then Unzip root file,
          7. http://www.mediafire.com/download/2uuje4isd2mwdwb/Root_Files_G357FZ.rar
            • To Unzip this file you can use the application like Winrar, Winzip or other applications that support the Zip format.
            • When you finish extract this Root file, You will have two files. step 1 file and a step 2 file.
          8. After you finish extract this file, please install on your computer.
          9. Download the latest ODIN, here.  
            http://www.mediafire.com/download/b8w1on8pwd11yby/Odin+v3.09.zip
             Once downloaded extract the file to a convenient location such as the desktop.Rename Step1.md5 to Step1.tar.

          STEP 1; Guide Root Samsung Galaxy Ace 4 G316.

          1. Activate your USB Debugging on your Samsung Galaxy Ace 4 G316.  see this guide (link 1 and link 2)
          2. Turn Off your Samsung Galaxy Ace 4 G316.
          3. Enter download mode by pressing and hold Volume Down Button + Home Button + Power Button. Hold and press all button until your phone vibrate and LCD show menu.
            Root Samsung Galaxy Ace 4
            Root Samsung Galaxy Ace 4

          4. And wait until you see notification like this picture.
            Root Samsung Galaxy Ace 4 G316
            Root Samsung Galaxy Ace 4 G316
          5. Open your ODIN software that you download before.
          6. Connect your Samsung Galaxy Ace 4 G316 to your PC / laptop using a USB cable. 
          7. After your phone connected, you will see a message appear that show your device added and there is info on the ID: COM at top left corner. Keep in mind for this COM vary depending on the PC / Laptop. Just Ignore all
            Root Samsung Galaxy Ace 4 G316
            Root Samsung Galaxy Ace 4 G316
          8. At ODIN, click the AP option and browse on your computer to the step1.tar root file you extracted above.
          9. Root Samsung Galaxy Ace 4 G316
            Root Samsung Galaxy Ace 4 G316
          10. Just wait for the process to run about 2-5 minutes, and make sure there is no interference in this process. 
          11. When complete it will display a notification PASS and your smartphone Samsung Galaxy Ace 4 G316 will restart.
            Root Samsung Galaxy Ace 4 G316
            Root Samsung Galaxy Ace 4 G316
          12. Root process will take a few moments,
          13. After finish the Samsung Galaxy Ace 4 G316 will restart itself and complete the rooting process – Do not remove the Samsung Galaxy Ace 4 G316 from your PC during this time.
          14. Once the Samsung Galaxy Ace 4 G316 starts up properly you need to flash the second file using Odin.

          STEP 2; Guide Root Samsung Galaxy Ace 4 G316.

          To continue this process you must ensure, your Samsung Galaxy Ace 4 G316 is still on download mode, how to do it ? Enter download mode by pressing and hold Volume Down Button + Home Button + Power Button. Hold and press all button until your phone vibrate and LCD show menu
          1. Root Samsung Galaxy Ace 4
            Root Samsung Galaxy Ace 4

          2. And wait until you see notification like this picture.
            Root Samsung Galaxy Ace 4 G316
            Root Samsung Galaxy Ace 4 G316
          3. Open your ODIN software that you download before.
          4. Run the Odin software you downloaded previously.
          5. Inside Odin click the AP option and browse on your computer to the step2.tar root file you extracted above
          6. Inside Odin click Start to begin the root process.
          7. Root process will take a few moments,
          8. After finish the Samsung Galaxy Ace 4 G316 will restart itself and complete the rooting process – Do not remove the Samsung Galaxy Ace 4 G316 from your PC during this time.
          When your Samsung Galaxy Ace 4 G316 boot up untill ready to use, it should be rooted, finish.

          Attention :  I am not responsible if you fail to follow this guide and brick your device. Don't attempt to do this if you not sure with root file. BE CAREFULL. DO With Your Own RIsk (DWYOR)

            How To Root Samsung Galaxy Grand Neo Plus GT-I9060i / Android 4.4.4 Kitkat

            How To Root Samsung Galaxy Grand Neo Plus GT-I9060i / Android 4.4.4 Kitkat


            Root Samsung Galaxy Grand Neo Plus GT-I9060i . Today's guidebelajar will share about guide how to Root Samsung Galaxy Grand Neo Plus GT-I9060i. Beware that root process on your android phone will void your waranty. And guidebelajar not responsible for bricked devices, bootloop, broken SD cards, because your failed root process.
            please being your note if all file available in this guide How to Root Samsung Galaxy Grand Neo Plus GT-I9060i  is only applicable to the current type GT-I9060i  Kitkat, But, If you use Samsung Galaxy Grand Neo Plus GT-I9060i for the other variant, You still can follow this guide. And you can find for specific type of file according your device. For other Samsung Galaxy Grand Neo Plus GT-I9060i  variant file you can find download link at the end of this guide.
            Root Samsung Galaxy Grand Neo Plus GT-I9060i
            Root Samsung Galaxy Grand Neo Plus GT-I9060i

            Warning
            : Before you following this guide How to Root Samsung Galaxy 
            Grand Neo Plus GT-I9060i, make sure you understand the benefits and risks of Root processes are going to do. We can not be responsible if there is damage in the your hardware or software caused to follow this guide How to Root Samsung Galaxy Grand Neo Plus GT-I9060i .

            Preparation Root Samsung Galaxy Grand Neo Plus GT-I9060i .

            1. Make sure your Samsung Galaxy Grand Neo Plus GT-I9060i battery is not in a state of low battery, a minimum of 80%. If the battery runs out in the middle of the Root, it can lead to failure
            2. Always perform backup your important data before Root process, Although this process does not remove or delete the data in memory, Preferably in case if there is a failure and you have to Flash your phone.
            3. Make sure you have installed a Latest of Driver Samsung  that support with your Smartphone, If you don't have, please download here 
              http://developer.samsung.com/technical-doc/view.do?v=T000000117
              or can also use the default application Samsung KIES. Download Samsung KIES 
            4. http://click.xda-developers.com/api/click?format=go&jsonp=vglnk_143904674253812&key=f0a7f91912ae2b52e0700f73990eb321&libId=id36ie9t01000n4o000DA3hol1uzq&loc=http%3A%2F%2Fforum.xda-developers.com%2Fandroid%2Fgeneral%2Froot-galaxy-grand-neo-plus-gt-i9060i-ds-t3070302&v=1&out=http%3A%2F%2Fdownloadcenter.samsung.com%2Fcontent%2FSW%2F201503%2F20150302113623434%2FKies3Setup.exe&ref=https%3A%2F%2Fwww.google.co.id%2F&title=Root%20for%20Galaxy%20Grand%20Neo%20Plus%20GT-I9060i%2FDS%20%E2%80%A6%20%7C%20Android%20Development%20and%20Hacking%20%7C%20XDA%20Forums&txt=Download%20Kies3
            5. Original USB cable driver for your Samsung Galaxy Grand Neo Plus GT-I9060i.
            6. Download and then Unzip root file (This file is called Kingo ROOT).
            7. http://click.xda-developers.com/api/click?format=go&jsonp=vglnk_143904682394414&key=f0a7f91912ae2b52e0700f73990eb321&libId=id36ie9t01000n4o000DA3hol1uzq&loc=http%3A%2F%2Fforum.xda-developers.com%2Fandroid%2Fgeneral%2Froot-galaxy-grand-neo-plus-gt-i9060i-ds-t3070302&v=1&out=http%3A%2F%2Fd.kgroot.com%2Fandroid_root.exe&ref=https%3A%2F%2Fwww.google.co.id%2F&title=Root%20for%20Galaxy%20Grand%20Neo%20Plus%20GT-I9060i%2FDS%20%E2%80%A6%20%7C%20Android%20Development%20and%20Hacking%20%7C%20XDA%20Forums&txt=download%20
              • To Unzip this file you can use the application like Winrar, Winzip or other applications that support the Zip format.
            8. After you finish extract this file, please install on your computer.
            9. Then, Download boot.tar.md5 
            10. http://goo.gl/oc3q5w
              • Download the latest ODIN, here .
                http://www.google.com/url?sa=t&rct=j&q=&esrc=s&source=web&cd=1&cad=rja&uact=8&ved=0CBwQFjAA&url=http%3A%2F%2Fforum.xda-developers.com%2Fattachment.php%3Fattachmentid%3D1168421&ei=E5YYVe6JB8aOuAT1j4DoAw&usg=AFQjCNEdxqAS5QWImOPDJboTA_V3D5S9eA&sig2=-4eKph1ntHlqhUFui5mPXg&bvm=bv.89381419,d.c2E
                or Here.  
              • http://www.mediafire.com/download/kewx7q183938j3d/SM-E500H-4.4.4.zip

              Guide Root Samsung Galaxy Grand Neo Plus GT-I9060i.

              1. Connect phone to KIES3 on PC by USB 
              2. After identifying your phone , disconnect USB.
              3. Activate your USB Debugging on your Samsung Galaxy Grand Neo Plus GT-I9060i.  see this guide (link 1 and link 2)
              4. Turn Off your Samsung Galaxy Grand Neo Plus GT-I9060i.
              5. Enter download mode by pressing and hold Volume Down Button + Home Button + Power Button. Hold all buttons until your phone vibrate and LCD show menu.
              6. Root Samsung Galaxy Grand Neo Plus GT-I9060i
                Root Samsung Galaxy Grand Neo Plus GT-I9060i
              7. And wait until you see notification like this picture.
              8. Root Samsung Galaxy Grand Neo Plus GT-I9060i
                Root Samsung Galaxy Grand Neo Plus GT-I9060i
              9. Open your ODIN software that you download before.
              10. Root Samsung Galaxy Grand Neo Plus GT-I9060i
                Root Samsung Galaxy Grand Neo Plus GT-I9060i
              11. Connect your Samsung Galaxy Grand Neo Plus GT-I9060i to your PC / laptop using a USB cable. 
              12. After your phone connected, you will see a message appear that show your device added and there is info on the ID: COM at top left corner. Keep in mind for this COM vary depending on the PC / Laptop. Just Ignore all
                Root Samsung Galaxy Grand Neo Plus GT-I9060i
                Root Samsung Galaxy Grand Neo Plus GT-I9060i
              13. At ODIN, click PDA then navigate to the location where you saved the Root extension file boot.tar.md5 already you download before.
                Root Samsung Galaxy Grand Neo Plus GT-I9060i
                Root Samsung Galaxy Grand Neo Plus GT-I9060i
              14. Make sure the Re-Partition is not checked, then click Start. 
              15. Just wait for the process to run about 2-5 minutes, and make sure there is no interference in this process. 
              16. When complete it will display a notification PASS and your smartphone Samsung Galaxy Grand Neo Plus GT-I9060i will restart.
                Root Samsung Galaxy Grand Neo Plus GT-I9060i
                Root Samsung Galaxy Grand Neo Plus GT-I9060i
              17. open Kingo ROOT + connect Samsung Galaxy Grand Neo Plus GT-I9060i to your computer using USB Cable, and wait till finish
              18. Then click Root Again and wait till finish.
                Root Samsung Galaxy Grand Neo Plus GT-I9060i
                Root Samsung Galaxy Grand Neo Plus GT-I9060i


              19. Congratulations you've been successful ROOT your Samsung Galaxy Grand Neo Plus GT-I9060i Smartphone.