الثلاثاء، 7 أبريل 2015

Chocolate Chili Cake

Quick and easy cocoa loaf cake with a hint of heat from chili powder. Not too sweet, it pairs well with fresh raspberries or even a pat of butter for a bit more richness.

Chocolate Chili Cake

Most of my sweet treats these days are raw ones that often incorporate dried fruits, nuts, including nut butters, a bit of natural sweetener and sometimes chocolate and coconut. Not that I don't enjoy baking, but I find raw power bars, balls and squares are an ideal, pretty much guilt-free energy boost as part of breakfast and a good pick-me-up for drowsy afternoons. Just anytime at all really.

Chili Cake

But sometimes there is nothing quite like the aroma of baked goods, such as chocolate cake in this instance. On a recent visit to my Dad and stepmom, I happened to overhear a conversation they were having after dinner. My stepmom is an excellent baker and cook and my Dad has made some pretty tasty meals and desserts himself. Although there is usually homemade dessert to complete their evening meal, it so happened that the next day for them was busy and my stepmom teased my Dad and told him he was going to have to eat yogurt for dessert. Not that a bit of sweetened yogurt is an unwelcome dessert, but my Dad likes his baked sweets.

chocolate cake

Looking for something to do and inspired by excess insomniac energy, I decided I would surprise them with a treat the next day. Considering this recipe yields a whole standard loaf, it's not particularly sweet at all, though it makes a fine after-dinner dessert, especially when served up with some raspberries or maybe a little scoop of vanilla ice cream if you want to sweeten up the deal. It is also lovely for lunch. The unexpected ingredient in this cake is some chili powder. When I do eat chocolate, one of my favorites is dark chili chocolate. I used cocoa here with coconut sugar, combined with a relatively mild chili powder.

When I told my Dad what was in it before he had some, he expressed some hesitation — not that he doesn't like spice, but for some it is not a common thing with dessert. The tantalizing aromas soon had everyone curious and I was pleasantly happy with the result. Moist with just a wee bit of heat that gently stimulates the palate after a few bites, I will surely be making this again.

550

Quick and easy, with little fuss, this is a recipe that inexperienced and experienced bakers alike will be proud of.

Chocolate Chili CakeChocolate Chili Cake
Recipe by
Published on April 6, 2015

Quick and easy not-too-sweet cocoa loaf cake with a hint of chili heat goes well with fresh raspberries or just a pat of butter

Print this recipePrint this recipe

Ingredients:
  • 2 cups unbleached white flour
  • 2 teaspoons baking powder
  • 1/2 teaspoon baking soda
  • 1 tablespoon chili powder
  • 2/3 cup unsweetened cocoa
  • 1/2 cup butter, melted
  • 3/4 cup coconut sugar or brown sugar
  • 3/4 cup milk
  • 2 large eggs
Instructions:
  • Preheat an oven to 350». Grease a standard 9-inch loaf pan.

  • In a medium bowl, whisk together the flour, baking powder, baking soda, chili powder and cocoa.

  • In large bowl, whisk together the butter and sugar. Whisk in the milk and then beat in the eggs. Gradually stir in the dry ingredients until just combined.

  • Transfer the batter to the prepared pan and baked for 50 to 60 minutes until a cake tester inserted in the middle comes out clean. Let sit in the pan for 15 minutes and then transfer to a wire rack to cool.

Makes 1 9-inch loaf

Chocolate Chili Cake

Other cakes to enjoy from Lisa's Kitchen:
Honey, Lemon and Poppy Seed Cake
Guinness Gingerbread Cake
Rich Chocolate Bundt Cake with Bittersweet Chocolate Glaze
Sour Cream Blueberry Cake

الأحد، 5 أبريل 2015

Muslim Wedding Biryani Recipe-Bai Biryani-Sunday Lunch Recipes-12

Muslim wedding biryani
Sorry friends,I couldn’t post this recipe yesterday as I am in Salem and having trips to temples continuously.I got few requests to share Tamil nadu Muslim style wedding biryani recipe in my Sunday lunch recipes series.Actually i was thinking kuska and muslim wedding biryani are one and the same.But after going through few “Muslim biryani recipes,i came to know there are slight differences between the two.This biryani is also called as “Bai biryani”.As usual i replaced Chicken/Mutton with soya chunks/Meal maker and prepared this biryani for the first time.The taste and the smell of this biryani with jeera rice was awesome.It was wafting around my house for long time.Muslim style wedding biryani is not difficult to make as one thinks.Its taste & procedure were very similar to Dindigul thalappakatti and Coimbatore Angannan biryani.With the combination of masala/Spices and freshly ground ginger+garlic+green chilli paste,it gives the delectable aroma and taste.Try it once,u will come to know.I would like to mention a point about the color.In the actual biryani recipe,they add food color to bring the bright orange shade.But here,I have not used any color but still it came out light orange in color because I used ripe green chillies.So the color of this biryani may vary for you if u don’t use food color.I made tomato capsicum masala,roti & badusha along with biryani for my Sendhil’s birthday treat.Very soon,u can expect badusha recipe in my blog.Ok,lets see how to make this yummy muslim wedding biryani recipe in detail.
Check my Badusha recipe HERE
Musslim-wedding-biryani

Muslim Wedding biryani recipe


Muslim Wedding biryani recipe How to make Muslim Wedding biryani recipe at home
Cuisine: Indian
Category: Lunch
Yields: 2
Prep time: 10 Min
Cook time: 15 Min
Total time: 25Min


INGREDIENTS
1 cup = 200ml

  • Jeera Rice – 1 cup 
  • Cooking oil or ghee– 3 tbsp 
  • Cinnamon – 2 inch piece
  • Cloves – 3 nos
  • Cardamom – 1 no
  • Bayleaf – 1 no
  • Blackstone/Kalpasi – 2 nos
  • Green chillies – 4-5 nos ( based on size)
  • Ginger – 1.5 inch piece
  • Garlic – 5 cloves
  • Big onion – 1 no
  • Tomato – 1 no
  • Turmeric powder – 1/8 tsp
  • Crystal Salt – as needed
  • Water – 2 cups
  • Mint + coriander leaves – a handful
  • Curd – 2 tbsp
  • Orange food color ( optional,I dint use as I used ripe green chillies.It gave a slight red color to my biryani.But actual muslim biryani calls for food color)
METHOD

  • Wash the rice and set aside.Wash and soak the soya chunks in hot water for 10 minutes.It will bloat in size.Squeeze it well,drain the excess water and set aside.
  • Grind the green chillies along with ginger,garlic & the salt required.Add water and grind it to a paste.
Muslim biryani-1
  • Heat a pressure cooker base or a big heavy bottomed vessel. Add oil and saute the whole spices(for variation,u can powder the spices and add).Then add the onion and saute till transparent.Now add the ginger+garlic+green chillies paste.Saute till raw smell goes off.Then add half of the chopped coriander+mint leaves.Add the finely chopped tomato & saute it.
Muslim biryani-2
  • After the tomato turns mushy,add the curd,turmeric powder,squeezed soya chunks.Add the curd,mix well.Add water and let it roll boil.Add the washed rice and the remaining mint+coriander leaves now and pressure cook the rice in low flame for one whistle.
Muslim biryani-3
  • Open the cooker after the steam is released.Fluff it with fork and serve hot with raita.
  Muslim biryani-4
Alternatively u can make the entire process in  a wide mouthed pot and cook the biryani using DUM method.This is how muslims cook the actual biryani.The more time u DUM the biryani,the more tasty it would be.


Note

  • You can use either basmati rice or jeera rice.If using basmati rice,soak it for 30 minutes and use 1.75 cups of water for 1 cup of rice. 
  • No need to use chilli powder. U should add more green chillies if u want the biryani to be more spicy
  • U can use mushrooms,cauliflower or mixed vegetables instead of soya chunks.
  • For variations,u can powder the spices instead of sauting as whole spices.

Try this easy,tasty biryani for your lunch and enjoy ! I served with onion raita, tomato masala and badusha as a special treat for my husband’s birthday Smile
Tamil muslim biryani recipe

السبت، 4 أبريل 2015

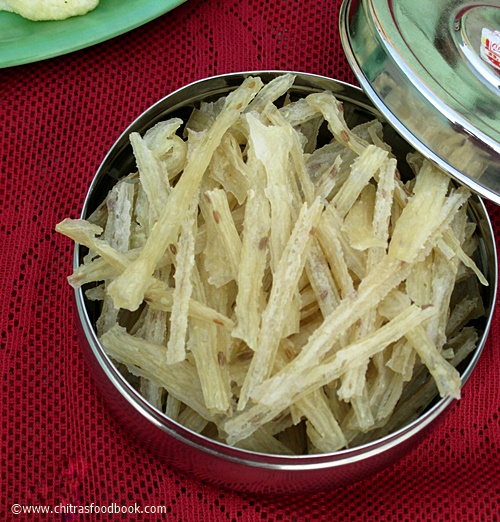
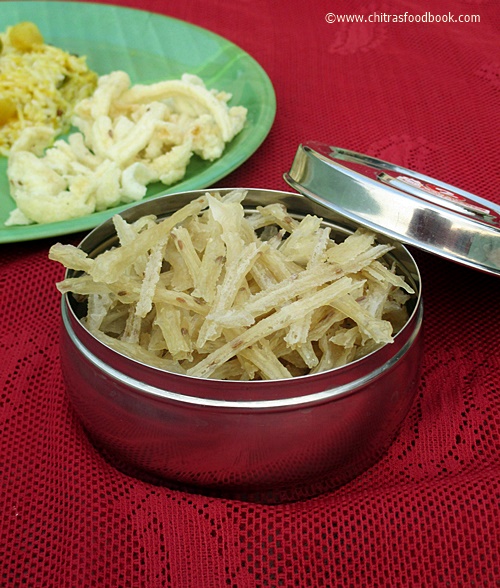
Koozh Vadam/Arisi Koozh Vathal Recipe-Summer Recipes

Koozh vadam recipe

Every year during summer, my MIL makes Vadam/Vathal in large quantities and give me for the whole year’s use.So I never thought of making on my own till today.But I have the anticipation and eagerness to try on my own.Last year I successfully tried and shared mor milagai recipe with my MIL’s guidance over phone.For making koozh vadam dough,I wanted to see my MIL’s preparation in person before I attempt on my own.But every year it is not possible as she finishes all these works in the beginning of summer season as it starts to rain during mid summer in Salem.So this year,when she prepared koozh vathal ,I told my in-laws to take step by step pictures for this post and for my future reference as well.I am very thankful to my FIL for taking such a detailed stepwise pictures which even I can’t doEye rolling smile.They mailed me a video for making sago vadam/Javvarisi vadam and these stepwise pictures for arisi koozh vadam.My mom usually makes vathal with leftover rice and we call it as”killu vadam/vathal”.I will try to make a post for it soon.Today lets see how to prepare arisi koozh vathal/Rice koozh vadam recipe in detail.With the help of this post,I will surely make it next year and update my vathal pictures hereOpen-mouthed smile.


Arisi Koozh Vadam recipe


Arisi Koozh Vadam recipe How to make arisi koozh vadam at home
Cuisine: Indian
Category: Snacks
Yields: 3-4 cups
Prep time: 5 Hours
Cook time: 45 Minutes
Total time: 5H45M+3days


INGREDIENTS
1 cup = 200ml

  • Rice – Raw rice or steamed rice – 2 cups 
  • Javvarisi/sago – 3 tbsp ( optional,we don’t use) 
  • Lemon – 1/2 no
  • Green chillies – 4-6 nos ( based on size)
  • Cumin seeds/Jeera – 1/2 tbsp
  • Crystal Salt – as needed
  • Water – to make dough ( we used 8 cups)
For making vadam
  • Murukku press with star mould or Ribbon pakoda mould
  • White cloth or polythene sheet
  • A heavy bottomed vessel for cooking the koozh dough + a ladle
METHOD

  • Wash and soak the rice for 4 hours( add sago if using).Grind the rice adding enough water to a very smooth paste.No matter even if the batter becomes watery.
  • Grind the green chillies along with the salt required for koozh vathal. Add water and grind it to a paste.
  • Heat a pressure cooker base or a big heavy bottomed vessel. Add 2 cups of water to the ground koozh batter and mix it without lumps.Heat 8 cups of water to the cooker and let it boil.Add the chillies paste and cumin seeds while the water boils.
Koozh Vadam-1
Koozh Vadam-2
  • When the water starts to roll boil,add the koozh batter in one hand while stirring the water in the other hand.Keep the flame high & mix well till all the water is absorbed by the dough. Check for salt and add some powdered salt if needed.
Koozh Vadam-3
  • Now simmer the flame and cover the cooker.Let the dough cook well for 30 minutes.Stir it in regular intervals else the dough will be burnt in the bottom.
  • Once the dough is cooked,it will become shiny and non sticky. U should be able to roll by greasing your hands in water.Lastly add the lemon juice,mix well and let it rest for few minutes. ( Adding lemon juice gives a mild sour taste to vadam and makes the vadam white in color.But you should add it only at the end else the batter will taste bitter)
  • Now take a murukku press with star mould or ribbon pakoda mould.Ribbon pakoda mould is better to use.Take a ladle ful of koozh dough and fill the murukku press When the dough is hot.If u wait for the dough to cool down,a layer may form ie rice aadai and it may block the holes of press making it hard to press.so my Mil always press the dough when it is hot.
  • Wash and spread a white cotton cloth or polyester cloth( helps to remove easily) or plastic sheet.Press the murukku press over the cloth vertically as shown in the picture.
Koozh Vadam-5
  • Allow it to sun dry for a day till the evening and dry it under the fan over night.It will be half dried,The next day morning,sprinkle water on the back side of cloth and remove the half dried vadam.Spread them well and again sun dry it for whole day.Repeat the same process till they are completely dry.It takes maximum 3-5 days based on the weather.
Koozh Vadam-6
  • When they turn completely dry,heat oil and fry few pieces.If it comes out crispy,it is perfect.If it tastes chewy and uncooked,it has to be dried for more time.So let it dry for 2 more days.
  • Once they are completely dry,store it in a box.Fry it whenever needed.
Koozh Vadam-7
  • It stays good for years when u use clean dry hands to handle.Never touch the vadam with wet hands because small insects will come over time.
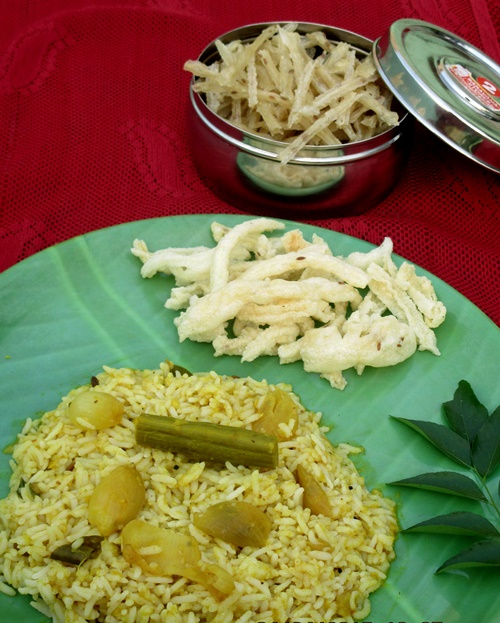
Enjoy with your favorite variety rice.We love to have it for tamarind rice,sambar rice and lemon rice.


Note

  • You can use either raw rice or steamed rice.Raw rice vadam looks white in color.But my MIL says vadam made with steamed rice tastes good.
  • You can also add little quantity of sago/javvarisi.It gives crispy and light vathal.But it absorbs little more oil while frying.
  • If u want to store the fried vathal,keep it in a polythene cover and close it air tight.It will stay good for a day


Try this arisi koozh vathal and enjoy with your favorite variety rice ! I had it with sambar rice
Koozh vadam recipe


Fresh Coconut Chutney with Tamarind and Cilantro

Fresh Coconut Chutney with Tamarind and Coriander

I virtually never purchase chutneys because they are so easy to make at home. The additional plus is that the cook in their own home kitchen can control the quality and portions of ingredients that go into the mix.

This particular fresh green chutney was made to accompany some fried Indian savories. Tamarind and coconut adds some natural sweetness with some earthy cilantro added to the mix with spices and chilies. This is a versatile chutney that goes well with anything that needs a bit of dressing up.


Fresh Coconut Chutney with Tamarind and CilantroFresh Coconut Chutney with Tamarind and Cilantro
Recipe by
Cuisine: Indian
Published on April 4, 2015

Simple versatile fresh chutney with coconut, tamarind and fresh cilantro

Print this recipePrint this recipe

Ingredients:
  • 2-inch piece tamarind pulp
  • 4 tablespoons fresh cilantro (coriander), trimmed and chopped
  • 2 tablespoons coconut sugar or brown sugar
  • 2 to 3 green chilies, seeded and chopped
  • 1/2 teaspoon sea salt, or to taste
  • 1 cup unsweetened dried grated coconut
  • 2 tablespoons ghee, coconut oil or sesame oil
  • 1 teaspoon brown mustard seeds
  • 1 teaspoon cumin seeds
  • 1/4 teaspoon asafetida
  • small handful of dried curry leaves, crumbled
Instructions:
  • Soak the tamarind in 1/2 cup of hot water for 20 to 30 minutes. Press the tamarind with your fingers to remove any excess seeds and tough fibers. Drain through a sieve, collecting as much of the pulp as possible.

  • Combine the tamarind pulp, fresh cilantro, sugar, chilies and salt in a blender or food processor and blend until smooth. Add the coconut and process further until everything is well combined. Transfer to a bowl.

  • Heat the ghee, coconut or sesame oil in a small saucepan or frying pan over medium heat. When hot, add the mustard seeds and cumin seeds and fry until the mustard seeds turn grey and begin to splutter and pop. Toss in the asafetida and curry leaves, stir a few times, and pour over the chutney. Stir and serve with your favorite Indian flat breads or savories.

  • Refrigerate in a sealed container for up to 2 to 3 days.

Makes about 1 1/2 cups

coconut chutney with tamarind and coriander

Other chutneys to enjoy from my vegetarian kitchen:
South Indian Tomato Chutney
Green Mango Coconut Chutney
Easy Spicy Tomato Chutney
Cashew Chutney (Kaju Chatni)

الأربعاء، 1 أبريل 2015

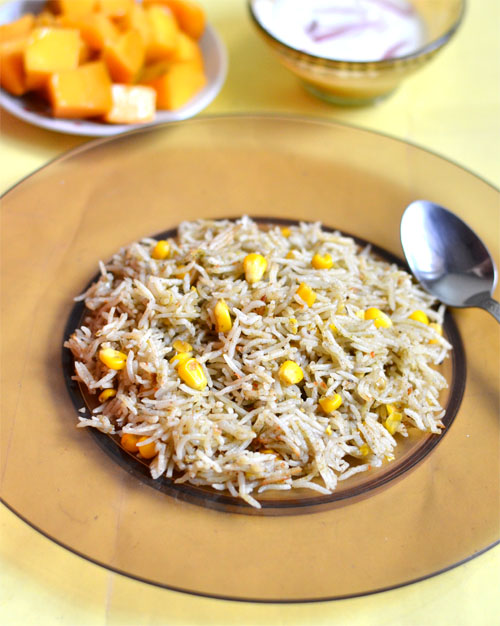
Sweet Corn Pulao Recipe-Corn Pulav-Lunch box Recipes

Corn pulao recipe

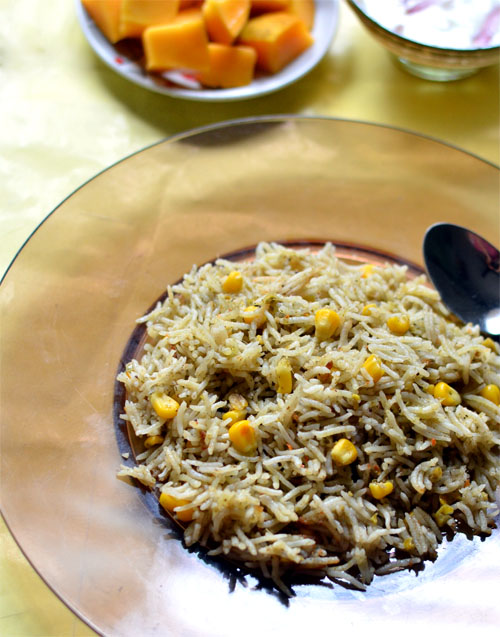
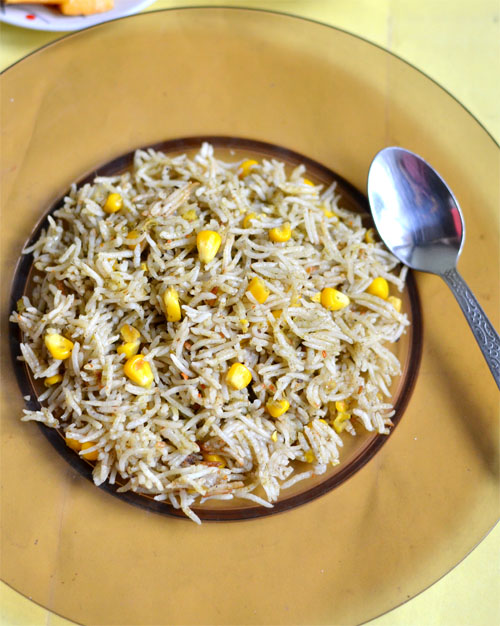
Corn pulao is an yummy,easy to make lunch box recipe.It would be an instant hit among the kids as it has sweet corn.I learnt this recipe from my friend Shalini.I modified her recipe slightly & tried it for Sendhil & Raksha’s lunch box.It has become their favourite rice varieties.I don’t make any gravies or curries as side dish for this rice.A simple onion raita would do.You would have come across many versions for this particular recipe.Here is my style of making it.You can make any variations to this recipe by adding capsicum,green peas etc.The color of this rice would be light green.If u want to have white colored rice,saute all the spices instead of grinding.You can make it as per your wish.It comes out well.Try this easy,one pot rice recipe for your lunch and let me know your feedbackHappy.Lets see how to make this Indian style corn pulao recipe with step wise pictures.
Corn pulao recipe

Sweet corn pulao recipe


Sweet corn pulao recipe Sweet corn pulao recipe-An easy lunch box recipe for Kids !
Cuisine: Indian
Category: Lunch
Serves: Serves 2
Prep time: 30 Minutes
Cook time: 20 Minutes
Total time: 50 Minutes


INGREDIENTS

  • Basmati rice - 1 cup (I used India gate super)
  • Water - 1.75 cups ( use 2 cups if u soak for 30 minutes)
  • Salt - as needed
  • Cooking oil - 1.5 tbsp
  • Ghee - 2 tsp
  • Bayleaf - 1no
  • Big onion - 1 no ( finely chopped)
  • Sweet corn - 1/2 cup ( frozen or fresh ones)
To grind to a paste
  • Cinnamon - 1 inch piece
  • Cardamom - 1 no
  • Cloves - 2 nos
  • Soambu/Fennel/Saunf - 1/4 tsp
  • Green chillies - 2 nos ( use 3-4 for more spice)
  • Ginger - 1 inch piece
  • Garlic - 4 cloves
  • Mint leaves - 5 nos
  • Coriander leaves - 1 tbsp
  • Cashewnuts - 5 nos
METHOD

  • Wash and soak the basmati rice in water for minimum 30 minutes and maximum 6 hours.The quantity of water will vary based on the soaking time.If u soak for 30 mins or less,u should add 2 cups of water.If u soak more time,u can add 1.5-1.75 cups of water to get a soft n firm rice.I soaked the rice for 6 hours.So i used 1.75cups of water.So measure the water u need and set aside( you can also use milk & water in equal quantity)

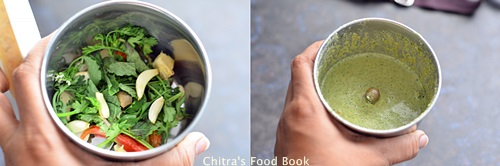
  • Take all the ingredients given under “to grind”  to a smooth paste using 1/4 cup of water from the measured 1.75 cups of water.So now u will have 1.5 cups of water in hand,remember.
    Sweet corn pulao recipe
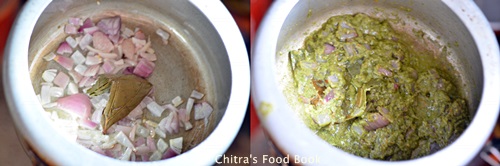
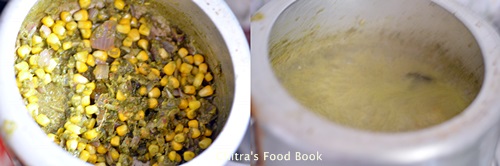
  • In a pressure cooker base,heat oil and put the bay leaf.Then add the finely chopped onions and saute till they turn transparent.Now add the ground masala paste and required salt.Mix well till raw smell goes off.To this,add the corn kernels( to remove corn kernels easily,take a knife and run through the corn from the top.Kernels will fall off easily.U can use it for the recipe)U can use frozen corn too.
Corn pulao recipe
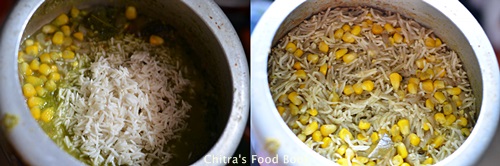
  • Mix well and add the measured water.Let it come to roll boil.Now add the soaked basmati rice by draining all the soaked water.Cover & pressure cook in low flame for one whistle.It takes 10-12 minutes in very low flame.After the steam is released,remove the lid and fluff the rice with a fork.Serve hot with onion raita.
Corn pulao recipe
Corn pulao recipe

Enjoy !


Note


  • For variations,u can add 2 tbsp of finely chopped capsicum along with onions.
  • You can add 2 tbsp of coconut in place of cashews. 
  • You can also add a handful of peas to make it healthy.
  • If u want to make white colored pulao,just saute the masalas instead of grinding them.Replace half of the water with milk.
  • To make this pulao more flavorful,add kalpasi/balck stone flower along with bayleaf.
  • No side dish is needed for this recipe.If u want,u can make any tomato based gravies.

Try this easy,one pot corn pulao for lunch box.It tastes yummy !
Sweet corn pulao recipe

No Croutons Required - March 2015 Roundup of Vegetarian Soups and Salads

Welcome to the March edition of No Croutons Required, a monthly event alternately hosted by my dear friend Jacqueline and myself. We have a nice balance of soups and salads to share this month, so cozy up and see what some of our fellow bloggers served up. Thanks as always to all who shared their lovely dishes.

apple carpaccio
Recipe: Apple Carpaccio

Chef: Dena
Blog: Oh! You Cook
Location: USA

Our first submission is this lovely appetizer salad with thinly sliced apples dressed with pomegranate molasses, honey, lemon juice and black pepper. To serve, some greens are placed on a plate, topped with the apple and some blue cheese and then drizzled with some dressing. Delicious and unique.

broccoli soup
Recipe: Easy Broccoli Soup

Chef: Helen
Blog: Roast Chicken and a Country Walk
Location: UK

I would eat this for lunch anytime, or for dinner for that matter. Two whole heads of broccoli feature in this easy soup, along with onion, garlic, nutmeg and simple seasoning. Serve with some hummus and a salad for a most satisfying dairy-free experience.

Recipe: Herby Salad with Chickpeas and Olives

Chef: Lisa
Blog: We Don't Eat Anything With a Face
Location: UK

Chickpeas always get my attention, and they do feature so well in a salad. Here is a variation on tabbouleh without the bulgar wheat, with romaine lettuce, tomato, cucumber, green pepper, olives, fresh herbs, all dressed up with lemon juice, olive oil, a bit of garlic and some seasoning. Certainly a delicious side.

almond carrot soup
Recipe: Almond Carrot Soup with Garlic and Caramelized Onions

Chef: Lata
Blog: Flavours and Tastes
Location: West Africa

I'm certainly intrigued by this soup that surely will warm and nourish. This creamy delight features almonds, and like Lata, I always have a good bunch on hand. Carrots, garlic, red onion, ginger and simple seasoning also shine here. I'm craving a bowl just now. We must not forget the caramelized onions either.

tofu salad
Recipe: Smoky Tofu and Pomegranate Arugula Salad

Chef: Janet
Blog: The Taste Space
Location: Canada

Next up is Janet with a sandwich idea that got turned into an interesting salad. Tofu is marinated with liquid smoke, tamari and a wee bit of maple syrup. Then it is baked and dressed up with cashews, apple and plum vinegar. Add some arugula, cucumber and pomegranate seeds and you have a feast indeed.

pumpkin soup
Recipe: Phool Makhana Pumpkin Soup (Puffed Lotus Seeds Pumpkin Soup)

Chef: Padmajha
Blog: Seduce Your Tastebuds
Location: India

Spicy and a bit sweet, I am certainly glad PJ shared this recipe for this lovely soup. Puffed lotus seeds (that I yet to try), with pumpkin, tomato, garlic, chili powder, nigella seeds and some fresh herbs to garnish makes for one colourful and nourishing soup.

broccoli soup
Recipe: Broccoli Cheese Soup

Chef: Shaheen
Blog: Allotment2Kitchen
Location: UK

I think most of us in the Western hemisphere are tired of winter, but there is always soup, and this creamy broccoli soup topped with cheese is just the thing to comfort. Like Shaheen, I am rather more partial to broccoli stems, but the whole vegetable is something I can enjoy anytime of year, especially when buttered up and dressed up with some simple seasonings.

roasted red pepper soup with tomatoes and lentils
Recipe: Roasted Red Pepper, Tomato and Lentil Soup with Dates and Lime

Chef: Lisa
Blog: Lisa's Kitchen
Location: Ontario, Canada

My contribution this month is a heavenly rich and robust roasted red pepper soup with tomatoes, lentils and dates. Slightly sweet, with substance from lentils and vegetables, the layering of flavors and textures is an experience as a whole, yet each mouthful is slightly different making this soup all the more interesting and satisfying.

cabbage soup
Recipe: Sweet and Sour Cabbage Soup with Tomatoes and Rice

Chef: Helen
Blog: Family Friends Food
Location: UK

Feeling nostalgic, Helen came up with this chunky soup that sounds delicious, especially if you want to serve it with some toast to dunk into your bowl. Nicely seasoned with onion and some fresh lemon juice, surely this is a fulfilling treat for lunch or dinner.

taco salad
Recipe: Taco Salad

Chef: Cindy
Blog: Seasonal and Holiday Recipe Exchange
Location: USA

Next up is a spicy salad to get us ready for spring temperatures. Cindy tells us it's easy for kids to help out in the kitchen too. Lettuce, cheese, beans, avocado, tomatoes, jalapenos, black olives and tortilla chips are complimented with a homemade Pico de Gallo. No doubt this is famous with the family. I am sure it is worth the price of admission.

chickpea fennel soup
Recipe: Leek, Chickpea Fennel Soup

Chef: Jen
Blog: Chardonnay & Samphire
Location: UK

This lovely soup features leeks, garlic, onions, carrots, fennel, chickpeas, lemon and some paprika and coriander for garnish. Surely an earthly and substantial bowl of goodness to serve up year round. Now I am certainly hungry.

orzo salad
Recipe: Orzo Salad

Chef: Linsy
Blog: Home Cook Food
Location: USA

Pasta always does feature well as a salad ingredient, especially when you combine it with shallots, red pepper, tomatoes, cucumber, chickpeas, black olives and pine nuts. Dress it up with some olive oil, balsamic vinegar and some herbs and you are in for a fine meal. The possibilities are endless but I am surely craving the combination of ingredients just as Linsy presents them.

broccoli salad with almond
Recipe: Warm Broccoli and Almond Salad

Chef: Pallavi
Blog: Thou Shalt Cook
Location: India

Our final submission is this healthy and satisfying broccoli salad with almonds. Certainly ideal for a date night, this warming delight is dressed with toasted sesame seeds, almonds and olive oil. Share the love while you enjoy good nourishment.

That concludes the roundup for this month. Jacqueline will be hosting the April 2015 edition of No Croutons Required. Be sure to stop by her space for details.