الأحد، 7 يوليو 2013

Chickpea Potato Koftas with Ricotta Cheese

chickpea potato koftas

I adore koftas and have experimented with many varieties in my kitchen. Popular in the Middle East and India, they are often made with ground meat, vegetables, legumes and almost always spices and herbs. They are typically served smothered with sauce or a gravy, though sometimes just a small amount of sauce or chutney is all that is needed. As a vegetarian, I of course don't cook meat, and you won't miss it when you try these little bites composed of chickpeas, potato, a little creamy ricotta cheese and a generous amount of spices to really impress the senses. Rather like a falafel, these are great for serving in rotis or chapatis along with some leafy greens and a tomato chutney or perhaps this sun-dried tomato paste. Perfect patio food, and they take very little time at all to make once the potato and chickpeas are cooked.

I've included ricotta cheese here as I had some in the refrigerator that I didn't want to go to waste. Yogurt will do just as well, or give them a try with some soft goat cheese.

An added bonus is these are baked rather than fried, meaning less mess and less oil. If preferred, you can shallow fry them in a few inches of oil, in batches, for about 5 minutes, taking care to lightly brown both sides. Drain on paper towels to get rid of excess oil if you choose this method.


Chickpea Potato Koftas with Ricotta CheeseChickpea Potato Koftas with Ricotta Cheese
Recipe by
Cuisine: Indian
Published on July 7, 2013

Soft, creamy and spicy baked chickpea and potato koftas with ricotta cheese — these are a hit at any gathering

Print this recipePrint this recipe

Ingredients:
  • 2/3 cup dried chickpeas (2 cups cooked)
  • 1 large potato
  • 1/4 cup fresh cilantro, chopped
  • 1-inch piece ginger, peeled and finely chopped
  • 2 green or red chilies, seeded and finely chopped
  • 1/4 cup sesame seeds
  • juice from 1 lemon or 1/2 teaspoon amchoor powder
  • 1 tablespoon ground coriander
  • 1/2 teaspoon turmeric
  • 1 teaspoon ground cumin
  • 1 teaspoon paprika
  • 1/4 teaspoon asafetida
  • 1/4 teaspoon cayenne
  • 1/2 teaspoon baking powder
  • 1 teaspoon sea salt
  • 2 tablespoons sesame oil
  • 3 tablespoons ricotta cheese, yogurt or soft goat cheese
  • chickpea flour (besan) as needed
Instructions:
  • Rinse the chickpeas and soak for 8 hours or overnight in several inches of water. Drain and rinse, then transfer to a medium saucepan and cover with several inches of fresh water. Bring to a boil, reduce heat to low, cover, and simmer for 1 to 1 1/2 hours or until the chickpeas are buttery soft. Drain and transfer to a food processor.

  • Meanwhile, roast, boil or steam the potato until fork tender. When cool, peel and transfer to a large bowl and mash with a fork or potato masher.

  • Pulse the cooked chickpeas in the food processor. Transfer half of the chickpeas to the potatoes, and then add all the remaining ingredients except the chickpea flour into the food processor. Pulse or process until you have a smooth and fairly thick batter. Add more sesame oil or ricotta, yogurt or goat cheese as necessary. Transfer to the potatoes and stir until combined. Stir in chickpea flour as needed if the mixture is too moist to shape.

  • Preheat an oven to 350° and line a baking sheet with parchment paper. Rub your hands with a thin film of oil and shape the mixture into small 2 1/2- to 3-inch patties. Transfer to the baking sheet.

  • Bake for about 20 minutes, turning the koftas once part way through the baking time, until lightly browned on both sides.

  • Serve hot or warm with your favorite sauce or chutney.

Makes about 20 koftas
chickpea kofta

More little bites you are sure to enjoy from Lisa's Vegetarian Kitchen:
Brown Rice and Quinoa Cakes with Parmesan
Quinoa Goat Cheese and Parmesan Cakes
Stuffed Jalapeño Peppers with Goat Cheese and Sun-dried Tomatoes

On the top of the reading stack: The Southern Vegetarian Cookbook by Justin Burks and Amy Lawrence

Audio Accompaniment: Brian Eno - On Land

الجمعة، 5 يوليو 2013

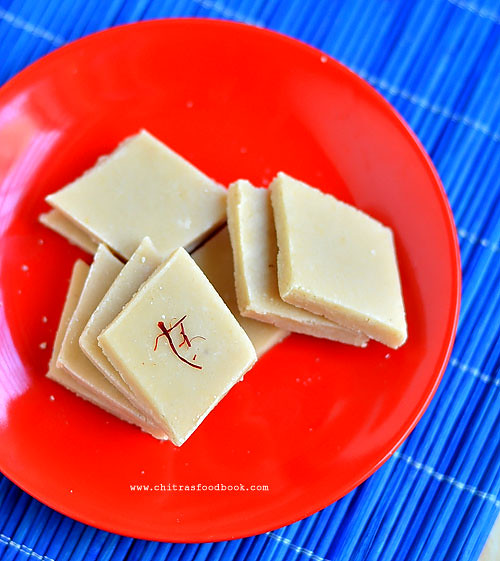
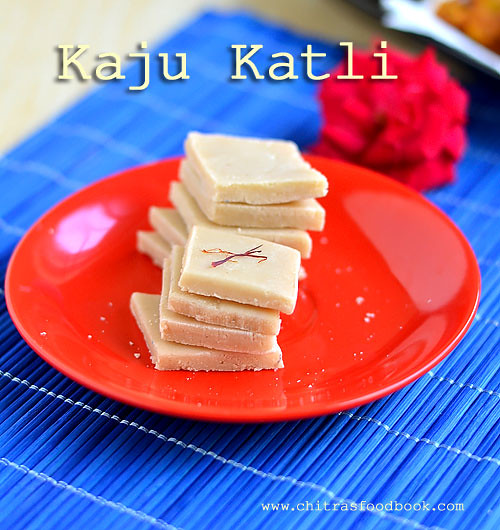
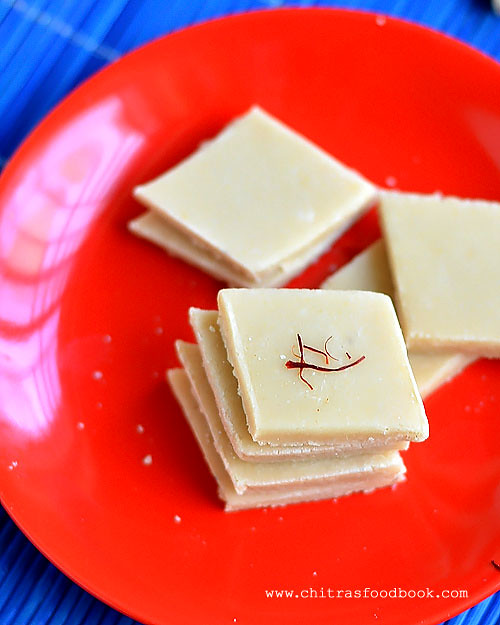
KAJU KATLI RECIPE | DIWALI SWEETS RECIPES


Kaju katli is my family’s favourite sweet. This was the first sweet i tried on my own ( without my MIL’s help) after my marriage for Sendhil & Raksha.Though I have tried this several times, i have not posted it here in detail.Long back i had posted this recipe without much details along with some other sweets & savouries during diwali.But i want to have a separate post for kaju katli in my blog with step by step pictures and some tips for easier understanding especially for beginners.I have tried this recipe several times and it comes out perfect. After i got the confidence of preparing kaju katli , i started making kaju lotus sweet which tastes very similar to kaju katli but it looks colourful. Both the sweets are very easy to prepare. So when u try this recipe , don’t forget to try kaju lotus. U’ll love it.In this recipe i have used cashews & sugar but i heard milk powder & saccharine is also added along with cashews in sweet stalls to yield more quantity.For 1 cup of cashews, u can get 8-10 pieces using this recipe.
I also have a good news to share with u all. I had won second prize in “Mj delight’s anniversary event “ and got these cute steel canisters.Thank u so much dear.I was very happy because this is the first event i participated & won the prize too.. Party smile
Check out my Easy Badam Cashew Burfi if interested !

box


Kaju Katli recipe


Kaju Katli recipe How to make Kaju katli - Diwali sweets recipes
Cuisine: Indian
Category: Sweet
Serves: 8-10 nos
Prep time: 5 Minutes
Cook time: 10 Minutes
Total time: 15 Minutes


INGREDIENTS
1 cup = 250ml
  • Cashew nuts – 1 cup
  • Sugar – 1/2 cup
  • Water – 1/4 cup
  • Ghee – 1 tsp
  • Milk – 1-2 tsp (optional, only if needed)
METHOD
HOW TO POWDER CASHEWS
  • Cashews should be dry. If u have kept in the refrigerator, bring it to room temperature by spreading them in a towel or paper to absorb all the water. OR Dry roast the cashews in a broad hot kadai in low flame without changing the color.Switch off the stove and put the cashews in the hot kadai for 10-15 mins till it becomes crisp & dry. I have followed both the methods & it works.
  • Grind cashews to a fine powder. U can do this by two methods.One is :Run the mixie at low speed for short intervals , stir in between to get a fine powder. Repeat the same for 2-3 times till u get a nice powder. Make sure u do not over grind them . If over ground , cashews will leave oil & becomes a sticky paste..
  • Second method is : Run the mixie continuously till u get a fine powder. U should be careful . Do not grind for more time.
I have tried both the methods .. They work very well. U can try any.
When u grind 1 cup of cashews u’ll get  2-3 tbsp more than 1 cup of powder. U can use the same quantity and proceed further. No need to measure 1 cup of powder. 1/2 cup of sugar would be enough.
How to make kaju katli

HOW TO PROCEED
  • After grinding the cashews,set aside.Grease a plate with ghee & keep it ready.
  • In a kadai , take 1/2 cup of sugar & add 1/4 cup of water just to cover the sugar. Allow it to boil till it reaches one string consistency.ie.take a drop of syrup from the back of ladle and test it between your thumb & fore finger. When u release it , u’ll get a thin,uncut single string.( oru kambi padham)
How to make kaju katli
  • Now add the ground cashew powder & mix well till u get a whole mass.ie, Keep stirring until the mixture starts to leave the sides of the pan and becomes thick. It takes maximum of 4-5 minutes in medium flame.Test the consistency by making a small ball from the dough using wet fingers. U should be able to roll a soft,non sticky ball out of it.
How to make kaju katli

  • Transfer the mixture to the greased plate and leave it for 10 minutes . It will become warm.Grease your hands with little ghee & Knead well like chapathi dough.Initially u’ll feel dry & hard but as u knead well, it will become soft & smooth. ( If u have missed the right consistency,the mixture will become very hard & crumbly.In that case add little milk and start kneading. U’ll get a soft ball like this at the end. But adding milk reduces the shelf life of the sweet.Add milk if u feel the dough is too hard to handle.Else add a tsp of ghee for kneading)
  • In a plastic sheet or butter paper,grease it with ghee, roll the kneaded dough using a rolling pin and cut them into the desired shapes.
How to make kaju katli
It just melts in ur mouth. Enjoy !! Stays good for 2-3 days..Smile Enjoy !

Trouble shooting tips 

In case, u missed the right consistency and if the dough becomes crumbly and hard, just break them into pieces. Grind in a big mixie jar adding little water or milk and make a smooth paste. Transfer the mixture to the kadai and again cook it till you attain the correct stage.You can easily identify the right stage as you know where you went wrong. So do it patiently and remove it at the right stage.
Note
  • Cashews should be completely dry before grinding.While powdering the cashews please be careful in running the mixie. Over doing it makes the cashews sticky & wet.U wont get the perfect smooth powder.
  • One string consistency is very important. If sugar reaches more than one string consistency , katli will become hard. U have to add more milk to make it soft. Adding more than the required milk makes it wet & sticky.It reduces the shelf life of the sweet.
  • U can check the consistency of dough by making a small ball out of it.The ball should be non-sticky.Suppose if u over mix the dough and if it becomes hard,no worries.Just keep the dough in a plate and let it warm.Add little milk to it and knead it well.It will become soft.Then u can roll it and make pieces as mentioned above.
  

Enjoy this kids favorite Kaju Katli for Diwali  & have a great celebration !!


الخميس، 4 يوليو 2013

Asparagus and Pesto Risotto with Mushrooms

asparagus risotto with mushrooms

Asparagus has such an extraordinarily fresh and unique flavor that all I typically need to enjoy the local asparagus in season is a quick steaming or roasting, a pat of butter, a drizzle of lemon juice and a sprinkling of sea salt. But this elegant summer vegetable is quite deserving of a more elaborate treatment when you want to make it the spotlight of a special meal, so long as it is paired with similarly simple but fine flavors.

A simple creamy risotto provides the opportunity to lend even more distinction and flair to asparagus. Fresh lightly sautéed button mushrooms and a simple basil pesto add refined and delicious adornments that enhance the taste experience of asparagus without overshadowing it. Quite easy to prepare and make and just requiring attention, this risotto is really quite a stunning gourmet way to enjoy the asparagus season.


 Asparagus and Pesto Risotto with Mushrooms Asparagus and Pesto Risotto with Mushrooms
Recipe by
Cuisine: Italian
Published on July 4, 2013

Elegant and delicious summer asparagus and fresh mushroom risotto flavored with a simple basil pesto

Print this recipePrint this recipe

Pesto:
  • small handful of fresh basil leaves
  • 1 large clove garlic
  • 2 tablespoons olive oil
  • 1/2 cup fresh grated Parmesan cheese
Risotto:
  • 1 bunch fresh asparagus
  • 8 oz (225 g) button mushrooms
  • juice from 1 lemon (3 tablespoons)
  • 6 tablespoons unsalted butter
  • 4 1/2 cups vegetable stock
  • 2 tablespoons olive oil
  • 1 onion, chopped
  • 1 1/2 cups arborio or other risotto rice
  • 1/2 cup dry white wine
  • 1 teaspoon sea salt, or to taste
  • fresh ground black pepper
Instructions:
  • Prepare the pesto by placing the basil, garlic and olive oil in a mortar and pestle, food processor or blender. Process until blended, transfer to a bowl, and stir in the Parmesan cheese. Set aside.

  • Snap the woody ends off the asparagus and cut the stalks into 1-inch pieces, leaving the tips whole.

  • Chop the mushrooms into bite-size pieces. Transfer to a bowl with the asparagus and toss with the lemon juice.

  • In a large saucepan, melt 2 tablespoons of the butter over medium-high heat. Toss in the fresh mushrooms and cook, stirring often, until the mushrooms just begin to release their juices and brown — about 3 to 4 minutes. Add the asparagus and stir for another 2 to 3 minutes. Remove from heat and drain the cooking liquid into the stock. Transfer the mushrooms and asparagus to a bowl and set aside.

  • Bring the vegetable stock to a good simmer in a small saucepan. In the same pan that the mushrooms and asparagus were cooked in, heat the olive oil and another 2 tablespoons of the butter over medium heat. When hot, add the onion and stir for 5 to 8 minutes or until golden brown. Add the rice and stir for another few minutes to coat the grains with oil.

  • Pour in the white wine, raise the heat slightly, and cook, stirring constantly, until the liquid evaporates.

  • Now add a ladle of the simmering stock and cook, stirring constantly, until the liquid is absorbed. Continue adding the stock a ladleful at a time, stirring constantly, waiting until the liquid is absorbed between each addition. Continue until the rice is al dente — this should take 20 to 30 minutes and use most of the stock (add hot water to the stock if necessary).

  • Before adding the last ladle of stock, stir in the mushrooms and asparagus. Add the last ladle, stir a couple of times, then add the pesto. Gently stir to combine, then remove from heat when most of the last ladle of stock has been absorbed.

  • Stir in the remaining 2 tablespoons of butter and season with salt and pepper. Taste for seasoning and serve hot.

Makes 4 to 6 servings

asparagus risotto

Other risottos you will enjoy:
Mushroom Risotto
Mushroom, Lentil and Spinach Risotto
Lemon Risotto with Leeks and Mushrooms
Sweet Corn Risotto with Tomato and Basil

On the top of the reading stack: The Southern Vegetarian Cookbook by Justin Burks and Amy Lawrence

Audio Accompaniment: Paul Kalkbrenner

الثلاثاء، 2 يوليو 2013

Blueberry Lemon Cream Cheese Loaf

If there are multiple dimensions, then surely this bread should exist in each and every one.

blueberry cream cheese loaf

As noted many times in this space, I am a savory girl, although I do like to bake and enjoy the fruits of the experience in moderation. My husband and friends have no trouble sharing with me. More often than not, my favorite baked goods are berry treats, such as muffins or loafs and of course cheesecake. This moist and creamy loaf, bursting with fresh blueberries, brings together that treasured cheesecake experience, with a loaf twist. Already I have made it twice so as to share the perfected result with my readers.

There has been lots of renewed interest in coconut sugar over the past few years. Recently, I was offered a sample to try from Grace Foods. Organic, made from gently boiled sap collected from coconut flower buds, it is free of artificial flavors, preservatives and coloring. Baking is a key test for new sugar products, and I give this natural alternative to processed sugars a happy pass in my kitchen. For most recipes, especially ones calling for brown or cane sugar, but also for granulated sugar, just substitute an equal amount of coconut sugar. If you must put sugar in your coffee or tea, then go ahead. Coconut sugar is also believed to have a relatively low glycemic index. Moderation is essential when it comes to sugar, even if processed naturally, but we all need a bit of sweetness in our lives.

blueberry cream cheese loaf

A lovely breakfast or brunch or, of course, dessert, explore the possibilities with the flours and sweeteners of your choosing.

blueberry loaf

Blueberry Lemon Cream Cheese LoafBlueberry Lemon Cream Cheese Loaf
Recipe by
Published on July 2, 2013

Moist and creamy "cheesecake" loaf bursting with fresh blueberries

Print this recipePrint this recipe

Bread:
  • 1/2 cup (1 stick) unsalted butter, softened
  • 1/2 cup + 3 tablespoons coconut sugar or granulated sugar
  • 1/2 teaspoon sea salt
  • 1 teaspoon pure vanilla extract
  • 2 large eggs, separated
  • 1 1/4 cups unbleached white flour or soft spelt flour
  • 1/4 cup cake flour or white flour
  • 1 teaspoon baking powder
  • 1/3 cup yogurt or milk
  • 2 teaspoons fresh lemon juice
  • 1 1/2 to 2 cups fresh blueberries, dusted with a few teaspoons of flour
Filling:
  • 8 oz (225 g) cream cheese, softened
  • 1/2 cup coconut sugar or granulated sugar
  • 1 tablespoon unbleached white flour or spelt flour
  • 1 large egg
  • 1 teaspoon fresh lemon juice
Glaze:
  • 2 tablespoons granulated sugar
  • 1/2 teaspoon pure vanilla extract
  • 1 1/2 teaspoons fresh lemon juice
Instructions:
  • Preheat an oven to 350°. Butter and lightly flour a 10-inch loaf pan.

  • Begin by preparing the loaf batter. In a large bowl, cream together the butter and 1/2 cup of the sugar until light and fluffy. Stir in the salt and vanilla, and then beat in the egg yolks until creamy.

  • In a medium bowl, combine the flours and baking powder. Add the dry ingredients to the butter and sugar mixture alternately with the yogurt or milk and lemon juice, stirring until combined. Gently fold in the blueberries.

  • In a small bowl, beat the egg whites until soft peaks form. Add the remaining 3 tablespoons of sugar, a tablespoon at a time, and beat until stiff peaks form. Fold the egg whites into the batter.

  • To make the filling, beat the cream cheese, sugar, flour, egg, and lemon juice in a medium bowl until smooth.

  • To make the glaze, whisk together the sugar, vanilla and lemon juice in a small bowl.

  • To assemble the loaf, spoon about 1/2 of the batter into the prepared loaf pan and spread evenly. Scoop the filling over the cake layer and spread evenly. Top with the remaining batter, again spreading it out evenly. Spoon the glaze over the loaf.

  • Bake for 50 to 60 minutes until golden brown on top and a cake tester comes out clean when inserted into the middle of the loaf. Let sit in the pan for 15 to 20 minutes to cool, then turn out onto a wire rack to cool to room temperature. slice and serve.

Makes 1 10-inch loaf
blueberry cream cheese loaf

More cakey goodness from Lisa's Kitchen:
Guinness Gingerbread Cake
Blueberry Lemon Cake Cookies
Flourless Chocolate Cake with Bittersweet Chocolate Glaze
Goat Cheese Cheesecake with Mixed Berries

On the top of the reading stack: various cookbooks

Audio Accompaniment: Katedra

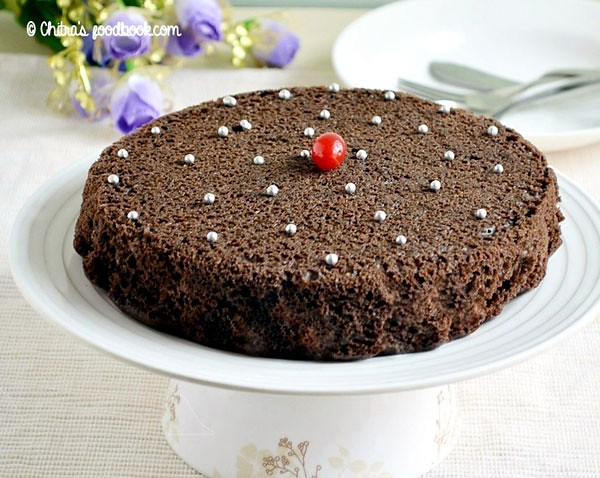
EGGLESS CHOCOLATE CAKE IN PRESSURE COOKER

Eggless pressure cooker cake
I tried this cake from an old cookbook. I wanted to post an eggless chocolate cake in my blog but i couldn’t do it. Now i am so happy i did a cake in pressure cooker which is very easy for beginners and for people who don’t own a oven. I just followed the recipe i noted in my cookbook and the result was soft , moist & delicious tasting chocolate cake. I have not used oil/butter/ ghee in this recipe. But i used fresh cream & curd to bring the softness. Do try this cake. You’ll get it perfect for sure.You can also try this recipe in microwave oven ( use convection mode @ 180c) . This cake is apt for beginners.Kids would love this cake !!

Eggless pressure cooker cake

Eggless chocolate cake in pressure cooker


Eggless chocolate cake in pressure cooker How to make Eggless chocolate cake in pressure cooker
Cuisine: Indian
Category: Cake
Serves: 10 pieces
Prep time: 10 Minutes
Cook time: 20 Minutes
Total time: 30 Minutes


INGREDIENTS
1 cup - 250ml
PART - I
  • All purpose flour/ Maida – 1 cup
  • Baking powder – 3/4 tsp
  • Cooking soda – 1/2 tsp
  • Cocoa powder – 1.5 tbsp
  • Salt –A pinch
PART-II
  • Sugar – 1/2 cup
  • Fresh cream – 1/2 cup
  • Thick Curd – 1/3 cup
  • Milk – 1/4 cup
  • Vanilla essence – 1/2 tsp
METHOD
  • Mix all the ingredients mentioned under Part - 1.Set aside.
PRESSURE COOKER CAKE

  • Powder the sugar nicely and add the other wet ingredients like curd , fresh cream & vanilla essence in the mixer and pulse in once or twice in low speed.All the ingredients will be mixed well.
PRESSURE COOKER CAKE

  • In a separate bowl take the wet ingredients and add the dry ingredients (PART-I) . mix well in the same direction. The consistency of batter should fall like a thick ribbon.If not add little more milk and mix well. Make sure consistency should be right.
PRESSURE COOKER CAKE
  • Now cover the bottom & sides of the vessel ( i used my aluminum baking pan) with a butter paper and pour the cake mixture into it. Pat it in the bottom of vessel for even spreading.U should fill the batter till half of the vessel because the cake will rise while it cooks..Again cover the top of the vessel with another butter paper tightly o avoid the vapour that goes inside the cake.
PRESSURE COOKER CAKE
  • Then take a big pressure cooker and add water in the base.Keep a plate inside( just as a stand for the vessel in which u bake ,i used mini idli plate here ). Now keep the vessel over the plate. If you are adding water ( if using salt,refer notes section),please add water till half of the size of vessel. If u add more water , the extra water may go into the vessel & the cake mixture will become watery.
PRESSURE COOKER CAKE
  • Do not put the weight valve , keep the flame high and allow the water boil till the full steam comes. Once the full pressure is reached , simmer the flame completely and allow it to cook for 20 minutes exactly without putting weight valve.During this time , steam will be coming out in low pressure. After 20 minutes switch off the flame & give a standing time till all the steam is released completely by itself. Please do not open till that time. It takes maximum of 20 minutes for all the steam to go by itself.
PRESSURE COOKER CAKE
  • Remove the vessel from the cooker and insert a knife or spoon. If it comes out clean ,your cake is done. Cut into pieces & enjoy !!
PRESSURE COOKER CAKE

Enjoy !
Note : You can bake the cake in a cooker by adding salt.For that,you should spread powdered salt in the base of cooker for 2 inches.Use 1/2 kg of salt.Then place the cooker plate and close the cooker by removing the gasket and weight valve.First preheat the cooker in high flame for 5 minutes.Then place the baking pan with cake mixture and cook in  low flame for 20-30 minutes.Check with the back of spoon and remove after the steam is released.
Eggless chocolate cake

الاثنين، 1 يوليو 2013

No Croutons Required - The Winner for June and the Theme for July


The challenge for June was to come up with a soup-like smoothie that included at least one salad green or vegetable. There are lots of lovely entries to browse to quench your thirst and nourish your body. Not everyone was up to adding greens, so there was a bit of cheating going on, but no matter, because it's really a delicious spread. And, a winner we have. Congratulations to Elizabeth from Elizabeth's Kitchen who contributed this tempting and gorgeous Fresh Fruity Surprise Juice. Packed full of fruity and vegetable goodness indeed, what a way to kick start your morning.

fruity surprise smoothie

I am hosting the July 2013 edition of No Croutons Required. The summer is heating up so salads are in order. This month the challenge is to come up with a stunning legume salad. I was mulling over a theme and as I adore legumes of any kind, and considering how well they are suited for salads, that is what we are going with for the challenge this time around. As always, this is a vegetarian challenge, so no meat, fowl or seafood.

All you need to do to participate is come up with your bean salad, post about it on your blog, mentioning I am the host this month with a link to this announcement, and submit your recipe via the linky tool at the end of this post by the 20th of the month. Please note that only one entry per blogger will be accepted. We look forward to your delicious creations to enjoy on the patio or cozy kitchen.


السبت، 29 يونيو 2013

Whole Wheat Sweet Potato Flatbreads

sweet potato flatbreads

These simple sweet potato delights occupy a spot on the quickbread spectrum somewhere between a cracker and a rather dense flatbread, but with a wonderful flaky interior. Ideal for dipping into spreads or curries too, they were on the menu with some spicy hummus. Roasted sweet potato and a hint of Indian spices elevate these to one of my new favorite savory flatbreads. They are baked too, so no need to hover over a hot skillet cooking up each round individually. Especially if you roast the sweet potato beforehand, these are easy to make and take very little time to come together. A cross between a roti and a paratha? You decide. Toss in your favorite spices or seeds or keep it simple with minimal seasoning — either way enjoy as a side for any meal or just snack on them. They are that good.


Whole Wheat Sweet Potato FlatbreadsWhole Wheat Sweet Potato Flatbreads
Recipe by
Adapted from Yogi Kitchen
Published on June 29, 2013

Simple, sturdy and flaky baked flatbreads made with roasted sweet potato and a hint of Indian spicing — great for serving with hummus or chutneys

Print this recipePrint this recipe

Ingredients:
  • 1 large sweet potato, roasted in a 425° oven for 30 to 40 minutes or until fork tender
  • 1 cup whole wheat flour
  • 3/4 cup spelt flour
  • 1 1/2 teaspoons sea salt
  • 1 teaspoon ground cumin
  • 1/2 teaspoon chili powder
  • 1/4 teaspoon cayenne
Instructions:
  • Preheat an oven to 400° and line a baking sheet with parchment paper.

  • When the roasted sweet potato is cool enough to handle, remove the skin, transfer to a large bowl and mash with a fork or potato masher.

  • Sift the flours, salt and spices into the bowl and stir. Gently knead the dough until it comes together, adding more flour or a few drops of water as necessary — the dough should be moist but workable to pat into small rounds. Divide the dough into 5 equal portions and form each portion into a small ball.

  • Lightly dust a large cutting board with flour and dust your hands too. Press down each ball of dough into a circle and shape into a roughly 1/2-inch thick round about 5 to 6 inches in diameter. Alternately, roll out each round with a lightly floured rolling pin.

  • Arrange on the baking sheet with space between each round. Bake for 20 to 25 minutes, then remove from the oven and let cool.

  • Serve warm or at room temperature, or store in a sealed container for up to several days.

Makes 5 six-inch flatbreads
spicy sweet potato whole wheat flatbreads

Other flatbreads you are sure to enjoy from Lisa's Kitchen:
Paratha Stuffed with Sweet Potato and Potato
Sweet Potato Roti
Fenugreek Chapatis
Off and On the Trail Bannock

On the top of the reading stack: Roadside Picnic by Arkady and Boris Strugatsky

Audio Accompaniment: the ceiling fan