الأربعاء، 25 مارس 2015

Portobellos Stuffed with Spinach and Sun-Dried Tomatoes

Portobellos Stuffed with Spinach and Sun-Dried Tomatoes

This succulent mushroom-centered presentation could easily be classified as a salad I suppose. A side dish perhaps, but honestly, the mushroom and spinach steal the show and deserve to serve as the centerpiece of a meal. Nutritional yeast lends a cheesy element to this dish and then there are the robust flavors of sun-dried tomatoes and black olives, complete with the meaty texture of the portobellos. Serve with a creamy vegetable lentil soup and a side of brown rice for a completely satisfying meal.

Stuffed Portobello Mushrooms

Portobellos Stuffed with Spinach and Sun-Dried TomatoesPortobellos Stuffed with Spinach and Sun-Dried Tomatoes
Recipe by
Adapted from The Complete Coconut Cookbook: 200 Gluten-free, Grain-free and Nut-free Vegan Recipes Using Coconut Flour, Oil, Sugar and More
Published on March 25, 2015

Plump juicy roasted portobellos stuffed with a savory filling of wilted spinach, sun-dried tomatoes and olives

Print this recipePrint this recipe

Ingredients:
  • 1/4 cup sun-dried tomatoes
  • 6 medium portobello mushrooms
  • 2 tablespoons melted coconut oil
  • 2 teaspoons balsamic vinegar
  • 2 tablespoons coconut flour
  • 1/2 cup water
  • 2 tablespoons nutritional yeast
  • 1 shallot, finely chopped
  • 1 to 2 green chilies, seeded and minced
  • 6 cups (6 oz) baby spinach, trimmed and roughly chopped
  • 4 tablespoons Kalamata or black olives, pitted and finely chopped
  • sea salt and fresh cracked black pepper to taste
Instructions:
  • Soak the sun-dried tomatoes in hot water for 20 minutes, then drain and finely chop. Set aside.

  • Line a baking pan with foil and lightly grease with coconut oil. Preheat an oven to 450°.

  • Clean the mushrooms and remove the stems. Finely chop the stems and set aside. Gently scoop out much of the inner part of the mushrooms, taking care not to puncture the bottoms and sides, and discard — you'll want to leave some of the mushroom interior so they retain their meatiness and shape. Transfer the mushroom caps to the prepared pan, hollow side down, and brush with a mixture of 1 tablespoon of the melted coconut oil and the balsamic vinegar. Bake for about 5 minutes until the mushrooms just begin to release their juices. Remove from the oven and wipe any excess juices from the pan.

  • In a small bowl, whisk together the coconut flour and water. Let sit for 5 minutes, then whisk in the nutritional yeast.

  • In a large frying pan, heat the remaining tablespoon of coconut oil over medium heat. When hot, add the shallots, chilies and mushroom stems, and stir for a few minutes to soften. Add the spinach a few handfuls at a time, stirring until wilted. Stir in the coconut flour mixture, sun-dried tomatoes, olives, and salt and pepper to taste. Cook for another few minutes, stirring frequently.

  • Flip the mushrooms over on the pan and distribute the filling evenly among the mushrooms. Bake in a 400° oven for 5 to 7 minutes until the filling begins to brown. Place under a broiler for a few minutes to brown the mushrooms and filling further.

Makes 4 to 6 side servings or 2 to 3 main servings

Stuffed Spinach Mushrooms with Sun-Dried Tomatoes

Other stuffed delights from Lisa's Vegetarian Kitchen:

Stuffed Eggplant Poriyal
Quinoa Stuffed Tomatoes
Stuffed Mushrooms with Sun-Dried Tomatoes, Goat Cheese and Olives
Samosa-Style Stuffed Baked Potatoes

On the top of the reading stack: Sweetly Raw Desserts: Raw Vegan Chocolates, Cakes, Cookies, Ice Cream, and More

Audio Accompaniment: Marsen Jules

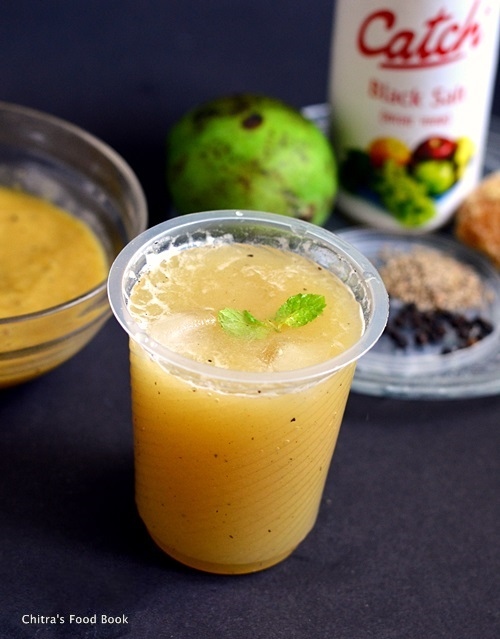
Aam Ka Panna Recipe-Raw Mango Drink-Summer Recipes

 aam panna recipe
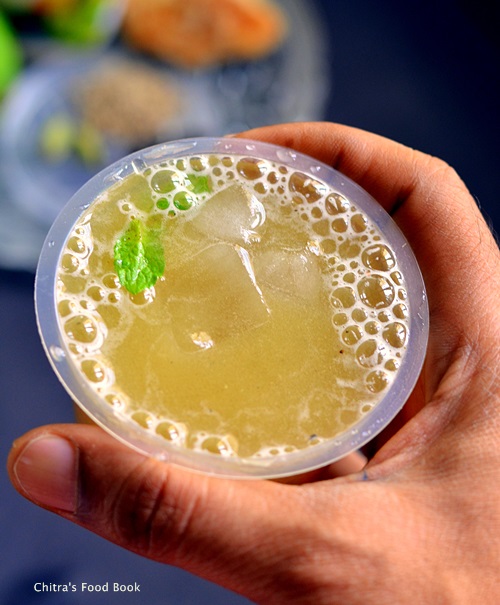
Aam Panna @Aam ka panna is one of the most popular Summer drinks of North India.It is made using the pulp of cooked Raw mangoes(Kacha Mango) blended with jaggery or sugar along with some spices.It is considered to be the best,healthy beverage/drink to beat Indian summer heat.As green mangoes are rich in source of oxalic acid,Citric acid and malic acid,it is used to treat Gastro intestinal disorders.It is also a good source of Vitamin C,B1,B2.So it is used as a tonic to increase the resistance against tuberculosis,anaemia,Cholera and dysentry.I wanted to start my summer recipes with mangoes.To begin with,i tried this drink today for the first time after referring few recipes from various websites.I came across different versions using smoked raw mangoes and steamed raw mangoes.Some recipes are with sugar & some called for Jaggery.I followed a recipe based on my convenience & family likings.Whatever be the method,making aam panna is so easy and tastes great too.I felt its taste was too close to our South Indian Panagam recipe which we make for Rama Navami.Myself and Sendhil enjoyed a glass of it and we loved it a lot.You can prepare this juice in minutes if u have the panna concentrate ready in hand.Lets see how to prepare this flavorful,popular North Indian drink-Aam Ka Panna/Raw Mango juice recipe.
Check out my other Mango recipes here!
aam panna concentrate

Aam panna recipe


Aam panna recipe Aam panna recipe/Raw mango drink- Healthy North Indian beverage using raw mangoes
Cuisine: Indian
Category: Drinks
Serves: 1.5 cups
Prep time: 10 Minutes
Cook time: 10 Minutes
Total time: 20 Minutes


INGREDIENTS

  • Raw mango - 2 nos (small round ones, I used one long variety)
  • Jaggery - 1 cup ( heaped) ( Pulp & jaggery ratio is 1:2)
  • Cardamom - 2 nos
  • Black salt - 1/2 tsp
  • Roasted cumin powder - 1/2 tsp
  • Pepper corns – 1/4 tsp
  • Mint leaves – few ( to garnish)
METHOD

  • Method – 1 : Wash and steam cook the mangoes in a pressure cooker or idli pot.Once its cooked,peel the skin and squeeze the pulp.Take in a plate and keep aside.( I got 1/2 cup of pulp)
Aam panna recipe
  • Method – 2 :Alternatively,u can burn the mangoes over direct flame till it turns like a charcoal.Cook in medium flame and turn it every now and then.Remove when the mango is cooked completely.Discard the burnt skin and take out the pulp.Keep it ready.U can follow this method if u want smoky flavor in the drink.I followed First method as we don’t like smoky flavor in our food.
  • After taking the pulp from the mangoes,measure it in a cup.Take grated jaggery that is twice the measure of mango pulp.In my case,i got 1/2 cup(heaped) of pulp.So i used 1 cup (heaped) of grated jaggery.
Aam panna recipe
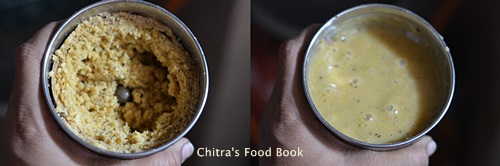
  • In a mixie jar,take the pepper corns,roasted cumin powder,Black salt and cardamom seeds.Powder it nicely.To this powder,add jaggery and pulse it twice.
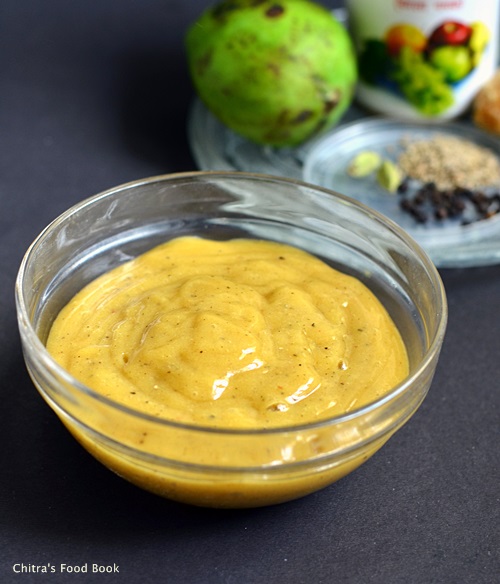
  • Lastly add the mango pulp and grind it well to make a smooth paste.No need to add water.Aam panna concentrate is ready. Remove the paste using a clean spoon and store in a bottle.
Aam panna recipe
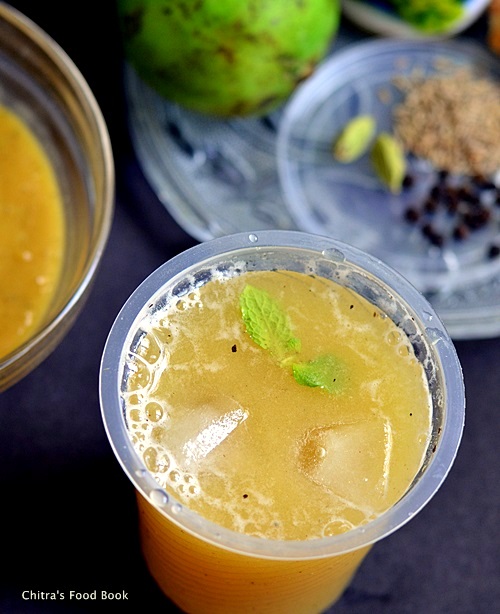
  • To make this drink,take 2 tbsp of concentrate and mix in a cup of water(200ml).Check the taste and add more paste or water based on your taste.Enjoy adding few ice cubes and mint leaves.

Note

  • Follow method 1 or 2 based on ur liking.
  • The ratio of mango pulp and jaggery should be 1:2
  • You can also use sugar instead of jaggery.
  • Black salt gives a nice flavor to this drink.so don’t skip it.

aam ka panna

Enjoy this flavorful,refreshing drink and beat the heat !
aam ka panna recipe

الاثنين، 23 مارس 2015

Chana Vada (Chana Dal Peanut Patties) with a Tamarind Chili Sauce

channa dal vadi with tamarind sauce

I will admit that I have a hard time keeping up with all of the different names for Indian dishes, as the cuisine varies so much depending on every region's unique traditions and influences. Indian savories often have me a bit confused, even though I started cooking Indian food soon after adopting a vegetarian diet, and that was over twenty years ago.

One thing I do know is that Indian appetizers have always been one of my favorite aspects of dining out, and since growing keen on experimenting in my own kitchen, there is no match for homemade preparations. With some research and control over the quality of your ingredients and process, eating out will in all likelihood pale in comparison. I now find most of the offerings from local establishments greasy and bland in comparison to homemade. The only drawback is that many breads, patties, balls and fritters can take time and be a bit messy. It really is worth the effort though and oftentimes the savories, such as these chana dal patties complete with some tamarind sauce in this instance, easily make up the main portion of a lighter meal if the temptation to indulge doesn't overwhelm.

Vadas seem to be a new favorite of mine. Popular in South India traditionally, vadas are fried savories usually made with dal and spices that are now popular in many parts of India and beyond. Often disc or doughnut shaped, this popular street food can be eaten for breakfast or as a snack with any variety of chutneys, and are a fine feature of any celebratory meal.

These chana dal and peanut vadas came together in very little time at all, and instead of the usual deep-frying method I shallow fried them for a healthier appetizer or meal accompaniment. I adore little bites and I'm always happy to serve them up as the star of the meal. Serve with rice and a side vegetable curry and rest assured no one will leave the table hungry. The peanuts not only provide extra protein and nutty flavor but also serve to help bind the cake together, without any need for excess oil, eggs or flour. I was pleasantly surprised how well they held together when frying and after they were gone, I was eager to make up another batch. The thick, creamy coconut milk, tamarind and chili sauce that I served them with was the crowning glory.

chana dal peanut patties

I adapted this recipe from Raghavan Iyer's comprehensive guide to Indian cooking, 660 Curries. His book occupies a treasured space on a prominent bookshelf in my kitchen, and with so many ideas, including fusion-style dishes, I never get bored of exploring his tried and tested recipes and exploring new delights awaiting the curious and eager cook. Whether a novice or an experienced cook, I'm certain anyone with a keen interest in Indian cooking will embrace this book as I have for many years and many more to come.

Chana Vada (Chana Dal Peanut Patties) with a Tamarind Chili SauceChana Vada (Chana Dal Peanut Patties) with a Tamarind Chili Sauce
Recipe by
Adapted from 660 Curries
Cuisine: Indian
Published on March 23, 2015

Shallow-fried Indian spiced chana dal and peanut patties served with a tangy, creamy and zesty tamarind, chili and coconut milk sauce

Print this recipePrint this recipe

Vadas:
  • 1 cup dried split chana dal or yellow split peas
  • 1/4 cup unsalted peanuts
  • 1/2 cup unsweetened dried grated coconut, soaked in 1/2 cup boiling water for 15 minutes and drained
  • 4 green chilies, seeded and chopped
  • 1-inch piece ginger, finely sliced
  • 1/2 cup fresh cilantro leaves, finely chopped
  • 1 1/2 teaspoons sea salt, or to taste
  • 1/2 teaspoon turmeric
  • 1/2 teaspoon ground cumin
  • 1/2 teaspoon paprika
  • 1/4 teaspoon asafetida
  • 2 tablespoons coconut oil or other cooking oil for frying
Sauce:
  • 1 teaspoon tamarind paste
  • 2/3 cup coconut milk
  • 2 teaspoons garam masala
  • 1/2 teaspoon sea salt
  • 2 dried whole red chilies, crushed
  • 2 tablespoons fresh cilantro, finely chopped
Instructions:
  • Thoroughly rinse the chana dal or yellow split peas. Transfer to a medium bowl, add the peanuts, and soak for 2 hours in several inches of water.

  • Meanwhile, soak the grated coconut in 1/2 cup boiling water for 15 minutes, then drain and set aside.

  • Drain the dal or split peas and transfer to a food processor. Add the coconut, chilies and ginger. Process until the mixture is well blended and turns into a fairly thick paste. Transfer to a medium bowl and stir in the cilantro, sea salt, turmeric, cumin, paprika and asafetida. Cover the bowl with plastic wrap and place in the refrigerator for about 30 minutes.

  • Meanwhile, make the sauce. Whisk together the tamarind paste, coconut milk and about 1/4 cup water in a small saucepan. Stir in the garam masala, salt, chilies and cilantro. Bring to a gentle boil, reduce the heat to medium, and stir occasionally until the sauce is thickened, about 10 minutes or so. Set aside until ready to serve the patties.

  • Shape about 1 to 2 tablespoons of the vada mixture into small patties about 1/2 inch thick and 1 1/2 to 2 inches wide, and place on a plate.

  • Line a few plates with paper towel and heat the oil in a large non-stick skillet over medium heat. When hot, fry the patties in batches, taking care not to overcrowd the pan. Cook for about 5 minutes on each side, until golden brown. Remove from the pan with a slotted lifter and let drain on the towel-lined plates. Repeat until all the patties are cooked.

  • To serve, place a few of the prepared patties on a plate and drizzle with sauce.

Makes 15 to 18 vadas

chana dal patties with tamarind chili sauce

I'm sharing this with Jacqueline's bookmarked recipe event and also My Legume Love Affair, a monthly event celebrating all things legumes, started by lovely Susan of The Well Seasoned Cook, now administered by me and kindly hosted this month by Siri. There is still time to submit a recipe to both of these vegetarian recipe roundups.

Other little bites you are sure to enjoy from Lisa's Kitchen:
Potato Patties Stuffed with Spiced Green Peas (Aloo Matar Tikki)
Chickpea Potato Koftas with Ricotta Cheese
Paneer Tikka Masala
Vegetarian Samosa Cakes with Tamarind Chutney

On the top of the reading stack: Sweetly Raw Desserts: Raw Vegan Chocolates, Cakes, Cookies, Ice Cream, and More by Heather Pace

Audio Accompaniment: chirping birds

الأحد، 22 مارس 2015

Ugadi Lunch Menu-Karnataka Style

Karnataka lunch menu
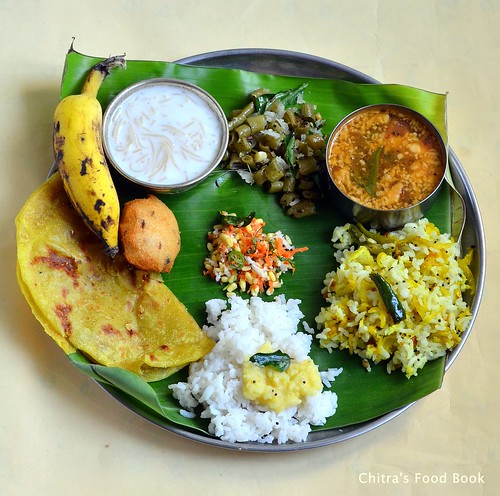
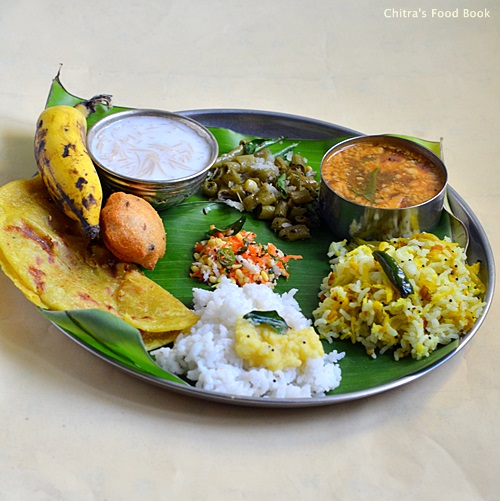
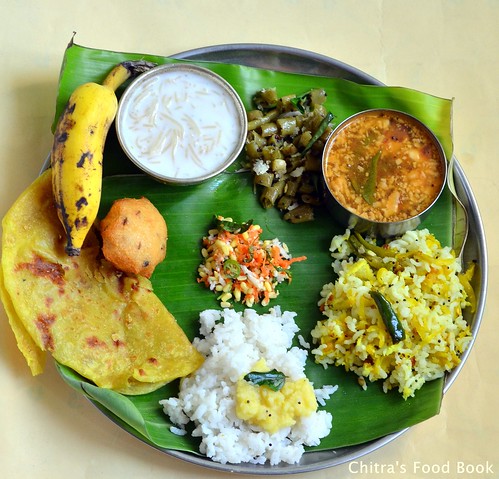
Friends,this week i have shared a lunch menu instead of Sunday biryani recipe.Sorry for disappointing u all.Yesterday i made this simple yet delicious lunch menu for Ugadi celebration.So i thought of sharing that platter here.Its been my long time wish to post a Karnataka style lunch menu in my blog.So I took Ugadi festival as an opportunity and made a simple lunch menu.After i prepared Holige successfully,i asked my friends to suggest me an easy lunch menu idea for Ugadi festival.Based on their suggestions,i made Obbattu,Obbattu saaru,Maavinakayi chitranna,Mysore Bonda,Beans palya,Shavige payasa,dal,plain rice and the most popular Kosambari recipe.Also Megha suggested me a very easy recipe for Obbattu saaru.As i had made Obbattu in the previous day,making this menu was easy for me.In this post,i have shared the recipes of Kosambari( using moong dal ) and beans palya.I will make a separate post for Obbattu saaru and Maavinakayi chitranna soon.Now lets see this yummy Karnataka lunch menu recipes for Ugadi festival.
Check out my other lunch menu posts here Happy
 Ugadi lunch menu

Ugadi Lunch Menu


Ugadi Lunch Menu Ugadi Lunch Menu Recipes-Karnataka style
Cuisine: Indian
Category: Lunch menu
Serves: Serves2
Prep time: 30 Minutes
Cook time: 1 Hour
Total time: 1H30M


INGREDIENTS
Kosambari recipe
  • Yellow moong dal - 2 tbsp
  • Carrot - 1 no small
  • Green chilli - 1 no
  • Cucumber- a small piece
  • Coriander leaves - 2 tbsp
  • Grated coconut - 3 tbsp
  • Salt - as needed
To temper
  • Cooking oil - 1 tsp
  • Mustard seeds - 1/4 tsp
  • Curry leaves - few
  • hing/asafetida - a pinch ( optional)
Beans palya recipe
  • Beans - 20 nos
  • Grated coconut - 1/4 cup
  • Green chillies - 2 -3 nos
  • Salt & water - as needed
To temper
  • Cooking oil - 1 tbsp
  • Mustard seeds - 1/2 tsp
  • Urad dal - 1 tsp
  • Curry leaves – few
Click these links for other recipes
METHOD

  • I assumed that u have made obbattu/Holige the previous day and shared the procedure of making other dishes below.
  • To make this menu,pressure cook one cup of rice along with moong dal in a small closed container.Soak tamarind in water for 20 minutes.Wash and soak urad dal for mysore bonda for 45 minutes.Rice and dal will be done in 15 minutes.
  • In another burner,boil the vermicelli and let it cook.In the mean time,wash and peel the skin of raw mango.Grate it and finely chop the green chillies.Heat a pan and do the tempering,add green chillies and grated mango.Saute well adding salt and turmeric powder.Mix well till mangoes get cooked.Lastly add the grated coconut,saute for a minute and switch off the flame.After the pressure is released,spread the rice in a plate and let it cool.Add this maavinakayi paste and mix well adding sesame oil.Adjust salt and garnish with coriander leaves.
  • Now vermicelli will be cooked well,add milk,sugar and roasted nuts and remove from the flame.Set aside.
  • To make kosambari,first wash the moong dal,drain the water and soak it for 30 minutes.After 30 minutes,drain all the water completely and add grated coconut,grated carrot,finely chopped cucumber,green chillies and coriander leaves.Mix well.Add salt just before serving otherwise this mixture will leave more water while serving.So add salt only before serving.Lastly do the tempering and Kosambari is ready.
  • For beans palya,wash and chop the beans into small circles.Heat oil in a kadai and temper mustard seeds,urad dal and curry leaves.Add finely chopped green chillies and beans.Add the required salt and saute well for few minutes.Sprinkle some water and cover cook the beans till its done.Mix it once or twice in the middle.Add the grated coconut in the end,give a stir and switch off the flame.Beans palya is ready.
  • Lastly u can do the obbattu saaru by using the reserved dal water.I will share obbattu saaru recipe soon.By now,urad dal would have been soaked well.Grind the batter and make bonda.Serve saaru and bonda really hot to get its best taste.So i made it at the end.
You can finish the entire process within an hour if u plan it right.Serve everything hot and enjoy !

Try this easy yet yummy lunch menu and enjoy Habbada Oota on this auspicious day !

 Ugadi lunch menu

الخميس، 19 مارس 2015

Urad and Toor Dal with Fresh Fenugreek

Urad and Toor Dal with Fresh Fenugreek

Sometimes a gentle Indian meal with split dal is just the thing I crave. I adore the creamy texture and mellow yet unique flavor of urad dal mixed with toor dal and smoky, aromatic spices. Fresh fenugreek is a must in this dish and it was a delight to find some at my local Indian grocery store. It imparts a slight bitterness and pepperiness but a highly pleasing and subdued contrast to the tomato and spice components of the dal. I served it with hot white basmati rice, but it certainly would go well with naan or any other Indian flat bread and a side vegetable dish to complete the meal.

I'm reposting this recipe from the archives with some updated photos and revisions.


Urad and Toor Dal with Fresh FenugreekUrad and Toor Dal with Fresh Fenugreek
Recipe by
Cuisine: Indian
First published on April 23, 2010

Simple dal and tomato curry seasoned with fresh peppery fenugreek leaves

Print this recipePrint this recipe

Ingredients:
  • 2/3 cup skinless split urad dal, rinsed
  • 1/3 cup toor dal, rinsed
  • 1 2/3 cups water
  • 1 teaspoon turmeric
  • 1 cup fresh fenugreek leaves, chopped
  • 2 teaspoons coconut oil, sesame oil or ghee
  • 1-inch piece ginger, finely chopped
  • 3 green chilies, seeded and finely chopped
  • 2 large tomatoes, finely chopped
  • 1 to 2 teaspoons sea salt, or to taste
Tempering:
  • 1 tablespoon coconut oil, sesame oil or ghee
  • 1 teaspoon brown mustard seeds
  • 1 teaspoon cumin seeds
  • 1/2 teaspoon fenugreek seeds
  • 1/2 teaspoon asafetida
  • 1/2 teaspoon chili powder
  • 1/2 teaspoon amchoor powder (optional)
Instructions:
  • Soak the urad dal and toor dal in enough water to cover for at least 1 hour. Drain, transfer to a medium saucepan, and add 1 2/3 cups of water and the turmeric. Bring to boil, reduce the heat to low, cover, and simmer until the dals are soft, stirring occasionally to ensure the water does not boil away, about 30 to 40 minutes.

  • Add the fenugreek leaves to the pot and stir.

  • Heat the oil or ghee in a frying pan over medium heat. When hot, toss in the ginger and chilies and stir for a few minutes. Add the tomato and salt to the pan and cook until the tomato begins to soften and thicken. Add the tomato to the dals, bring to a boil again, reduce the heat to low, and simmer for another 5 to 10 minutes, whisking occasionally. Turn off the heat.

  • For the tempering, wipe the frying pan down and heat the oil or ghee over medium heat. When hot, add the mustard seeds, cumin seeds and fenugreek seeds. Stir for 30 to 60 seconds or until the mustard seeds turn grey and begin to splutter and pop. Add the asafetida, chili powder and amchoor if using, stir a few times, and then immediately pour into the dal. Stir once and cover immediately. Let stand for 5 minutes to let the smoky flavor of the tempering diffuse into the dal. Stir well to combine and serve hot.

Makes 4 to 6 servings

Urad Dal with Fresh Fenugreek

More urad dal recipes from Lisa's Vegetarian Kitchen:
Urad Dal with Tomatoes
Fennel Flavoured Ural Dal Soup
Urad Dal with Tomatoes, Spices and Coconut

Audio Accompaniment: Arc of Passion by Steve Roach
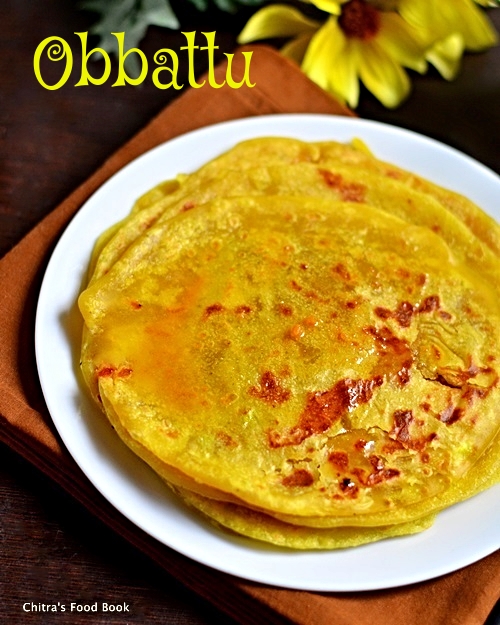
Holige/Obbattu/Puran Poli Recipe-Ugadi Recipes

Obbattu recipe
Wish u all a very happy Ugadi Happy.
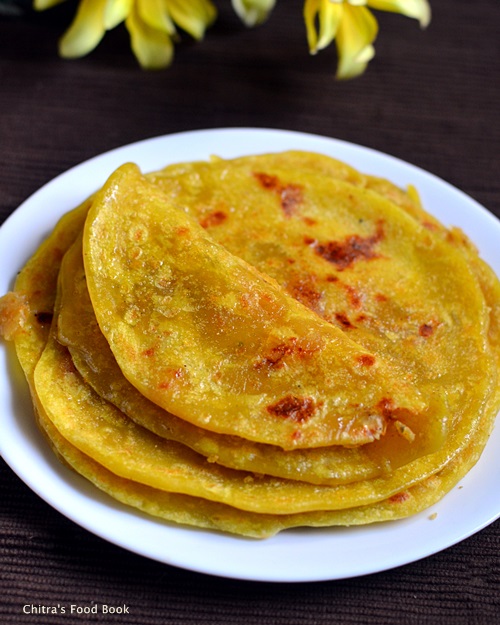
We Tamil people don’t celebrate Ugadi but being in Bangalore for the past ten years,i wanted to celebrate Ugadi at least by making holige.Holige/Obbattu is considered to be one of the most important Neivedyam recipes for Ugadi. People in Andhra & Karnataka make this obbattu on Ugadi day along with Mango pachadi or Maavinkayi chitranna and vada.As u all know,Holige/Obbattu is the most popular neivedyam recipe of Karnataka & Andhra as well.In Andhra,they call it as Bobatlu.Here in Bangalore,people make this holige not only for offering GOD,its a must serve sweet in weddings,Sathya Narayana pooja and for festivals like Ugadi,Vara mahalakshmi pooja etc.Here people make it with two different stuffing.One using dal ( bele obbattu) and the other one with coconut(Kayi obbattu).But the most famous one is bele obbattu with toor dal. In Tamil nadu, we call this as Boli/Poli and we make the stuffing with chana dal.In North India,it is called as Puran poli.I am not a big fan of this sweet recipe but i love Obbattu saaru( a spicy rasam kind of gravy made from the stuffing and the cooked dal water)sooo much.I will try to share that recipe tomorrow.My husband Sendhil loves obbattu like anything.He loves to have it hot hot drizzled with a tsp of gheeDrooling.I have tasted holige in my school moms friends houses and in marriage feasts.My friends make it extremely soft and tasty.So with the help of Megha and Tara’s recipes,i tried holige after a long time to make a special post for Ugadi festival.By God’s grace,it came out well and soft as i expected but not 100% like my friendsThinking. No worries.Practice makes a man perfect.After this successful attempt,i am pretty much confident of making it perfect next time.But i became very happy when Sendhil gave thumbs up with a broad smile on his face.Party.So its a hit recipe in my home.I have mentioned all the possible tips and tricks shared by my friends.Hope it will be useful for beginners.Now lets see how to make Karnataka special Holige/Obbattu recipe with stepwise pictures in detail ! Please don’t forget to go through the “Points to remember” before u start making it.
Points to remember
  1. Please be generous in adding oil.Oil helps u to get a really soft holige.So use the mentioned quantity of oil strictly.U can add more oil but definitely not lesser the given quantity.
  2. My friend Tara use the combination of maida and chiroti rava in the ratio of 2:1 for making the dough but Megha uses only maida.Here i used only maida as i din’t have chiroti rava in hand.
  3. You should knead the dough at least for 5-7 minutes adding oil in regular intervals.Its a very important step.
  4. Holige/Obattu dough needs to be fermented and soaked in oil at least for 8 hours to achieve the best result.I.e.If u want to make obattu in the evening around 6 pm,i suggest u to make the dough in the morning around 7 pm.This tip was shared by TaraHappy.This time i fermented the dough for just 4 hours as i wanted to click the pictures before sun light goes off.Next time,i am planning to soak the dough over nite.
  5. Rolling the dough along with stuffing also plays a major role in bringing out soft obattu.Do not roll the holige too thin or too thick.You can either pat it using your hands or use a rolling pin by keeping the dough between two greased obbattu sheets which is easily available in Market.If u don’t get it,use oil sheets or any plastic sheets.
  6. Make sure the size of maida dough should be half the size of stuffing ball .This helps in uniform spreading of stuffing all over the holige.
  7. Always cook the obbattu in medium flame and never forget to drizzle a tsp of oil around the corners and all over the obbattu to get a shiny look.
  8. To keep the obbattu stay soft for long time,always stack the cooked obbattu one over the other after they turn warm.Keep it covered till u eat.
  9. Last but not the least,serve the obbattu adding few tsp of melted ghee topped with it.If desired,u can add warm milk too.This is how it is served in Wedding feasts here.This combo is just out of the worldDrooling
Obbattu recipe

Obattu/Holige recipe


Obattu/Holige recipe How to make obattu/Holige recipe for Ugadi festival
Cuisine: Indian
Category: Sweet
Serves: 10 nos
Prep time: 8 Hours
Cook time: 5 Minutes
Total time: 8H5Minutes


INGREDIENTS

  • Maida/All purpose flour - 1 cup (levelled)
  • Cooking oil - 1/4 cup + Extra while cooking holige ( total 1/3 cup) 
  • Turmeric powder - 1/8 tsp
  • Salt - a pinch
  • Water – to make dough ( I used nearly 1/2 cup + 2 tbsp.But it may vary)
For stuffing
  • Toor dal or chana dal – 1/2 cup
  • Grated/powdered jaggery – 3/4 - 1 cup
  • Grated coconut - 1/4 cup
  • Cardamom - 2 nos
  • Water - as needed
METHOD

  • Prepare the dough part first. For this,take 1 cup of flour and add turmeric powder and  a pinch of salt to it.Mix well.Make a dent in the center and add water little by little. Make a slightly sticky dough.
Obbattu recipe
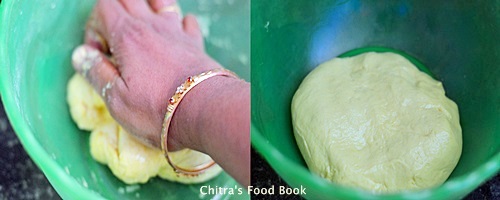
  • Take 1/4 cup of oil in a bowl & add 1 tsp of oil to the dough.Start kneading using your palm.Knead it for a minute and add another tsp of oil whenever the dough sticks to ur hands.Repeat the same thing until the dough is completely non-sticky and soft.I used nearly 6-7 tsp of oil.Knead the dough for 6-8 minutes.
Obbattu recipe
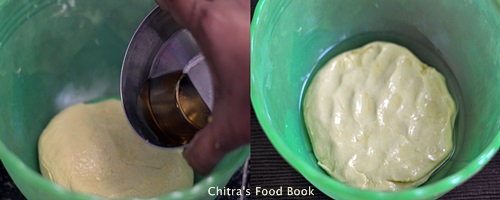
  • Now pour the remaining oil over the dough.The dough would be immersed in oil and it will be soaked.Close the bowl with a lid and leave it for 6-8 hours minimum.
Obbattu recipe
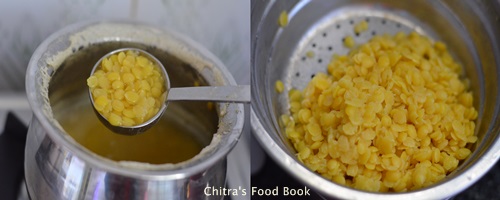
  • Next comes the stuffing part.Boil toor dal in an open bowl or pan adding 4 cups of water.Let the dal cook till it blossoms and not mushy.ie.the dal should be mashable by hands but it should look firm and stay in shape.So never pressure cook the dal for stuffing.It will make the dal mushy.
Obbattu recipe
  • After the dal is cooked,drain all the water and collect it in a bowl.Use this dal water for making obbattu saaru.
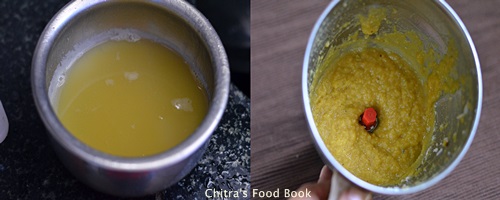
  • Now take the cooked dal,grated coconut,grated jaggery and cardamom in a mixie jar and grind it well to make a paste.
Bele obbattu recipe
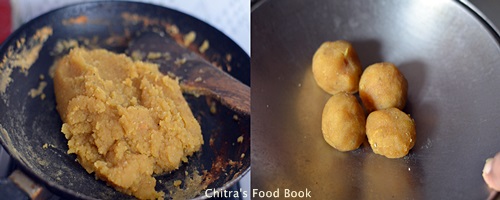
  • If u feel the mixture is watery and too wet to handle,saute & cook the mixture in a hot pan till it becomes like a whole non-sticky mass without moisture content.If the mixture is hard and non sticky,cooking the stuffing is not needed.Take the stuffing and make lemon sized balls out of it.Cover the balls and set aside.Reserve 2 balls of stuffing to add in obbattu saaru. 
Bele obbattu recipe
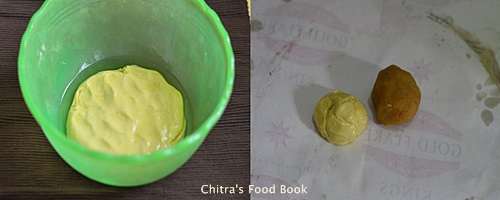
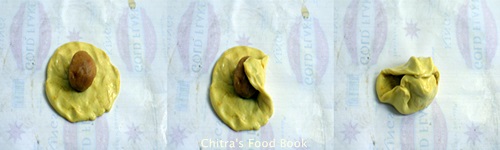
  • After the obbattu dough is rested for 8 hours,take it and pinch a big gooseberry sized ball out of it.The size of dough ball should be half the size of stuffing ball.Keep the ball in a greased obbattu sheet( U get in shops) and spread it lightly like a poori.Make sure the corners are thinner than the center portion.Now keep the stuffing ball in the middle and cover the stuffing with the dough.
Obbattu recipe
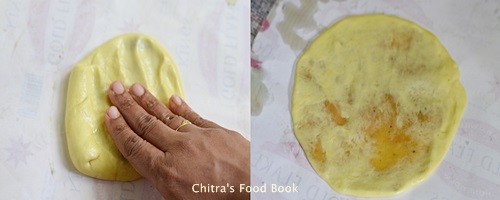
  • Press it using your hands and pat it as much as possible distributing the stuffing evenly all over the holige. Make it medium thin Or thick as u like(If u make polis too thick,it may turn out hard).
Obbattu recipe
Obbattu recipe
  • Heat a dosa tawa(Iron griddle is best) and drizzle few drops of oil.When the pan is heated,take the obbattu sheet and invert it over the tawa.Just drop the holige and remove the sheet.Spread it well.Cook it by adding a tsp of oil.Cook both the sides in medium flame till holige cooks with golden brown spots.Remove in a plate and serve it hot hot adding milk and Ghee generously.Tastes great!!
Obbattu recipe
  • Repeat the same for all the dough and stuffing.Stack the holige and store it.It will stay good for a week provided u cook the stuffing part without moisture.


Note

  • Please refer “Points to remember” given above before u start making obbattu.All the best !!


Enjoy making this Karnataka’s most popular Obbattu for Ugadi Habba Happy.Wish u all a very happy Ugadi festival celebration !!
OBBATTU RECIPE