‏إظهار الرسائل ذات التسميات TAMIL NEW YEAR RECIPES. إظهار كافة الرسائل

الثلاثاء، 13 يناير 2015

Kalkandu Pongal/Kalkandu Sadam Recipe-Pongal Recipes


Kalkandu pongal recipe
Kalkandu( Rock sugar in English & Kal Sakkare in Kannada) sadam aka Kalkandu pongal was in my to-do list for years.I had a recipe in my cook book which was waiting for me to try.Pongal is around the corner.This is the perfect time to blog this recipe.Actually it was mentioned as kalkandu bath recipe in my book.But whatever be the name,its method was very similar to our sakkarai pongal/sweet pongal using milk & sugar.I tried it this morning for the first time and it came out finger licking good.We all loved it very much.I packed it to my school moms friends.Everybody liked it so much & gave thumbs up!! This kalkandu pongal is a very rich sweet rice recipe.We can make it for any special occasions & festivals.Rice cooked in milk gives a super rich taste & flavor.Please don’t forget to add the spices i’ve given here.That’s the highlight for this recipe.One thing i would like to say is “ Do not compromise on the quantity of ghee”.It not only makes the pongal tasty but also helps to balance the body heat developed by rock sugar.My MIL usually tells us to consume moderate quantity of kalkandu pongal because over eating may upset your stomach ( ie may cause loose motion trouble).I am not sure about this.So take care and consume less.
Ok,Lets see how to prepare this yummy kalkandu pongal/rock sugar pongal.
Wish u all a very happy Pongal 2015 !
அனைவருக்கும் எனது இனிய பொங்கல் நல்வாழ்த்துக்கள் !! Happy
Kalkandu sadam recipe 

Kalkandu pongal recipe


Kalkandu pongal recipe Kalkandu pongal for thai pongal festival !
Cuisine: Indian
Category: Sweet
Serves: Serves 4
Prep time: 5 Minutes
Cook time: 15 Minutes
Total time: 20 Minutes


INGREDIENTS

  • Raw rice - 1/2 cup
  • Yellow moong dal – 1 tbsp(optional,i dint use)
  • Raw milk - 2.5 cups
  • Water - 1/2 cup
  • Sugar candy/rock sugar - 1/2 cup( heaped) OR Powdered rock sugar - 3/4 cup+2 tbsp
  • Salt - a pinch
Spices for flavor
  • Ghee - 3-4 tbsp
  • Cardamom - 2 seeds( crushed)
  • Cloves - 1 no
  • Saffron threads - few
  • Nutmeg/Jathikai - a very small piece
METHOD

  • Wash and soak the rice for 10 minutes.In the mean time,boil raw milk + water in a pressure cooker base.When it comes to a boil,add the washed rice draining the water.Let it pressure cook in low flame for one whistle.It takes nearly 10-12 minutes.After the steam is released,remove the lid & mash the rice well.Keep aside ( Note : If u want to add moong dal,roast it in a tsp of ghee & add to pressure cooker along with rice.)
Kalkandu pongal step2

  • Take the rock sugar and break it using a hammer or rolling pin by wrapping it in a news paper.Now it will be broken into small pieces & easy to powder in mixie.If u grind the rock sugar without breaking,mixie blade may break.So its better to follow this procedure.Suppose if u have small candies ( ie diamond kalkandu)u can powder it directly.
Kalkandu pongal step1

  • After opening the cooker,add the powdered rock sugar & mix well.It will melt soon & mixes with the rice.The mixture will become watery now.Keep stirring by adding a tbsp of ghee. Keep the flame medium.
Kalkandu pongal step3
  • In the mean time,roast the cashews,clove & nutmeg.Powder the nutmeg & cardamom.Add it to the pongal.Add saffron threads too.Mix well.After some time,Pongal will turn thick and start to leave the sides of cooker.Now add all the remaining ghee along with roasted cashews.Remove & let it cool.No problem if the pongal is slightly thin.It will thicken completely once its cooled down.
    • Please make sure the pongal has moisture content when u switch off. ( ie it should be slightly watery n mushy. Don’t make it very thick .) This is very important ..
    • Once it cools down,the consistency will be correct else it will  become very hard.If u feel , all the water is absorbed and if it looks dry , add little boiled milk, Mix well and switch off the flame.
Kalkandu pongal step4
Add a tsp of ghee & serve.
Enjoy !


Note

  • I have not used moong dal as per the recipe given in the book.If u wish to add,roast it in a tsp of ghee & add to rice in cooker.
  • Adjust the quantity of sugar candy as per your taste.I felt the ratio of rice & rock sugar should be 1:1.5 for perfect sweetness.U can also add 1:2 ratio if u have sweet tooth.
  • Do not compromise in the quantity of ghee.It not only makes the pongal tasty but also helps to balance the body heat developed by rock sugar.
  • My MIL usually tells us to consume moderate quantity of kalkandu pongal because over eating may upset your stomach ( ie may cause loose motion trouble).I am not sure about this.So take care and consume less.


Prepare this rich,creamy,delicious kalkandu pongal for this pongal festival and have a great celebration !
Once again, i wish u all a very happy pongal Happy
Kalkandu-pongal

الاثنين، 25 أغسطس 2014

EASY PAAL KOZHUKATTAI RECIPE WITH COCONUT MILK & SUGAR

kozhukattai recipe for ganesh chathurthi
As u all know,Paal kozhukattai is an yummy Chettinad dessert recipe.It is loved by all irrespective of ages.I should have made this post for Gokulashtami but I din’t.Now I am posting this easy paal kozhukattai recipe for my Bachelor friend , Jayagopal.He wanted to make it for potluck party in his office this week.So he told me share this recipe as soon as possible.This is not the authentic chettinad version though.I must learn that and post here soon. Actually i had planned to post some Ganesh chathurthi recipes as the festival is around. But then i thought,this is also a variety of kozhukattai which we can make easily & offer Lord Ganesh.” Pillayaar paal kudikum podhu,Paal kozhukattai sapda maattaaraa ?? Batting Eyelashes“.By keeping that in mind,i prepared this easy paal kozhukattai version using milk,coconut milk powder & sugar as Vinayagr chathurthi special recipe.It was tasting great. I had already shared my MIL’s Paal kohukattai recipe with jaggery which is Sendhil’s most favourite recipe.But i love this version more than that Love Struck.So i usually make it more often for myself and Raksha as evening snack or dessert for your guests.Special thanks to my friend Jayagopal, otherwise i would not have done this post even now Happy.Ok,Lets see how to make this yummy and easy paal kozhukattai recipe.

Easy paal kozhukattai recipe

Easy paal kozhukattai recipe


Paal kozhukattai recipe Easy paal kozhukattai recipe using coconut milk powder,milk and sugar
Cuisine: Indian
Category: Sweets
Serves: 2 persons
Prep time: 10 Minutes
Cook time: 15 Minutes
Total time: 25 Minutes


INGREDIENTS
  • Store bought rice flour - 1/2 cup
  • Water - 1/2 cup + 2-3 tbsp (for dough)
  • Gingely oil – a drop
  • Salt – a pinch
  • Sugar – 2 tbsp
  • Boiled milk – 1/2 cup
  • Coconut milk powder - 1 tbsp
  • Cardamom seeds - 1 no (crushed)
  • Saffron threads - few
METHOD

  • In a wide bowl , take the rice flour.Add a pinch of salt ,mix well & set aside.
  • Boil water adding a drop of gingely oil.when the water starts to boil,initially u can see some small bubbles on the bottom and sides of vessel.After few minutes,water will start to roll boil with big bubbles.Switch off the flame as soon as water starts to roll boil with big bubbles.
Paal kozhukattai 1
  • Add the boiled water to the rice flour little by little and mix well.Rice flour may not take all the water.Stop adding water as soon as u get a non-sticky dough.If u feel the dough is dry,add little more hot water.Make sure the dough is not sticky.Knead the dough when it is warm.Make small balls of seedai size by greasing your fingers.Cover it till use.
Paal kozhukattai 2
  • Now boil water in idli pot or in a kadai.Grease the idli plate with oil and spread the balls.If u are using kadai,keep the balls in a small plate.Place a small wide bowl and keep the plate over the bowl.Cover the kadai and cook for 5 – 10 minutes.
Paal kozhukattai 3
  • In the mean time,mix 1 tbsp of coconut milk powder in 1/2 cup of boiled n cooled milk without any lumps.To this add sugar, saffron thread and cardamom powder.Stir well.
Paal kozhukattai 4
  • Allow it to boil for 2 minutes in medium flame.Milk will thicken slightly.To this, add the cooked rice balls and boil for few seconds.
  • Remove and serve warm or cold.

Note
  • U can cook the rice balls directly in milk instead of cooking in idli pot.In that case,use 1/2 cup of milk + 1/2 cup of water.Cook till rice balls float on top.Now mix 1 tbsp of coconut milk powder in 1/4 cup of milk and add to the cooked rice balls.Boil for a minute and switch off the flame.Add cardamom powder & few saffron threads. Mix well and serve !
  • I cooked the rice balls in idli plate to ensure proper & easy cooking.Also balls won’t break or dissolve.
  • The consistency of dough is important for getting soft rice balls. No problem even if u make the dough little sticky.U can grease ur hands with oil and make balls.But if u make the dough hard and dry,u will never get soft balls.so please add water carefully.
  • If u don't have coconut milk powder in hand,use 1/2 cup of grated coconut.Grind & take thick coconut milk adding 1/2 cup of water.Add to the milk at the end.Give a boil in low flame & switch off.


Make this easy paal kozhukattai and offer to GOD Smile
Paal kozukattai

الجمعة، 11 أبريل 2014

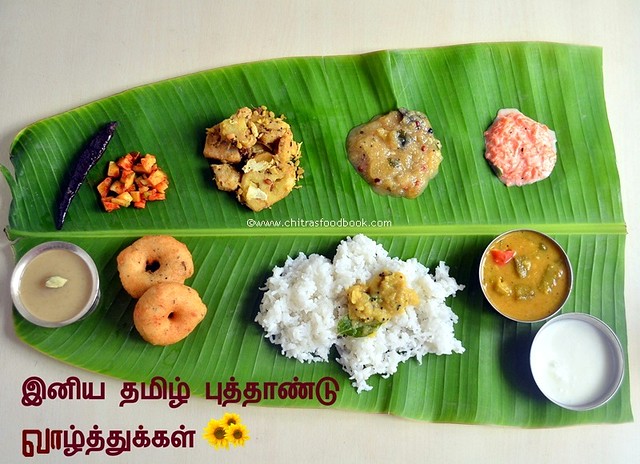
TAMIL NEW YEAR LUNCH MENU RECIPES(VARUSHA PIRAPPU MENU)


Tamil Varusha pirappu/Tamil puthandu is celebrated on the first day of Tamil month chithirai.Every year it falls on April 14th.Its a most important festival for us.We make a simple yet inviting lunch menu with sambar,poriyal or kootu,2 pachadi varieties,vada,payasam and curd.Neer mor and Panakam should be prepared only when we keep panchangam in neivedyam otherwise it is not necessary.Among these recipes,Mango pacahdi,Payasam and Vada are mandatory.We don’t keep appalam as it is not homemade.But Mor milagai i have kept is homemadeWinking smile.I will share that recipe next week.
.Actually I planned to post this lunch menu during last tamil new year but couldn’t, as i was in Salem.Yesterday i asked my MIL and prepared this menu with the vegetables i had in hand.Sendhil loved the entire platter & especially he gave credits for Vendakkai sambar.He had the same for dinner too.I will post sambar recipe tomorrow as i want to have it as a separate post in my food book.In this post,i have shared raw banana curry and carrot raita recipe.I have also shared other options for making this lunch menu.Do visit the links for other recipes.Try this No onion No Garlic lunch menu for Tamil New year.Let this year be filled with happiness & fortune!!
அனைவருக்கும் எனது இனிய தமிழ் புத்தாண்டு நல்வாழ்த்துக்கள் Smile


Tamil New year lunch menu recipes


Tamil New year lunch menu recipes Tamil New year lunch menu recipes - Paruppu,Vendakkai sambar,Raw banana curry,Carrot pachadi,Raw mango pachadi,Rice payasam,Pepper vada,Instant Mango pickle
Cuisine: Indian
Category: Lunch menu
Serves: Serves 2
Prep time: 30 Minutes
Cook time: 60 Minutes
Total time: 90 Minutes


RECIPE LINKS

Check out THIS POST for Tamil new year celebration procedure


RAW BANANA PORIYAL/CURRY RECIPE

Prep time-5 min | Cook time-10min | Total time-15mins
Ingredients
  • Raw banana -  1 no
  • Sambar powder – 1 tsp
  • Salt & water – as needed
  • Moong dal – 1 tbsp
  • Grated coconut – 3 tbsp
  • Tamarind –  A very small piece(optional)
  • Asafetida/hing – 2 pinches
To temper
  • Mustard seeds- 1/2 tsp
  • Urad dal – 1/2 tsp
  • Finely chopped ginger – 1/2 tsp
  • Curry leaves – few
  • Coconut oil – 1 tbsp
Method
  • Wash and peel the skin of raw banana.Remove and cut the raw banana into slices.Keep immersed in water till use to avoid discoloration.
  • In a cooking bowl,take the moong dal,raw banana,sambar powder,salt and a small piece of tamarind with required water and salt.
  • Cook until raw banana becomes tender.Make sure it is not over cooked.It should stay firm in shape.If u prick the cooked raw banana with a fork,it will go easily at the same time it will not break.
  • Remove and drain all the excess water..
  • In a kadai,temper all the ingredients given above and add the cooked raw banana,moong dal mixture.Saute well in low flame for 5 minutes.Make sure u don’t break the veggie.Do it gently.Lastly add grated coconut,mix well and saute for 2 minutes.Switch off the stove.
Serve with sambar sadam !
NOTE
  • Adding tamarind is optional but it helps to reduce the slight bitterness from raw banana.Add very little tamarind otherwise poriyal will become too tangy.
  • Adjust sambar powder as per ur need.Sometimes i add red chilli powder + sambar powder half n half.

CARROT RAITA/THAYIR PACHADI

Prep time – 5 mins | Cook time-2 mins | Total time – 7 mins
Ingredients
  • Carrot – 1 no
  • Curd – 1/2 cup
  • Salt – as required
  • Green chillies – 1 no (finely chopped)
  • To temper
  • Cooking oil – 1 tsp
  • Mustard seeds – 1/2 tsp
  • Urad dal – 1/2 tsp
  • Curry leaves – few
Method
  • Wash and grate carrot.Take in a bowl with finely chopped green chillies ,required salt.
  • Just before serving,mix the curd and temper the above said ingredients.
Serve with dal rice/paruppu sadam!

Make this yummy platter on Tamil New year day,Offer to God,Get his blessings and enjoy !


الجمعة، 9 أغسطس 2013

Wheat Flour Appam-Festival Recipes


appam-sweet version

I wanted to post this recipe in my blog for long time. I learnt this from my MIL. She makes this for occasions/festivals  & for guest as evening tiffin along with filter coffee.She makes a savoury version too.I’ll post it soon.Mostly my MIL makes this appam with maida and very rarely with wheat flour.Today, for friday pooja , i made this appam using wheat flour.  I din’t deep fry instead i made in paniyaram pan.. It was very soft ,spongy & delicious.Enjoy this guilt-free appam as evening tiffin along with bonda/bajji & coffee !

INGREDIENTS
1 cup - 250ml
  • Wheat flour – 1 cup
  • Ripe banana – 2 nos (small , use 1 if big)
  • Rice flour -  1 tbsp
  • Grated jaggery – 1/2 – 3/4 cup
  • Cooking soda – 1/8 tsp
  • Salt – A pinch
  • Elachi – 2 nos ( crush to powder)
Oil – to drizzle

METHOD

  • In a bowl , take the banana & mash well. Add the wheat flour ,rice flour , salt , soda , jaggery & cardamom powder.
wheat appam tile1
  • Add the required water to make a smooth paste.Use a whisk for mixing without lumps.The consistency of batter should fall like a ribbon.
wheat appam tile2
  • Heat a paniyaram pan and add 1/2 tsp of oil in each hole.Pour a small ladleful of batter .cover & cook for sometime in medium flame.
  • Flip it after few seconds and again add 1/2 tsp oil. cook for a minute & remove.
wheat appam tile3
  • Serve hot !!
NOTE
  • For variations , u can use maida instead of wheat flour.
  • Sometimes my MIL adds sugar instead of jaggery..
  • For kids , u an deep fry & give. To get a proper shape while deep frying , keep little oil and pour the batter & fry on both sides till golden brown. U’ll get a nice shape..

aapam sweet

الجمعة، 19 يوليو 2013

Sweet Pongal Recipe / Sakkarai Pongal In Pressure Cooker - Pongal Festival Recipes

9320609906_31d98c943e_z
Usually i make aval payasam or moong dal payasam for friday pooja.Today being Aadi velli , i made this sweet pongal ( Chakkara pongal/sakkarai pongal in Tamil).I usually make sakkarai pongal for aadi velli , aadi perukku & thai pongal. For the other occasions we make rice payasam mostly.I have already posted an authentic, traditional sakkarai/ sweet pongal in my blog where i have shown how to make pongal in venkala paanai (pot). In this post , i have mentioned our usual method of making sweet pongal using pressure cooker. To make perfect sweet pongal, always use good quality raw rice & dark colored jaggery to get the best results in color & taste.Its very flavourful , tastes similar to Kovil pongal/temple pongal and u’ll love it for sure. Try this & let me know dearies Smile. Check out the video too !

Sweet pongal/Sakkarai pongal - Video !


9317822729_8fb5a9a214_z


Sweet Pongal Recipe


Sweet Pongal Recipe Sweet Pongal recipe-Sakkarai pongal -How to make Temple style sweet pongal recipe at home.
Cuisine: South Indian
Category: Sweet
Serves: Serves 3
Prep time: 10 Minutes
Cook time: 20 Minutes
Total time: 30 Minutes


INGREDIENTS
1 cup - 200ml
To pressure cook
  • Raw rice – 1/2 cup
  • Yellow Moong dal – 1.5 tbsp ( add 2.5 tbsp for more dal flavor)
  • Water – 2.5- 3 cups(varies as per the quality of rice)
  • Salt – a pinch
For syrup
  • Jaggery – 3/4 cup ( use 1 cup for more sweetness)
  • Water – 1/2 cup
For Flavor
  • Ghee – 3 tbsp
  • Cardamom – 2 nos
  • Edible camphor – A pinch
  • Jaathikaai – A pinch
  • Cloves – 2 nos
  • Cashewnuts – 5-7 nos
  • Raisins – 5 nos (optional , i dint use)
METHOD
  • In a kadai , heat 2 tsp of ghee and roast the cashews , raisins, cloves & jaathikai. Powder the jathikkai and set aside.
sakkarai pongal tile1

  • In the same ghee , roast the moong dal till golden brown with a nice aroma.
  • In a pressure cooker base , take the washed rice & 3 cups of water. Add the roasted moong dal along with a pinch of salt. Pressure cook for 4-5 whistles till rice & dal turns mushy.Open the cooker & mash the rice , dal very well with a ladle..
sakkarai pongal tile2

  • In the meanwhile , prepare jaggery syrup. In a wide bowl , take the jaggery with 1/2 cup of water and allow the jaggery to melt completely. Strain the impurities and again boil the syrup till it becomes frothy. Remove & add this syrup to the cooker.
 sakkarai pongal tile3

  • Mix well and add 2 tsp of ghee to avoid the pongal sticking to the bottom.Stir very well for 4-5 minutes till all the syrup gets mixed.
sakkarai pongal tile4
  • Pongal will start to thicken and leave the sides of the cooker . At this stage add the remaining 2 tbsp of ghee and the roasted cloves , cardamom powder,edible camphor powder & roasted jaathikai powder..Mix well & switch off the stove. Initially it will look semi solid in consistency. But it will thicken as time proceeds.Before serving u can reheat it adding little milk or water.
  • sakkarai pongal tile5

    If your pongal looks dry when warm , add little ghee & milk ,reheat it n serve ! It tastes divine !!Enjoy !

Note

  • Always add more ghee at the end for a nice flavour . It also makes the pongal soft & non sticky.
  • Use good quality ghee & rice for better flavour n taste.Adding jathikkai  & cloves gives a superb smell.Don't skip it
  • Milk can be added if pongal looks dry or hard. But addition of milk reduces the shelf life , color will slightly change and also the sweetness gets reduced.. For the above recipe u can add 1/5 cup of milk to the max..
  • Use dark colored paagu vellam to get a nice color.

الأربعاء، 17 يوليو 2013

MEDHU VADAI RECIPE (WITH VIDEO) | ULUNDU VADAI


Medhu -- vadai

I have already posted urad dal vada with pepper. In that post i have mentioned the different methods used to shape vadas.By seeing that post many of my friends mailed & asked me to post a video on how to grind the vada batter using mixie & how to shape vada using a sheet and some easy tips to identify the consistency of batter..I was hesitant in the beginning whether i could do this and i wanted somebody to help me taking the video. Recently my in-laws visited my place and with the help of my MIL i took this video by keeping beginners in mind.The batter yield will not be good when we grind in mixie as compared to grinder.But i am sure u’ll get the taste & crispness equal to grinder batter…Please bear the mistakes in this video as this is my first attempt. I hope i can do it better in future & update here.I am also a beginner and i am still in the learning and experimenting phase.Most of us miss the batter consistency adding more water. So i have tried to give the exact water quantity i used .The quantity of water slightly differs as per the quality of urad dal.So keep this video as reference and adjust the water quantity.I have also given some tips in the “Note” section to adjust the consistency of batter if it is watery.Experts,please excuse and do share ur tips in the comments section Smile..
Recently i had vada for breakfast in AAB. I found jeera , pepper corns , onions and curry leaves . So i too started making in that way as my husband loves pepper more than onions. Here i have mentioned pepper & jeera in the ingredients list. For poojas & festivals we add only pepper.. Add onions alone or both onion & pepper as per ur wish.But remember to add onions just before frying vada else onions will leave water and make the batter watery. Always keep the batter refrigerated till use.No problem if one or two tsp of water goes extra. Batter will thicken if u refrigerate it. If u find the batter too watery , add few tsp of rice flour to make it thick & to make a proper shaped vada . But u should serve it hot . Otherwise vadas won’t be crispy in room temperature.Also if u add less water to grind the batter , vada will be hard. If u add the correct water & grind the batter , vada will stay crispy even after it cools down . Vada won’t drink much of oil if the batter is right. My MIL used to add a tsp of toor dal while soaking urad dal to avoid oil absorption. Beginners can follow this method.Some people soak little raw rice along with urad dal or add a tsp of rice flour to the batter. All these are not necessary if u grind the batter in right consistency..
Ok friends , let me know ur comments if u try this method. Good luck Smile with tongue out
Don't forget to check out my latest post with video about medhu vadai recipe using grinder

Do check out my mixed vegetable vada if interested ..

Medhu vadai closeup

INGREDIENTS
1 cup = 200 ml

  • White round urad dal – 1 cup
  • Green chillies – 3 nos
  • Ginger – 1 inch piece (chopped)
  • Water – 1/3 cup + 1 tsp (adjust as per the quality of urad dal , start with 1/4 cup of water & increase gradually)
  • Rice flour - 1 tsp 
To mix in the batter
  • Small onion/ Big onion – 15 nos / 2 nos
  • Curry leaves – Few
  • Pepper corns – 1 tsp
  • Jeera – 1/4 tsp
  • Asafetida / hing – 2-3 generous pinches
  • Salt - as needed

METHOD

  • Wash and soak urad dal for 1 hour and keep it inside the fridge( refrigerator).After soaking, drain all the water completely and keep in a bowl. Use this water for grinding the batter.Choose a bigger sized mixie jar to hold the urad dal batter.( jar should be double the size of batter).
vada tile1
  • First grind the green chillies , ginger piece without salt (updated). Grind it coarsely without adding water.
  • Then add the urad dal without water and grind for few seconds till it becomes a coarse paste.
vada tile3
  • Now add 1/3 cup of water and grind for a minute till smooth. Open the jar , wipe the sides & check the batter. .
vada tile4
  • If it is slightly coarse , add 1 more tsp of water.( Always add in tsp further).. Again grind & check the consistency. Batter should be thick, fluffy n smooth. When u drop the batter , it will slide slowly & it will form a stiff peak. One more tip is,drop a small quantity of batter in a bowl of water.It will float on top.Remove the batter & add some water to the jar, run the mixie once. Use this water for dipping ur hands while u deep fry vadas.
vada tile5
vada tile6
  • Refrigerate the batter.Remove,add salt & a tsp of rice flour and beat the batter well. Just before frying vadas , add the finely chopped onions , curry leaves and whole pepper corns & 1/4 tsp of jeera. Mix well. Dip ur fingers in the urad dal water , shape the vadas .Deep fry on both the sides till onion turns golden brown , remove , drain in a tissue paper & enjoy eating hot as evening snack with coffee !
vada tile7
Please watch the below videos for better understanding .. Hope it is useful Smile

Don't forget to check out my latest post with video about medhu vadai recipe using grinder


VIDEO FOR GRINDING THE BATTER

How to grind the vada batter for onion vada using mixie

VIDEO FOR SHAPING THE VADA USING A SHEET
How to shape the vada using a sheet

NOTE

  • 1/4 cup is the minimum quantity of water needed to grind the batter. It differs based on the urad dal. But after adding 1/3 cup , add water in tsp and check the batter every now & then. Please don’t add too much of water.
  • If u add more water,vada will drink more oil.To avoid oil absorption,u can add 1/2 tsp of toor dal along with urad dal while soaking.
  • The quantity of batter may not be more as u get in grinder. In grinder, we get batter for 25 medium sized vadas .In mixie , u can make 12-15 vadas.
  • Vada will absorb more oil if u deep fry in low heat oil.Heat of the oil should be right. It should not be smoky. If u deep fry when the oil is too hot , vada will brown quickly but the inside portion will not be cooked .
  • For proper cooking , always check the heat of oil by dropping a bit of batter. If it rises immediately , oil is in the correct temperature.
  • Adjust the flame to high and medium high while deep frying.
  • Deep fry in medium low flame for long time to get crispier vadas.For onion vada , u should remove the vada when the onions turn golden brown.For pepper vada , remove it when the sound ceases & turns golden brown.
  • Shaping of vada comes only by practice. Start using a sheet for shaping. Then u can make it directly using ur hands.
Don't forget to check out my latest post with video about medhu vadai recipe using grinder

Enjoy eating hot with coffee or tea !!
VADA WITH COFFEE

Don't forget to check out my latest post with video about medhu vadai recipe using grinder