الجمعة، 2 ديسمبر 2011

Thenkuzhal Murukku - Step By Step Recipe - Diwali Snacks Recipes


THENKUZHAL

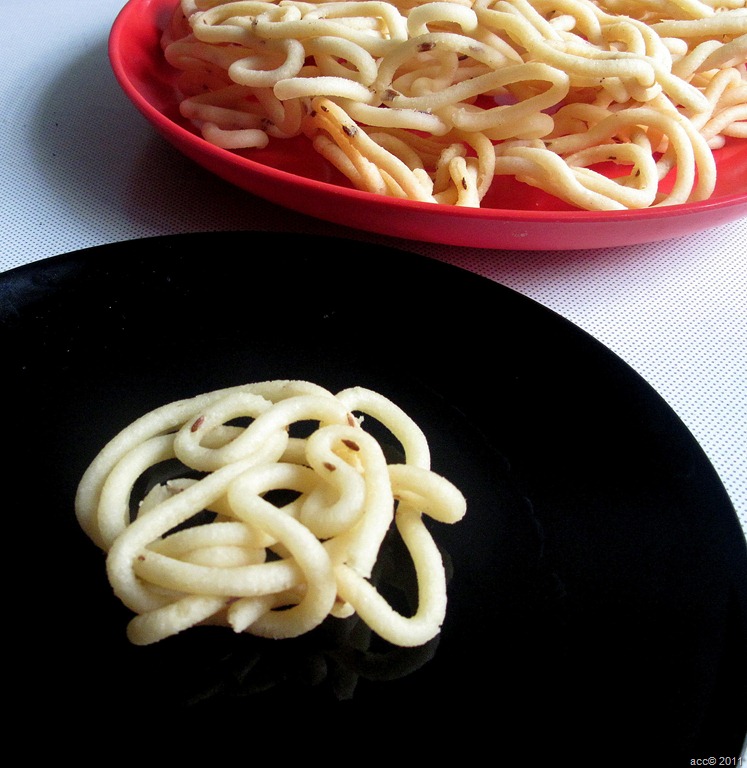
Mostly we all make thenkuzhal  murukku for diwali or some special occasions. I love this murukku since my childhood days.I used to do all the pre preparatory works like buying rice and dal , grinding it in flour mill,sieving etc.I sit with my mom & aachi when they make this for diwali especially to get the last batch of murukku,My mom make a batch of half cooked murukku( we call it “arai vekkaadu” in tamil) for me.I love this murukku more than the crispy ones. I eat it hot immediately after taking out from the oil.Even today,my MIL make this specially for me.How sweet !!In love .I saw so many thenkuzhal recipes in blogosphere with different proportions of rice and urad dal . I wanted to share my version too.I tried to take step by step pics for beginners for the first time.I really admire our fellow bloggers who blog recipes with step by step pics for each and every post.They have so much of patience and skill to do this. I really don’t have both Winking smile.I feel sweets and savouries need step by step presentation for better understanding. Hope this post helps beginners. Feel free to leave your comments about my presentation.I will improve in my further posts.Please go through the Notes section too.. Now coming to my version..

“””PLEASE HAVE A LOOK AT THE “POINTS TO REMEMBER” BEFORE STARTING..”””Thenkuzhal

Thenkuzhal murukku


Thenkuzhal murukku White thenkuzhal murukku for Diwali !
Cuisine: Indian
Category: Savories
Serves: 25 nos
Prep time: 15 Minutes
Cook time: 20 Minutes
Total time: 35 Minutes


INGREDIENTS
1 cup - 200ml
  • Raw rice/Maavu arisi - 5 cups
  • Round urad dal - 3/4 cup
  • Fried gram dal/Pottukadalai - 1/4 cup
  • Butter – 4-5 tbsp (1/4 cup)
  • Asafetida / hing – 1/2 tsp
  • Jeera / cumin seeds or Black sesame seeds – 2 tbsp
  • Salt & water – As needed.
  • Cooking oil – for deep frying.
For small quantity : 1 cup = 250ml
  • Rice flour - 1 cup
  • Roasted urad dal flour -  2 tbsp
  • Butter - 1 tbsp
  • Hing - 2 pinches
  • Cumin seeds or sesame seeds - 1 tsp
  • Salt & water - as needed
  • Cooking oil - to deep fry
METHOD

  • Heat a kadai and dry roast urad dal slightly without changing its colour. Roast till nice aroma comes from urad dal. Switch off the flame and add the fried gram dal. Now mix the rice, roasted urad dal and fried gram dal. Grind in flour mill or powder it in mixie. If u use mixie to grind the mixture, please don’t forget to sieve the flour. Flour should be very fine in texture. This is called “murukku maavu”. If you have store bought readymade murukku maavu,u can use it. OR u can use store bought rice flour and make urad dal flour at home.
  • Melt butter and set aside.
thenkuzhal
  • To this murukku maavu,add salt ,melted butter, hing , jeera or sesame seeds and water to make a non sticky dough. Take the murukku press and mould with one whole. Fill the dough and set aside..
thenkuzhal-recipe
  • Heat the oil in a broad kadai and and press the murukku in circular motion directly in oil or press the murukku in a polythene sheet or in the back of ladle separately and then drop in hot oil. This way u get a nice shape. If the string gets cut while pressing, either urad dal flour is less or water is less.So add 1 tsp more urad dal flour and drizzle some water, mix well and try it.  After u press the murukku , please stand a few feet away from the kadai.Sometimes , very rarely murukku may burst like seedai . If it doesn’t burst, then proceed.
thenkuzhal-recipe-1
  • Cook for sometime.Flip and cook for some more time till the hiss sound and bubbles ceases .Do it in medium flame.Adjust the flame whenever needed. Remove and drain in a paper towel..Store in an air tight container after it cools down.

thenkuzhal-recipe-2

Don’t forget to try the half cooked murukku in the last batch.For this, after u press the murukku in oil , just flip immediately and remove in 10 secs.. Eat it hot !!
White colored , crispy thenkuzhal is ready to enjoy !!
Note
  • When u make murukku in large quantities , make the dough in batches to avoid the dough from drying.Also cover the dough with a damp cloth or a lid while cooking murukku. This helps in getting white colored murukku for all the batches. Otherwise color may vary for the last batches.
  • We have added fried gram dal and butter to get the crispness & white color . But usually fried gram dal is not added in thenkuzhal.Its purely optional.
  • Adding too much of butter makes the murukku look oily and becomes soggy very soon.Shelf life gets reduced.
  • Adding more urad dal flour or too much of roasting the urad dal results in dark colored murukku.So make sure u roast the urad dal without changing the color..
  • If u use store bought rice flour and urad dal flour , the ratio would be 8:1.No need to roast the urad dal flour if it is ready made.
  • The murukku flour should be very fine in texture otherwise it may burst while cooking. So i always sieve the flour for safer side Winking smile
  • Use enough oil for deep frying. Add more oil after few batches if necessary.
  • Drop or press the murukku only when the oil becomes hot. U can find this by dropping a pinch of flour. It rises up quickly.This is the correct heating point. Do not let the oil fume. Always keep the flame in medium for even cooking.
  • Instead of pressing in oil directly , u can try pressing it in the back of ladle greased with oil or greased polythene sheets. This way u’ll get nice shape.. 
  • After cooking when u break the murukku , u can c a hole in the middle of the murukku like  funnel. This denotes the murukku is perfect !!
Perfect thenkuzhal must form a hole.Can u see the hole in the broken murukku piece Winking smile
Thenkuzhal-murukku
Catch u in my next post. Bye. Have a gr8 weekend Smile

الخميس، 1 ديسمبر 2011

November Indian Vegetarian Recipe Roundup

My regular readers will know how much I adore Indian cuisine, even though I am not of Indian descent myself. So for November, I invited readers to submit one of their favourite Indian recipes, with a randomly drawn winner from the entrants receiving a free copy of 660 Curries by Raghavan Iyer. This book is a treasury of wonderful Indian recipes from traditional to modern and fusion styles, suitable for beginners and experienced cooks alike, and is used constantly as a reference in my kitchen.

A very special thanks to all who submitted their recipes. I have shelves full of cookbooks but, as far as I am concerned, one can never have enough inspiration in the kitchen. And here are the submissions:


Up first is Lisa of We Don't Eat Anything with a Face. Paneer, mushrooms, spices, chickpeas, coconut and nuts and vegetables are all included in her dish. How could I resist this Paneer and Vegetable Tikka Masala?


Janet of The Taste Space is up next this mouthwatering Indian Eggplant and Lentil Curry (Dal Bhat Meets Baingan Bharta). Though roasting the eggplants created a lot of smoke, this one-dish meal was certainly worth the trouble and effort.


Divya of Dil Se has me craving dinner right now with a Mushroom Biryani. Spicy too, this will not fail to please mushroom lovers like myself.


From Claudine of The Kathmanduo we have this delicious Channa Masala Hummus. I love hummus, and this inventive Indian-style take on it has my tummy rumbling.


Privish of Killer on the Plate offers up this most tempting Spicy Stuffed Okra dish. This is a vegetable I need to make more often. Such a lovely presentation too.


Nayna of Simply Food submits one of my all-time favorite Indian dishes, Dal Makhani. Creamy, healthy, rich in protein and packed full of flavour, everyone should try a dal makhani at some time.


From Adam and Theresa of Keen on Food we have this gorgeous and very tempting Stuffed Eggplant Poriyal adapted, I was happy to hear, from one of my favourite cookbooks. I can never resist South Indian recipes, and this reminds me that I need to explore eggplant more often.


Tangy and spicy, this beautiful Spicy Dahi Aloo, or potatoes cooked in yogurt, from Laavanya of Cookery Corner won't fail to please fans of Indian cuisine. And I don't know anyone who doesn't love potatoes.

mattar paneer

My contribution for this event is another one of my all-time favourites, and an Indian classic. Mattar Paneer is a staple dish in any home that serves Indian food, and when I go out for dinner this is also one of my favourite menu choices.


Akheela of Torviewtoronto treats us to this Ivy Gourd Stir Fry. I've yet to try ivy gourds — small Indian summer squashes — but this would be a great place to start.


Now here is a Millet Bread from Vaishali of Ribbons to Pastas. Green chutney is of course an essential condiment to go along with this Leele Doongri ne Kadhi ane Rotlo. This innovative creation surely tempts my palate.


Geetha of Sun Moon and Tomatoes presents this lovely Kappa Curry (Tapioca in Roasted Coconut Sauce) inspired by her mom. This South Indian dish is sure to please your palate.


From Richa of Hobby and More, here is a delicious vegan and gluten-free Kaju Katli, or Indian Cashew Fudge. A perfect treat to share with friends and family to celebrate this month's Indian festivals.


Deepika of My Life and Spice certainly has my mouth watering for this Nargisi Kofta. Another beautiful dish, Deepika certainly dresses this one up. The spice mixture sounds just divine. Stuffing a paneer or chenna cheese shell with raisins and apricots is a brilliant idea.


Paneer cheese is one of my favourite foods, so how could I resist this Butter Paneer Masala from Reeta of mykaleidoscope. This is also one of my favourite restaurant dishes, but so much better when homemade in your own kitchen.


Here we have another paneer dish from Val of More Than Burnt Toast. I made Saag Paneer myself recently, and it is always a favourite. I am so happy that I inspired this dear woman to learn more about Indian cooking.


Another one of my favorites from Sweatha of Tasty Curry Leaf. A winter warmer indeed, you will have to try this Mulligatawny Soup. Adapted from another of my favourite cookbooks, this is a curry-flavoured soup from South India similar to South Indian rasams. Yum.


Sundried Tomato Chutney from Usha of Veg Inspirations. Wonderful flavours, and pictures of pretty flowers as well. I do so love sundried tomatoes and what a great creation. I am craving this just right now.


Usha of My Spicy Kitchen presents an Okra Stir Fry that will not fail to please us vegetarians. Simple and easy but surely not lacking in flavor, this is a dish I would enjoy anytime of year.


Sweet Soma of eCurry presents this tempting Pan-Fried Cauliflower with Yogurt and Soy Sauce. Inspired by her Grandmother, this Indian fusion Chinese dish is sure to please and it is easy to prepare. Wholesome and creative.


Lynds of Vanilla Clouds and Lemon Drops offers up some gorgeous Spicy Chickpea Fritters. Certainly the best Indian food is made at home and I can't wait to try this dish.


Priya of Easy N Tasty Recipes never fails to please. This one-pot meal of Soya Chickpeas Dumplings & Tomato Pulao will most certainly please and nourish hungry tummies. The possibilities are endless.


Oh, more paneer! Mansi of Fun & Food Cafe has me craving this Kaju (Cashew) Paneer Masala. You can never go wrong with cooking with paneer, in my opinion, and your dinner guests will never be disappointed — that is for sure.

Thank you again to all my readers who submitted these fantastic Indian recipes. I hope everyone finds something here to try.

الاثنين، 28 نوفمبر 2011

Aval Payasam - Rice Flakes Payasam Recipe


aval-payasam

I make this payasam every friday for pooja. This is the simplest & delicious payasam that can be made in 10-15 minutes.
INGREDIENTS
1 cup - 200ml

  • Thick rice flakes / poha/ Aval - 1/4 cup
  • Powdered jaggery - 1/4 cup ( + 2 tbsp - optional)
  • Milk/coconut milk - 1/4 cup
  • Cardamom seeds - 2 nos (powdered)
  • Ghee - 1 tsp
  • Water - As  reqd (around 2.5 cups)
  • Roasted Cashews - a few
For additional flavour roast in a tsp of ghee & add the following
  • Cloves /Krambu- 2 nos
  • Roasted Nutmeg powder/ Jathikkai - A pinch
  • Edible camphor / Pachai karpooram - a pinch

METHOD

  • Heat a kadai with a tbsp of ghee and roast the cashews.Set aside..
  • In the same kadai, roast the aval and cardamom together for 3-4 mins. Aval becomes crispy and turns little brown.Allow it to cool. Powder it nicely..
AVAL PAYASAM TILE1
  • Now take the water in a bowl and add the powdered aval.Mix welll , there should be no lumps.Cover and cook for 5 mins. Stir in between and check the water level.Add more water if needed.It thickens after few minutes.
AVAL PAYASAM TILE2
  • Now add the powdered jaggery and mix well.Allow it to boil for 5-10 mins.  Finally add the roasted cashews. Add the items given under "flavour" if necessary. Switch off the flame and add 1/4 cup of boiled  milk or coconut milk..Serve hot or cold !!
AVAL PAYASAM TILE3

NOTE
    1. U can add coconut milk for richness. But it should be added at the end before switching off the flame.
    2. If u feel sweetness is more, add little boiled milk.
    3. When u add milk along with jaggery , payasam gives a curdled look.To avoid this, add milk only at the end.
    4. If u want, u can replace jaggery with sugar.
    5. Here i've powdered the aval. If u wish, u can roast the aval and cook as it is. It will take little more time to cook.

الأحد، 27 نوفمبر 2011

A Christmas Giveaway

I am excited to offer my Canadian readers a chance to win a KitchenAid food processor. A well-stocked kitchen of appliances surely should include KitchenAid equipment. I love my KitchenAid stand mixer - it is gorgeous and handy and reliable. My inferior brand of food processor works well, but it is a pain to put together and clean. This KitchenAid food processor is a must have. All you need to do is leave a comment citing your favorite creation using a food processor by the 8th of December for a chance to win. I will choose a random winner and the food processor will be shipped out to you. If you don't have a blog, please do include your email when you comment. Only Canadian addresses are eligible.

Valued at $399.99, this wonderful machine features an external adjustable stainless steel slicing disc, dual shredding disc, a large 13-cup leak-proof work bowl, along with a chef's bowl and mini bowl, an ultra-wide mouth feed tube that adjusts to three different sizes to accommodate foods of varying sizes, including whole potatoes and cucumbers, 17 precise food processing options for speed-controlled slice, shred, chop and puree functions, plus three maximized slice, shred and puree/chop blades, and bonus dough, egg whip and julienne blades and 4-speed functions.

Convenient, sleek, and perfectly suited for all of your cooking preparations. This is my own Christmas wish, though I don't qualify for the giveaway that one of my lucky readers does.

I always enjoy making hummus and a trusty food processor works much better than a blender. You might wish to try this tasty dip:

hummus

Hummus with Sun-dried Tomatoes, Goat Cheese and Olives

1 cup of dried chickpeas
5 - 6 sun-dried tomatoes
1/2 cup of pitted black olives, chopped
a few generous scoops of goat cheese
2 cloves of garlic, peeled and finely chopped
1 1/2 teaspoons of sea salt
juice from 2 fresh limes
2 - 3 tablespoons of tahini
1 teaspoon of ground cumin
1/2 teaspoon of cayenne
1 teaspoon of sugar
1 tablespoon of olive oil
2 tablespoons of parsley or cilantro, chopped, for garnishing


Soak the chickpeas overnight in enough water to cover. Drain, transfer to a medium saucepan, cover with water, bring to a boil, reduce to a simmer and cover and cook until the beans are soft - roughly 1 hour. Drain and set aside.

Soak the sun-dried tomatoes in hot water for 20 minutes. Drain, reserving the soaking liquid.

In a food processor, combine the cooked chickpeas, sun-dried tomatoes, olives, garlic, salt, lime juice, tahini, goat cheese, cumin, cayenne, sugar, olive oil, 1/4 cup of the reserved liquid from the sun-dried tomatoes and a bit of parsley or cilantro. Puree until you have a thick paste.

Garnish with the remaining parsley or cilantro.

Serves 4-6.
You might also want to try this Holiday Slaw recipe from KitchenAid:
½ large green cabbage, cored
1 small fennel bulb, trimmed
8 large red radishes, trimmed
6 green onions, trimmed
1 green pepper, cored
1 cup (250 mL) dried cranberries
½ cup (125 mL) white wine vinegar
cup (75 mL) each oil and maple syrup
2 tbsp (30 mL) lemon juice
1 tbsp (15 mL) Dijon mustard
¾ tsp (4 mL) salt


Cut the cabbage into 5 or 6 wedges. Position the adjustable slicing disc in the work bowl and, using the thin setting on high speed, push the wedges through the feeding tube. Transfer to a large bowl. Switch to the coarse side of the reversible shredding disc. Cut the fennel into quarters. Push the fennel and radishes through the feeding tube; add to the large bowl.

Cut the green onion and green pepper into chunks. Use the multi-purpose metal blade to chop finely. Add to the cabbage mixture. Combine the cranberries, vinegar, oil, maple syrup, lemon juice, mustard and salt in a small saucepan set over medium heat; bring to a boil. Pour over the cabbage mixture and toss to coat. Chill for at least 1 hour or up to 4 days. Makes about 12 cups (3 L).

السبت، 26 نوفمبر 2011

Ottolenghi's Chickpea Sauté with Greek Yogurt

Good cookbooks provide instruction and inspiration, but some of my favourites have an additional benefit — beautifully crafted photographs that illustrate the wonders and creativity of food. One of the finest collections of mouth-watering food photographs in my library is contained in Plenty by Yotam Ottolenghi, a London chef and restauranteur with very inventive styles of cooking and presentation. I especially respect a master chef who pays more than just lip service to vegetarian cooking — the subtitle of the book is "Vibrant Vegetable Recipes", which includes legumes, grains, eggs and dairy. I can highly recommend this cookbook for more than just the pictures.

chickpeas saute gree yogurt

The following is a minor adaptation of one of Ottolenghi's more colourful and nourishing recipes. I've kicked up the heat a little with some dried red chili flakes, but the real attractions of this dish are the fragrance and sounds of caraway seeds and carrots sizzling in hot oil, the warm anise-like flavour of the seeds permeating the vegetables, and the zesty tang of lemon juice and a large dollop of Greek yogurt on top. By the way, I urge you to buy a whole-fat Greek yogurt (if you are not making your own) and avoid the no-fat varieties — without the milk fat, a Greek yogurt is just flat.

Chickpea Sauté with Greek YogurtChickpea Sauté with Greek Yogurt
Recipe by
Adapted from Plenty: Vibrant Vegetable Recipes From London's Ottolenghi
Published on November 26. 2011

Warm and fragrant caraway-seasoned chickpeas and vegetables combined with the zest and tang of lemon juice and Greek yogurt

Print this recipePrint this recipe

Chickpeas:
  • 1/2 cup dried chickpeas
  • 1 lb Swiss chard
  • 2 tablespoons olive oil
  • 4 medium carrots, diced
  • 1 teaspoon caraway seeds
  • 1 teaspoon dried red chili flakes
  • 1 clove garlic, minced or crushed
  • juice of 1 lemon
  • small handful fresh mint leaves, chopped
  • small handful fresh cilantro or parsley, chopped
  • 1/2 teaspoon sea salt, or to taste
  • fresh ground black pepper
Yogurt:
  • 1/2 cup Greek yogurt
  • 2 tablespoons olive oil
  • 1/4 teaspoon sea salt, or to taste
  • fresh ground black pepper
Instructions:
  • Rinse the chickpeas under cold running water and soak 8 hours or overnight under several inches of cold water. Drain and rinse the soaked chickpeas, then place in a medium saucepan and cover with several inches of fresh water. Bring to a boil, then reduce the heat to medium-low, cover, and simmer for 1 to 1 1/2 hours or until the chickpeas are tender. Drain and set aside.

  • Prepare the Swiss chard by separating the stems from the leaves. Chop the stems into bite-size pieces and chop the leaves coarsely. Fill a large saucepan with plenty of water, bring to a boil, and blanch the stems for 2 minutes. Add the leaves and cook for 2 more minutes, then remove from heat and drain. Rinse the chard under cold running water and squeeze dry. Set aside.

  • Heat a large saucepan or wok over medium heat. When hot, add the olive oil, wait a few moments, then swirl to coat the bottom of the pan. Add the carrots and caraway seeds, and sauté for 5 minutes, stirring occasionally to keep the seeds from sticking. Stir in the dried red chili flakes, and continue to sauté for another 30 seconds. Now stir in the chickpeas and chard, and cook for 5 more minutes to warm the ingredients, stirring occasionally.

  • Stir in the garlic, lemon juice, mint and cilantro or parsley, and remove from heat. Season with salt and black pepper to taste.

  • Mix the Greek yogurt, olive oil, and salt and black pepper to taste in a small bowl. Serve the chickpeas hot or warm on plates with a generous dollop of the yogurt mixture on top. Sprinkle with more black pepper if desired.

Makes 4 servings
chickpeas

More ideas from my kitchen that you may enjoy:
Tuscan-Style Pinto Bean Soup with Kale
Vegetarian Mushroom Bourguignon
Sautéed Spinach and Cannellini Beans with Balsamic Vinegar
Roasted Butternut Squash and Herbed Cannellini and Artichokes with Fennel and Parsley Salad

Audio Accompaniment: Radiohead

الثلاثاء، 22 نوفمبر 2011

Paneer Cheese Cubes with Sun-Dried Tomatoes

Because one can never have too many paneer dishes on hand … here is another from my vegetarian kitchen. Ovo-lacto-vegetarians are in for a most satisfying meal, especially if this dish is served along with a steaming bed of hot fresh-cooked white rice and some Indian flatbreads. Paneer cheese cubes are cooked in fragrant spices and then gently simmered in a sun-dried tomato sauce. Sun-dried tomatoes are not part of traditional Indian cooking, but I also enjoy fusion-style interpretations. I might add that sun-dried tomatoes feature in many of my dishes that go well with tomatoes.

Paneer Cheese Cubes with Sun-Dried Tomatoes

Paneer Cheese Cubes with Sun-Dried TomatoesPaneer Cheese Cubes with Sun-Dried Tomatoes
Recipe by
Adapted from 1,000 Indian Recipes
Cuisine: Indian
Published on November 22, 2011

Warm, fragrant and spicy fried golden paneer cheese cubes

Print this recipePrint this recipe

Ingredients:
  • 12 ounces paneer cheese
  • 6 sun-dried tomatoes
  • 1 medium tomato, diced
  • 3 tablespoons ghee, butter or olive oil
  • 1 teaspoon black mustard seeds
  • 1 1/2 teaspoons cumin seeds
  • 1/2 teaspoon black peppercorns, crushed
  • 1 medium onion, finely sliced
  • 2 - 3 fresh green chilies or jalapeños, finely chopped
  • 1 1/2 tablespoons ground coriander
  • 1/2 teaspoon ground cumin
  • 1/2 teaspoon cayenne
  • small handful of dried fenugreek leaves
  • sea salt to taste
  • a few tablespoons fresh chives, finely chopped
  • 1/2 cup frozen peas, defrosted
Instructions:
  • Soak the sun-dried tomatoes in hot water for 20 - 30 minutes. Drain and chop, and set aside. Meanwhile, cut the paneer cheese into 1/2-inch to 1-inch sized cubes.

  • Heat the oil in a large wok or large frying pan over medium heat until hot. Toss in the black mustard seeds and stir until they begin to splutter and pop. Immediately add the cumin seeds and crushed peppercorns, and stir and fry for another minute. Next add the onion and stir and fry until they begin to soften and turn golden, about 5 minutes.

  • Now add the paneer cubes, along with the green chilies or jalapeños, ground coriander, ground cumin, cayenne, fenugreek and salt and cook, stirring and turning the paneer cubes every few minutes until golden, about 5 - 10 minutes. Add the sun-dried tomatoes and diced tomato and cook for another 5 - 10 minutes. Sprinkle with chopped chives and serve hot.

Makes 4 - 6 servings
Paneer Cheese Cubes with Sun-Dried Tomatoes

More paneer cheese dishes from Lisa's Indian Vegetarian Kitchen you may enjoy:
Wild Mushroom and Paneer Pilaf with Urad Dal
Saffron Marinated Paneer Cheese with Fresh Basil, Cashews and Pomegranate Seeds
Chickpeas and Paneer in a Spicy Creamy Cashew Gravy
Mung Beans and Paneer Cheese

On the top of the reading stack: Dakshin by Chandra Padmanabhan

Audio Accompaniment: 50 Words For Snow by Kate Bush

Green Gram Rice Upma - Paasi Payaru Recipe

I made this upma for dinner yesterday. Its a simple one pot meal. It tastes best with sambar.I add equal amount of rice and green gram dal ( Pacha Payaru/Paasi pauaru in Tamil) in this upma. So its very filling and rich in protein. We wanted little mushy. So I added more water.But if u add the quantity of water given below, u'll get the rice grains separate and fluffy. Please use the water according to your choice.
green gram upma

INGREDIENTS
1 cup - 200ml
  • Steamed rice or Raw rice - 1/2 cup
  • Green gram / Pacha payaru - 1/2 cup
  • Water - 1- 1.25 cups
  • Salt - As needed
To temper
  • Cooking oil - 1 tbsp
  • Mustard seeds - 1/2 tsp
  • Urad dal - 1/2 tsp
  • Channa dal - 1/2tsp
  • Green chilly - 2 no (slit into two)
  • Curry leaves - A few
  • Ginger- 1 inch (cut into pieces)
  • Hing / Asafetida - 3-4 generous pinches

METHOD
  • Heat a kadai and dry roast the rice till it slightly puffs up.
  • In the same kadai add a tsp of oil and roast the green gram until nice aroma arises.It may take 5-8 mins.
  • Now heat 1 tbsp of oil and temper the items given above in the same order.
  • Then add the roasted rice and dal. Add the required water and salt .Transfer everything into a pressure cooker.
  • Add a drop of oil and a pinch of hing .Pressure cook for one whistle.
Delicious upma is ready to serve. I served with AAB sambhar.