الخميس، 3 سبتمبر 2015

Krishna Janmashtami/Krishna Jayanthi Celebration At Home-Pooja Procedures

Krishna janmashtami celebration at home

Yesterday I got a request from a reader to make Krishna Janmashtami celebration post.So I have discussed how to celebrate Krishna Jayanthi/Gokulashtami/Krishna Janmashtami at home by Indians along with a video on how to draw Krishna feet using rice flour paste.Pooja procedures i have shared here is based on my family's tradition.It may vary from place to place.So take this as a reference & get the guidance from your family's elders.As you all know,Krishna Jayanthi is celebrated as the birthday of Lord Krishna.It’s a most important & sacred day for Hindus.People pray to Lord Krishna on this day and seek his blessings for a happy and good life.Krishna Janmashtami is observed on Ashtami – the eighth day of Krishna Paksha month/Shravana month i.e between mid August & early September.This year it falls on August 25, 2016 - Thursday evening.It is celebrated all over India.In Tamil nadu,Kerala,Karnataka & North Indian temples,Gokulashtami is celebrated in a grand manner.Festivities begin before dawn and extend all day until midnight, the exact moment of the anniversary of Krishna’s appearance.Many people observe fasting on this day.But we don't have that practice.At home,we do the pooja only in the evening i.e after 6 pm.On those days,my MIL used to do the pooja around 11 pm at night.So its better to do the pooja anytime after 6 pm till midnight.Midnight is the exact time that Krishna appeared on this planet, so it is most auspicious and spiritually inspiring.Temples prepare at least one hundred and eight different food dishes on Janmashtami. At home,pooja is done by offering flowers,neivedyam recipes like Cheedai , murukku, laddu, appam , payasam/Kheer etc and  performing Mangala aarti to Lord Krishna Idol or photo. If you are not able to prepare all these dishes,don’t worry - Krishna says in the Bhagavad-gita, “If you offer Me with love a leaf, flower, fruit or water, I will accept it.” So offer whatever you can—it’s just your love and devotion that matters.
Source : www.krishna.com
Please click here for the full collection of Krishna Janmashtami recipes of my blog ! I have also shared a No cook Aval panchamirtham recipe with fruits to make a simple neivedyam.
Visit my in-laws blog for kolam ideas.


Krishna janmashtami recipes


NEIVEDYAM RECIPES
Krishna janmashtami recipes
INGREDIENTS NEEDED FOR POOJA & NEIVEDYAM
  • Flowers/Garland for decoration
  • Fruits like apple,pomegranate,Orange,banana,guava etc
  • One coconut for neivedyam
  • Betel leaves & nuts (Vetrilai paaku)
  • Oil & ghee to light the lamp
  • Rice flour & colors for drawing Rangoli & Krishna feet
To offer in front of GOD
  • A small cup of milk,curd,butter,Poha/Aval mixed with jaggery or sugar.
These offerings are must & should even if u don’t prepare the deep fried stuffs.
Ingredients for making neivedyam recipes
  • Raw rice & Rice flour ( for making seedai , murukku & paal payasam )
  • Sesame seeds & Jeera
  • Coconut
  • Jaggery ( For vella seedai & appam)
  • Banana ( for appam)
  • Sugar ( for Milk payasam)
  • Milk ( for payasam/Kheer)
  • Urad dal & Roasted gram dal ( Pottukadalai ) ( For making seedai,murukku)
  • Butter/Ghee for snacks
  • Cooking oil ( to deep fry)
HOW TO CELEBRATE KRISHNA JANMASHTAMI
  • Do the shopping two days before the festival and finish making the deep fried neivedyam recipes like vella seedai , Uppu seedai , Kai murukku etc on the previous day of festival.Store them in an air tight box after everything cools down completely else they may turn soggy.DO NOT TASTE IT UNTIL YOU FINISH POOJA.
  • Wash the lamps and other pooja vessels on the previous day night & keep the turmeric,kumkum dots.Put the threads & oil the lamp.Suppose if u don’t have enough time,u can do this job the next day morning or afternoon as we are going to do the pooja only in the evening after 6 pm.So its your choice.
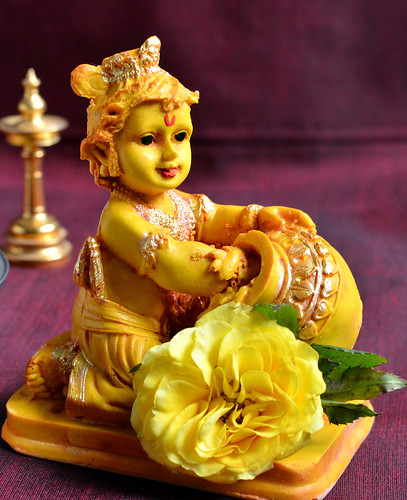
On Gokulashtami afternoon,Mix the ingredients for sweet appam and make payasam in cooker.Cook the appam around 5.30 pm.Around 4 pm in the evening,sweep the house and entrance.Draw Rangoli in the entrance & in front of the Pooja room. Draw the krishna feet from entrance till pooja room.Decorate the krishna idol by keeping flowers & garland.Make him ready for celebration.
HOW TO DRAW KRISHNA FEET
In many houses in South India, people draw footsteps of Lord Krishna from the entrance of the house to the Puja room. These footsteps are drawn with rice flour paste and drawing these footsteps is a sign of welcoming Lord Krishna home. Women draw patterns of tiny footsteps like those of infant Krishna.

How to draw Krishna Feet - Video

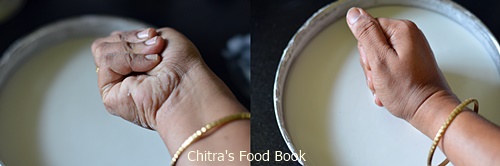
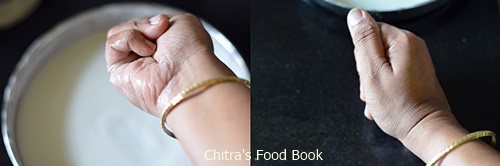
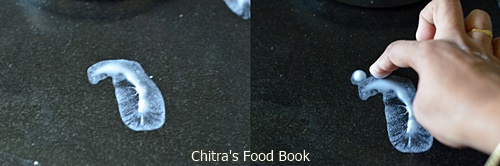
Take a broad plate such that your hands should fit in.Dilute the rice flour adding enough water and make the paste.Do not make it too thick or too thin.Its consistency should be like dosa batter.Now fold your hands as if you are punching someoneWinking.Dip your side of the hand in the rice paste.It will be coated with the paste.Now make the impression on the flour.Keep 5 dots for fingers.Draw the right leg first.Repeat the same procedure using your left hand for drawing left leg.Do this alternatively.Draw both the legs together near the entrance & pooja room. Refer the stepwise pictures for clear understanding. For drawing legs of baby Krishna,fold your hands tightly and make the impressions as shown in pics.If you want to draw slightly bigger legs,watch this video.Alternatively,u can ask your kids to make impressions on the floor.They would enjoy doing this and help you out Happy

POOJA
After you finish the decoration & neivedyam preparations i.e after 6 pm, place the decorated Krishna on a plank/Peeta.Offer all the neivedyam recipes,fruits,curd,milk,butter in front of the God.Light the lamp & do the pooja, perform Mangala aarthi.You can sing Krishna songs or read Bhagavad Gita/Sri Krishna Ashtakam OR simply chant “Om Namo Bhagavate Vasudevaya “means “Om, I bow to Lord Vasudeva or Lord Krishna’'in front of the GOD.

The next morning,do the pooja with a simple neivedyam like dry grapes or candy(kalkandu).Remove the idol at a good time ( Avoid Rahu kalam & Yama kandam )
DISCLAIMER : The details I have shared here is purely our family’s method of celebration.It may vary from place to place and traditions.

الأربعاء، 2 سبتمبر 2015

Paal Payasam Recipe-Milk Kheer-Easy Gokulashtami Recipes

Paal payasam recipe 
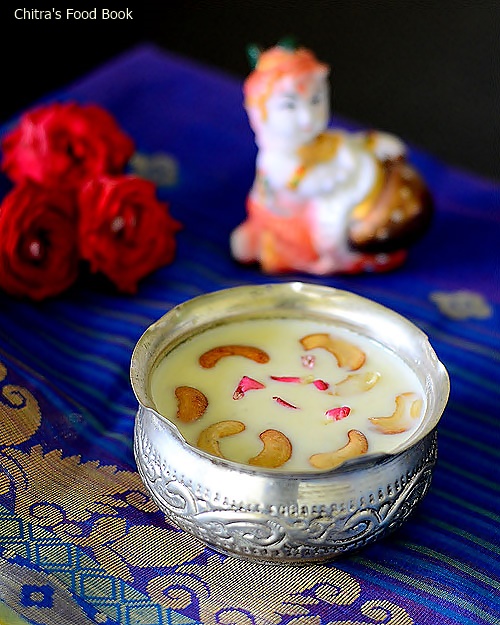
Paal payasam is a must & should neivedyam recipe for Krishna Jayanthi.Even if you don’t make seedai,murukku and appam , a glass of this simple & yummy milk kheer along with a small cup curd & butter is enough to please Lord Krishna & to get his blessingsPraying.It’s a very easy payasam recipe that can be made in pressure cooker.I have been making this payasam for years but I wonder how I missed this post in my blog.Few years back,I shared the most popular Kerala Paal payasam & Bengali Chaler payesh recipes.But this recipe is of Tamil nadu style without condensed milk(Milk maid) .Paal payasam is prepared by people all over India in various names.In North India,this is called as Chawal kheer/Rice ki kheer.There might be slight variations in the method of preparation.Some people add vermicelli or sago along with rice.However its made,the taste would be awesome and you can enjoy creamy,rich kheer.Lets see how to make this simple and easy dessert recipe – South Indian Paal Payasam Happy.Do try this for Krishna Jayanthi and don’t forget to share your feedback hereWinking. I have added a video for beginner's reference.Do watch it :)
Click here for Gokulashtami recipes.

Paal payasam- Full video recipe

Krishna idol

Paal Payasam recipe


Paal Payasam recipe Paal Payasam recipe for Gokulashtami/Krishna Janmashtami
Cuisine: South Indian
Category: Sweet
Serves: Serves 2-3
Prep time: 5 Minutes
Cook time: 20 Minutes
Total time: 25 Minutes


INGREDIENTS

  • Milk - 2.5 cups ( 1/2 litre)
  • Basmati rice or raw rice - 3 tbsp/9 tsp
  • Sugar – 1/3 cup ( 1/2 cup for more sweetness) 
  • Cardamom powder - 1/2 tsp
  • Ghee - 1 tbsp
  • Cashews - to roast
METHOD
  • Heat 1 tsp of ghee and roast the rice till it puffs up slightly.Grind it coarsely.Make sure you don’t powder the rice.It should be just broken into two.So pulse twice for short time.
Paal payasam recipe

  • Boil milk in a small pressure cooker. Add a small plate or spoon to avoid spilling & burning of milk.When the milk starts to boil,add the rice.
Paal payasam recipe
  • Pressure cook it in very low flame for 2-3 whistles.Open the cooker after the steam is released.Mix well and boil the milk.Remove the plate using a ladle. Add sugar,stir well and boil for sometime to thicken the payasam slightly.Add cardamom powder.Do not over boil because this payasam will thicken as time proceeds.So let it be watery.
Paal payasam recipe
Paal payasam recipe

  • Roast the cashews in 2 tsp of ghee and add to the payasam.Mix well and enjoy !
Paal payasam recipe
Note
  • Adding more rice makes the payasam to become pongal.So add the mentioned quantity of rice.
  • Adjust the quantity of sugar based on your taste.Add 1/4 cup for less sugar & 1/2 cup for more.
  • You can also add saffron threads soaked in warm milk.It will give a nice flavor & color to this payasam.

Try this creamy,rich paal payasam recipe for this Gokulashtami !
Paal payasam recipe


الثلاثاء، 1 سبتمبر 2015

Chickpea Flour Cubes in a Spicy Madras Sauce

Chickpea Flour Cubes in a Spicy Madras Sauce

For now, I'm following an essentially dairy-free diet. That's not really a drastic change for me as I've been a strict vegetarian for over 20 years now and dairy has't made up a significant portion of my daily meals for quite some time now. It's unlikely I would follow a strict vegan diet, but for digestive reasons, this seems to be the right approach for me personally for the time being.

The thing is, some of my favorites happen to be not so dairy-free. Like cheese! That's the sad part. The fun part is finding alternatives that closely mimic my favorites, while still focusing on real and nourishing food. So far, I've been quite satisfied with vegan versions of some classics such as coleslaw and Caesar salad. It's a refreshing challenge and my taste buds and body are certainly content.

When it comes to cheese, paneer is a particular weakness of mine, if you could call it that. A succulent soft and mild cheese with a high melting point, it is perfectly suited to curries as it takes on the flavors of the dish it stars in, and adds a unique chewy texture. And then I found a recipe for "chickpea tofu" from Vegan Richa's Indian Kitchen. Without soy and containing only chickpea flour, some spices, and my own addition — nutritional flakes for a bit of a cheesy flavor — these cubes are not only easy to make, but delicious as a snack. I had to restrain myself from snacking too much, otherwise there wouldn't have been enough left over for this tomato-based curry that I also adapted from Richa's book.

chickpea flour cubes

This dish reminded me of very much of mattar paneer, one of my all time favorite North Indian classics featuring cubes of paneer simmered in a spicy tomato gravy with green peas. As an analogy to my habit of ordering mushroom dishes on those occasions when I happen to dine out to test the prowess of the chef, likewise I seem to judge the quality of Indian restaurants from the paneer dishes offered up and am always finding new ways to make it in my own kitchen.

chickpea flour cubes in a spicy gravy

Here chickpea flour cubes instead of paneer cheese are smothered in a smooth, rich and fiery tomato gravy with green peas. The heat builds with each luscious bite. The cubes turned out to be a fantastic alternative to paneer too. They held their shape nicely, adding a nice chewy texture to the curry and some legume goodness too. This just might be one of my new favorites.

Chickpea Flour Cubes in a Spicy Madras SauceChickpea Flour Cubes in a Spicy Madras Sauce
Recipe by
Adapted from Vegan Richa's Indian Kitchen: Traditional and Creative Recipes for the Home Cook
Cuisine: Indian
Published on September 1, 2015

An elegant, rich and spicy tomato and green pea curry with tender creamy pieces of chickpea "cheese" made from chickpea flour and spices

Print this recipePrint this recipe

Chickpea flour cubes:
  • 1 cup chickpea flour (besan)
  • 1/4 cup nutritional yeast
  • 1/2 teaspoon garam masala
  • 1/4 teaspoon turmeric
  • 1 3/4 cup water
  • 2/3 teaspoon sea salt
Spice blend:
  • 1 tablespoon coriander seeds
  • 1 teaspoon cumin seeds
  • 1 teaspoon brown mustard seeds
  • 1/2 teaspoon fenugreek seeds
  • 1/4 teaspoon fennel seeds
  • 1/4 teaspoon black peppercorns
  • 2 dried whole red chilies, broken into pieces
  • 1/2 teaspoon ground cardamon
  • 1/2 teaspoon ground cinnamon
  • 1/2 teaspoon turmeric
  • 1/2 teaspoon paprika
Curry:
  • 1 tablespoon sesame oil
  • 1 small red onion, chopped
  • handful of dried curry leaves
  • 2 cloves garlic, minced
  • 1-inch piece ginger, minced or grated
  • 1 to 2 green or red chilies, seeded and finely chopped
  • 3 medium tomatoes, chopped
  • 1 1/2 cup fresh or frozen green peas
  • 1 small red pepper, seeded and chopped
  • 1 teaspoon sea salt, or to taste
  • 1 teaspoon coconut or brown sugar
  • 1/2 cup water, or more as needed
  • 2 tablespoons dried fenugreek leaves (optional)
  • 1 tablespoon fresh lemon juice
  • 2 to 3 tablespoons fresh cilantro, chopped
Instructions:
  • Begin by making the chickpea flour cubes. Grease a 9 × 5 inch loaf pan. In a medium bowl, combine all of the ingredients and whisk until the mixture is smooth.

  • Pour the mixture into a medium saucepan and cook over medium heat, stirring continuously, for about 5 minutes until it begins to evenly thicken. Cook for another few minutes over medium-low heat, stirring until a bit stiff and thick.

  • Transfer the mixture to the prepared pan and spread evenly. Let cool to room temperature and then refrigerate for at least 3 hours. Turn out onto a cutting board and pat off any liquid with a kitchen towel. Cut into 1-inch cubes and return to the refrigerator until needed.

  • Make the spice blend by toasting the coriander seeds, cumin seeds, mustard seeds, fenugreek seeds, fennel seeds, peppercorns and dried red chilies in a dry unoiled saucepan or frying pan over medium-low heat. Stir or toss often for a few minutes, until the seeds start to darken a few shades. Remove from heat and let the mixture cool, then transfer to a spice grinder or small blender and add the cardamon, cinnamon, turmeric and paprika. Grind to a powder and set aside until needed.

  • Heat the oil in a large non-stick skillet over medium heat. When hot, toss in the onion and curry leaves and sauté for 5 minutes until the onion begins to soften. Add the garlic and ginger to the pan and sauté for another few minutes.

  • Transfer the onion mixture to a blender and add the tomatoes and spice blend. Process until smooth. Add a bit of water if necessary. Return the mixture back to the pan and cook over medium heat, stirring occasionally, for 20 minutes or until the mixture has thickened and is well roasted.

  • Stir in the chickpea cubes, peas, red pepper, salt, sugar, water and fenugreek leaves if using. Cover and cook, stirring occasionally, for 5 minutes. Add the lemon juice and a bit more water if the sauce is too thick, and simmer, covered, for another few minutes. Stir in the fresh cilantro and serve hot, alongside a bed of fresh cooked rice or savory flatbreads.

  • Notes: You can use a block of paneer cheese cut into cubes instead of the chickpea flour cubes in this recipe, or even cubes of tofu if soy isn't an issue for you. Blending the onion mixture and the tomatoes makes for a luxuriously thick restaurant-quality sauce with all the stamps of superior home cooking. The chickpea cubes can be made up a day or two ahead of time as they keep well for a few days in a sealed container in the fridge.

Makes 4 to 6 servings

chickpea flour cubes with spicy madras gravy

I'm sharing this recipe with Jacqueline's weekly Meat Free Mondays event. I'm also sharing with My Legume Love Affair, a monthly event celebrating the goodness of legumes, started by Susan of The Well Seasoned Cook, now administered by me and kindly hosted this month by Swathi of Zesty South Indian Kitchen.

You may also enjoy:
Classic Mattar Paneer
Butter Paneer Masala
Aloo Mattar
Aloo Gobi

On the top of the reading stack: And Quiet Flows the Don by Mikhail Sholokhov

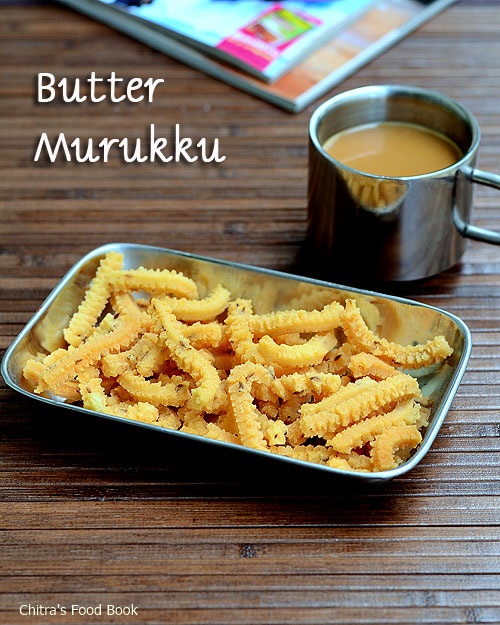
Butter Murukku Recipe(With Video)-Benne Murukku-Easy Snack Recipes

butter murukku
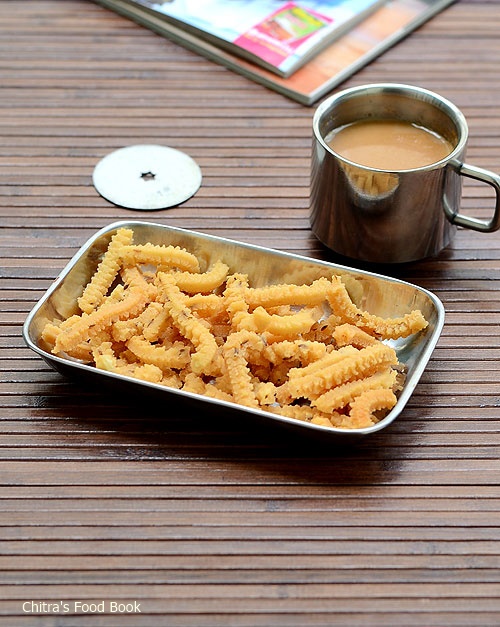
Gokulashtami is around the corner.As I have already shared Vella seedai , Uppu seedai , Kai murukku , thattu vadai and Appam recipes , I wanted to try some other easy neivedyam recipe. Yesterday I came across this super crunchy butter murukku recipe/Benne murukku under easy Diwali snacks recipe.I bookmarked it immediately and tried it on account of Krishna jayanthi. The results were too good. We loved it a lot and the whole box got emptied in minutesWinking. Making kai murukku may be difficult to some of you in this festive season.It needs a lots of practice & patience. In that case,this butter murukku ( Vennai murukku in Tamil) comes to rescue.As Lord Krishna is fond of butter,this recipe suits this festival very well. Its so easy to make and you don’t need to prepare soaked & ground processed rice flour or urad dal flour for murukku dough. Just store bought idiyappam flour, roasted gram flour and besan flour would do.I tried this recipe from here by making a small change in the ratio of flours to make white colored murukku.It came out well with crispy,melt in mouth texture. Friends,if you are looking for some easy murukku recipes for this Gokulashtami,Diwali and other festivals you can go ahead with this recipe. You can make it successfully even if you are a beginner.It’s a good tea time snack & for packing  kids snacks box.Lets see the preparation of butter murukku recipe with stepwise pictures.I took a video to help beginners.Hope it is  understandableThinking and useful to you all. 
Check out my collection of Gokulashtami Recipes HERE

butter murukku

Butter murukku recipe


Butter murukku recipe Crispy,easy butter murukku recipe - For gokulashtami & diwali festivals
Cuisine: Indian
Category: Snacks
Serves: -
Prep time: 10 Minutes
Cook time: 15 Minutes
Total time: 25 Minutes
INGREDIENTS
1 cup = 200 ml
  • Rice flour - 1 cup ( store bought flour/Idiyappam flour)
  • Besan flour/Kadalai maavu - 1.5 tbsp
  • Gram flour/Pottukadalai maavu - 1.5 tbsp
  • Butter - 1.5 tbsp ( at room temp,unmelted)
  • Cumin seeds - 1 tsp
  • Asafetida/Hing - a big pinch
  • Salt & water - as needed
  • Cooking oil - to deep fry
METHOD
  • In a wide bowl,take the rice flour,gram flour,besan flour,butter,salt,hing and cumin seeds.Mix everything well. Add water little by little and make a non sticky dough. I used nearly 1/2 cup + 1-2 tbsp of water.Cover the dough till you make murukku.Do not let it dry.
butter murukku

  • Now take the star mould and fill the murukku maker with a ball of dough. Heat oil to deep fry and check the oil temperature by dropping a pinch of dough.If it raises to the top immediately,oil temperature is right.Keep the flame low and press the murukku.
butter murukku

  • Cook in medium flame till the bubbles cease.Fry it patiently else murukku will turn brown with a burnt smell.Remove in a tissue paper using a slotted ladle.Store in an air tight box once its cool down completely.
butter murukku

Enjoy with tea/coffee.
Note
  • As per the original recipe,2 tbsp of besan and 1.5 tbsp of gram flour is used.But I added them in equal ratio to get white colored murukku.
  • Do not replace butter with oil or ghee.As the name says,butter murukku should be made with butter.
  • You can replace cumin with sesame seeds or ajwain.But flavor would vary.

Try this easy murukku recipe and enjoy with tea/coffee !

الاثنين، 31 أغسطس 2015

No Croutons Required - Call for September 2015 Submissions

no croutons required challenge

Once again it's my turn to host No Croutons Required. This long running monthly event, alternately hosted by Jacqueline of Tinned Tomatoes and myself, showcases vegetarian soups and salads from fellow cooks. The weather is still warm, but there is a hint of autumn in the air, so I suspect we will have a nice mixture of soups and salads as the season is in transition.

As always, it's easy to participate.

To do so, prepare a soup or salad that is suitable for vegetarians and showcase it on your blog.

Link back to this announcement and Lisa's Kitchen as I am the host for September, and also Jacqueline's blog, as she is my co-host for this event.

Add your recipe using the linky tool at the end of this post by the 28th of this month. Only one entry per blogger please.

The roundup will be posted at the end of the month.

We are very much looking forward to your inspired creations. Soups and salads are a staple all year round and those who enjoy cooking never seem to tire of finding new recipes, myself included.


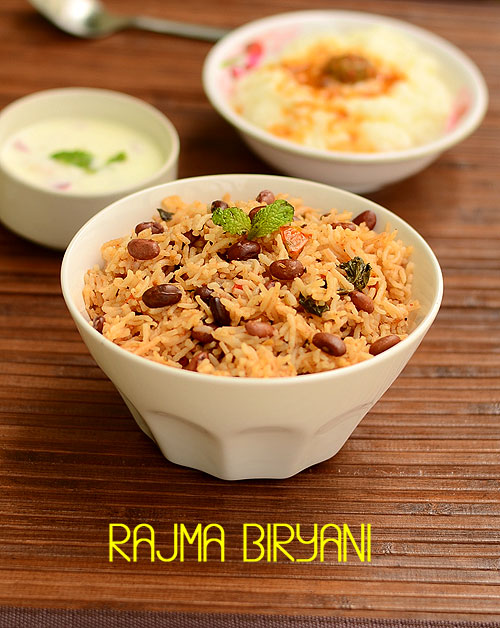
Rajma Biryani Recipe-Rajma Rice-Sunday Lunch Recipes Series 28

Rajma biryani recipe
Last week I couldn’t make biryani recipes on Sunday as I was busy in Onam Sadya preparation.This Sunday I cooked Rajma biryani in an easy way following this recipe.I guess many of you make Rajma pulao/Rajma rice.This recipe is also very similar to that but its with slight variations in masala.I have already shared mixed pulses biryani using Chana,rajma etc.But today’s Rajma biryani recipe is simple to make compared to pulses biryani.Its an ideal lunch box recipe for kids & adults as well.Do give a try.Lets see how to prepare Rajma biryani in pressure cooker.Check out my other biryani recipes in this series here.
Rajma biryani recipe

Rajma Biryani recipe


Rajma Biryani recipe Rajma biryani recipe - Sunday Lunch Recipes Series 28
Cuisine: Indian
Category: Lunch menu
Serves: Serves 3
Prep time: 10 Hours
Cook time: 15 Minutes
Total time: 10H15Min


INGREDIENTS

  • Kashmir Rajma - 1/3 cup ( Its small in size than usual rajma)
  • Basmati rice - 1 cup
  • Salt - as needed
  • Water - 1.75 cups
To grind
  • Ginger - 1 inch & Garlic - 5 cloves OR G&G paste - 1/2 tbsp
  • Green chilli - 1-2 no
  • Turmeric powder - 1/8 tsp
  • Red chilli powder - 1/2 tsp
  • Dhania powder - 1 tsp
  • Cloves - 2 nos
  • Cardamom - 1 no
  • Cinnamon - 1 inch piece
  • Fennel seeds - 1/2 tsp
To saute
  • Cooking oil - 1 tbsp
  • Bayleaf - 1 no
  • Big onion - 1 no
  • Tomato - 1no
  • Mint leaves - 1 tbsp chopped
  • Curd/yogurt - 1 tbsp
  • Ghee - 1 tbsp
METHOD
  • Wash and soak the rajma for 12 hours or overnight.I used Kashmiri rajma.So my rajma looks small in size( I soaked in hot box adding hot water.So mine cooked very soft).Wash and soak the basmati rice for 30 minutes.
Rajma biryani recipe
  • Grind all the ingredients given under “ to grind” to a smooth paste.Set aside.
Rajma biryani recipe

  • Heat oil in a pressure cooker base. Saute the bayleaf,sliced onions.Saute till onion turns transparent.Add the ground masala paste.Saute till the raw smell goes off.Add the chopped tomatoes & saute till mushy.Add the chopped mint leaves,curd and mix well.
Rajma biryani recipe
  • Add water,salt and soaked rice & rajma.Add ghee & pressure cook in low flame for one whistle in low flame.Open the cooker,fluff the rice with a fork.Serve with raita !
Rajma biryani recipe
    Enjoy !
Note
  • Adjust the quantity of spices as per your taste
  • You can use the regular rajma in place of kashmiri rajma..

Try this simple n healthy rajma biryani recipe.It tastes yumm !!
Rajma biryani