الأربعاء، 22 مايو 2013

Creamy Herbed Potato and Green Pea Salad

herbed potato salad

Spring is toddling into summer with faltering steps this year, but the respites of warm sunny weather along the way bring to mind the comforts and pleasures of summer eating. Soups and hearty meals give way to salads and light fare that can be transported to the patio, warming foods give way to refreshing plates, and dried and canned goods give way to fresh herbs and produce. This simple salad of steamed baby potatoes, green peas and fresh herbs tossed in a creamy and vibrant Dijon mustard dressing is just the thing to give you a taste of summer comfort food — especially if you can get your hands of fresh garden peas, although frozen peas will also make for a lovely salad.

The occasion for serving this dish was an opportunity to try some Nasoya vegan "nayonaise" that was sent to me to sample. Now I tend to stay away from unfermented soya products generally, but I've never been overly fond of "traditional" jarred mayonnaise either and, considering how rarely I use mayonnaise anyways, I figured it was worth a try. First, I tried it with my famous vegetarian Caesar salad as it's a classic that I figured would be a fair assessment of the spread. Next, I wanted a potato salad and used it in the dressing with good results. Though it smelled a little unfamiliar when I opened the jar, the taste was mellow and pairs well with stronger flavors for a seamless taste experience. My verdict is that is stands up well to store-bought canola-based mayo and it's vegan-friendly and gluten-free too, made from expeller-pressed oil and fortified with Omega 3.

nayo

Note: I received complimentary samples of the Nayonaise for consideration. The opinions expressed here are my own and I am receiving no compensation for writing this post.

الثلاثاء، 21 مايو 2013

RAW ONION CHUTNEY RECIPE | CHUTNEY RECIPES


I love raw onion chutney. I have already posted my MIL’s and Mom’s onion chutney recipes . I got this recipe from Yummytummy.Thank u Aarthi for this yummy side dish :).Its a very simple & delicious chutney recipe that goes well with idli and dosa. As Sen is not fond of raw onion chutney , i usually make it only for me.I love onion chutney with uttapam a lot .. Its my favourite combo Smile with tongue out..

INGREDIENTS

  • Big onion (or)  Small onion – 2 nos / 12 nos
  • Red chillies – 5 nos
  • Tamarind – A small berry size
  • Garlic – 5 cloves
  • Salt & water – as needed
To temper
  • Gingely oil – 1 tbsp
  • Mustard seeds – 1/2 tsp
  • Urad dal – 1/2 tsp
  • Curry leaves – few

METHOD

  • Grind onions , chillies , garlic , tamarind , salt & water to a smooth paste.
  • Temper all the ingredients given under “to temper” .. Serve with idli , dosa.

NOTE

  • Use small onions for best taste..Add more red chillies if u want more spicy..Adjust tamarind accordingly..U can also use cooking oil or olive oil to temper.

No Croutons Required - Appetizer Soups and Salads

The challenge for May was little bites. We asked for soups and salads that would make for a perfect starter for a meal. Certainly the entries this month stimulated my appetite and I would be delighted to serve each and every dish. Thanks to everyone who found the time to share their creations. We do need to determine a winner, so please vote for your favorite in the comment section or via email. Note that neither my submission nor Jacqueline's is eligible for the vote.

Japanese Cucumber Salad

Our first entry is this refreshing Japanese Cucumber Salad from Charul of Tadka Masala that would be just perfect on a hot and humid day. No cooking required for this combination of cucumber, lemon juice, a bit of sweetener, wine vinegar and toasted sesame seeds. Cucumber gets elegant here.

appetizer salad

Preety is up next with this tempting and rejuvenating Skewered Bite Size Appetizer Salad. The possibilities are endless here. Try grapes, mint leaves, red pepper, cucumber and paneer or feta or mozzarella. Good without any dressing at all, but dress it up with some lemon juice, olive oil, seasonings and herbs, or perhaps a combination of balsamic vinegar and olive oil.

tempeh miso salad

Janet of The Taste Space presents us with a gorgeous Tempeh and Arugula Salad with a Mustard Miso Dressing that is sure to make your table shine. Tempeh is marinated in cider vinegar, tamari, ginger and a bit of oil and then baked. Next arugula, tomatoes and cucumber are topped with the tempeh strips and this goodness is drizzled with a dressing of white miso, Dijon mustard, lemon, oil, garlic and maple syrup. The dressing we are told is especially addictive.

avocado strawberry salad

The next dish to get the taste buds watering is this beautiful Avocado and Strawberry Salad with Honey Vinaigrette from Jagruti's Cooking Odyssey. I'm more eager than ever for the strawberry season and here they are combined with avocado and baby salad leaves and then tossed with a tangy dressing of honey, fresh lemon or lime juice, olive oil and seasoning. Certainly a sweet way to make a sunny day even sunnier.

creamy raw mushroom soup

My contribution this month is this light and earthy Raw Mushroom Soup. A variety of wild mushrooms are whizzed up in a blender with cashews, pine nuts, almond milk, yellow miso, dill, paprika and seasoning. It's incredibly easy to prepare and makes for an elegant starter despite its simplicity or perhaps because of.

fava yogurt soup

Ma Niche tries fava beans at home for the first time and experiments with a Fava Yogurt Soup that has my mouth watering. Skinned fava beans are lightly cooked with sauteed onions, garlic, ginger and chives and then pureed with yogurt and some water and served up chilled, garnished with fresh mint. This is a delightful warm weather appetizer soup for a variety of meals.

halloumi salad

My good friend Jacqueline and co-host of this event shares this stunning Halloumi Salad with Balsamic Tomatoes. Lightly seasoned halloumi is paired here with potatoes, salad greens and herbs, balsamic pan-fried tomatoes and all this goodness is dressed with olive oil, balsamic vinegar, mustard and black pepper. This is a hearty salad, but served in small portions, it would make for an exciting appetizer to start your meal.

cucumber mint soup

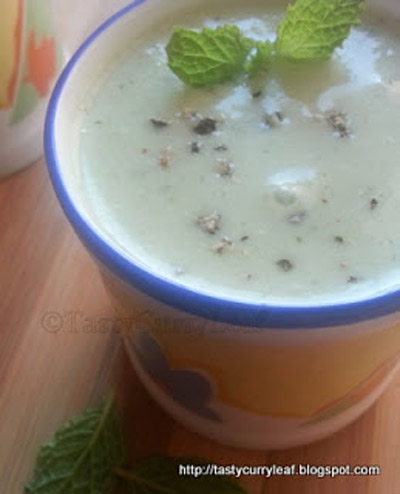
Our final entry is from Sweatha of Tasty Curry Leaf. Served up for our consideration is a delightfully cooling Cucumber Mint Yogurt Soup. Easy to prepare, cucumber is blended with shallots, fresh mint leaves, yogurt and a bit of water. This delicious concoction is then seasoned and garnished with more fresh mint and some olive oil. Sounds like a perfect summer meal starter to me.

Jacqueline will be hosting the June 2013 edition of NCR. Check back at the beginning of the month for the theme.

الاثنين، 20 مايو 2013

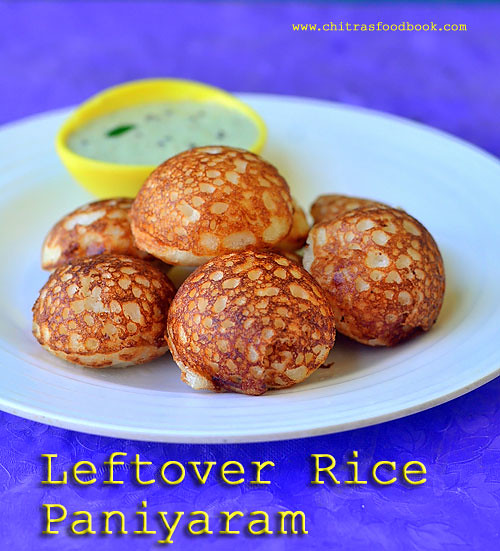
Leftover Rice Kuzhi Paniyaram Recipe|Paniyaram Varieties - Leftover Rice Recipes

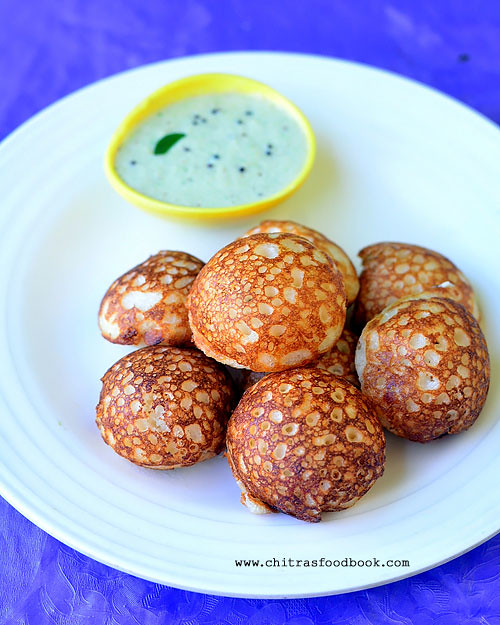
Leftover rice kuzhi paniyaram
I got this recipe from my friend Shalini.I had some leftover rice lying in my pantry.I asked her to suggest me some interesting recipes using it.She immediately told me about this kuzhi paniyaram recipe.I ground the batter in the afternoon and prepared paniyaram for dinner. It was very nice ,soft as well as puffy and we loved it very much. I used mixie to grind the batter which made my job much more easier.In this recipe I used sour curd. So the batter takes less time to ferment ( For me it took 4 hours). Based on the weather in ur place , the fermentation time differs.It may need maximum of 6-8 hours. If u grind the batter in the morning / afternoon (around 1pm) , u can use it for dinner.But my friend told this paniyaram can be made immediately after grinding the batter.Thank u so much Shalini for this yummy recipe.Do try this friends , u’ll love it a lot.Adding cooking soda is a must for this recipe. U can also try ENO fruit salt instead of cooking soda.Hope it gives the same result. :)

If u r interested, do check out my
Leftover rice kuzhi paniyaram

Leftover rice Kuzhi paniyaram


Leftover rice Kuzhi paniyaram Leftover rice Kuzhi paniyaram - How to make instant kuzhi paniyaram using leftover cooked rice
Cuisine: South Indian
Category: Breakfast/dinner
Serves: Serves 4
Prep time: 120 Minutes
Cook time: 5 Minutes
Total time: 125 Minutes


INGREDIENTS
To grind
  • Raw rice ( Good quality sona masoori) – 1.5 cups
  • Leftover cooked rice – 1 cup (Sadham)
  • Sour curd – 1/2 cup
  • Green chillies – 2 nos
  • Salt – As needed
  • Water – as needed
To add in the batter
  • Cooking soda – A big pinch
  • Big onion – 2 nos (finely chopped)
  • Curry leaves – few (-do-)
  • Ginger – 1/2 inch piece (finely chopped)
  • Coriander leaves - few
METHOD

  • Wash & Soak the raw rice and leftover rice together for 2 hours.Then drain all the soaked water and grind it to a smooth paste adding sour curd , green chillies ,salt using required water.Consistency should like dosa batter.

  • After 4 hours or 8 hours of fermentation ( skip cooking soda if you leave the batter for over night fermentation. You should add soda if you leave for 4 hours), add cooking soda ,finely chopped onions, ginger, curry leaves and coriander leaves. Mix well. Heat paniyaram pan. Add 1 tsp oil in each hole and pour the batter till 3/4th of the pan. Cover it with a lid and cook for few minutes. Then flip the paniyaram and cook the other side for few more minutes.

  • Remove using a fork / spoon and serve it hot with chutney !
Leftover rice paniyaram


Enjoy !


Note

  • Urad dal & methi seeds are not necessary for this recipe. Still paniyaram comes out fluffy and soft.
  • Please add the cooking soda just before u make paniyaram. If you leave the batter for overnight fermentation or 12 hours, soda is not necessary.
  • Tastes the best when served hot !!
Enjoy this easy, yummy leftover rice paniyaram for your dinner or breakfast!! 
Technorati Tags: ,,,,,,,,,,,

الأحد، 19 مايو 2013

Peanut Butter Cookie Dough Bites

peanut butter cookie dough bites

I found the idea for these easy, soft and moist, and healthy gluten-free peanut butter and chocolate chip cookies while browsing on facebook one day and eventually found out that the recipe was created by Erin at Texanerin Baking. Egg-free and flour-free too, they contain cooked chickpeas that end up like a flour-based dough after they are whizzed up in a food processor with other ingredients. The dominating flavor is the peanut butter combined with the chocolate resulting in a pleasant rather unstated sweetness from the presence of the raw honey. Do I really need to note that one of life's sweet pleasures is peanut butter paired with chocolate?

They truly are heavenly and guilt-free too, despite the rich flavor experience that awaits you. If you were fortunate enough to grow up in a household where homemade cookies were often made, you will be nostalgic for those bits of raw cookie dough that you sneaked on the sly before you were granted permission to lick the bowl. Again, no need to feel guilty about snacking on some of the dough even before they go into the oven. Nothing bad here at all. These cookies stay moist in a sealed container for several days too, although keeping them around for several days isn't all that likely.


Peanut Butter Cookie Dough BitesPeanut Butter Cookie Dough Bites
Recipe by
From Texanerin Baking
Published on May 19, 2013

Easy, rich and moist peanut butter and chocolate chip "cookie dough" cookies made with chickpeas — egg-free, flour-free, gluten-free and just as guilt-free as they are delicious

Print this recipePrint this recipe

Ingredients:
  • 1 1/4 cups cooked chickpeas (about 1/2 cup dried chickpeas)
  • 2 teaspoons vanilla extract
  • 1/2 cup + 2 tablespoons natural chunky peanut butter
  • 1/4 cup raw honey or agave
  • 1 teaspoon baking powder
  • pinch of sea salt
  • 1/2 cup (3 oz or 90 g) carob or chocolate chips (I used a combination of both)
Instructions:
  • Preheat an oven to 350° and line a baking sheet with parchment paper.

  • Combine all the ingredients except the carob or chocolate chips in a food processor and process until smooth and well combined, scraping down the sides of the processor as necessary.

  • Stir in the carob or chocolate until evenly distributed. The mixture will be thick and gooey.

  • Wet your hands and form the mixture into roughly 1 1/2 inch balls. Transfer to the prepared baking sheet about 1 inch apart. Press down the dough slightly. Bake for about 10 minutes, until the cookies just begin to brown. Transfer to a wire rack to cool for at least 5 minutes before serving.

  • These cookies will keep moist in a sealed container for several days.

Makes 12 to 14 cookies

moist peanut butter cookies

More peanut butter delights you are sure to enjoy from my kitchen:
Cayenne Peanut Butter Cookies
Healthy Peanut Butter Cookies
Gooey Peanut Butter Brownies with Carob Chips
Peanut Butter Carob Balls

On the top of the reading stack: various piles

Audio Accompaniment: Carbon Based Lifeforms

الجمعة، 17 مايو 2013

Mung Beans in a Golden Karhi Sauce

mung beans in yogurt sauce

One of my favorite dishes from Yamuna Devi's gospel of Indian cooking, Lord Krishna's Cuisine: The Art of Indian Vegetarian Cooking is her tender chickpeas simmered in a golden karhi sauce. I've more than a few favorites from the book that often appear on my table, yet each and every time I browse through the 800 pages of culinary Indian bliss, I find yet another recipe that I can't believe I haven't tried … I have owned this treasured cookbook for about 20 years. Then there is the pleasure of revisiting some of my favorites from the book and tinkering with the recipes and my initial adaptations.

Truly, if I had to pick just one cookbook to keep out of my extensive collection, this would be that desert island choice. I'd hope for a truckload of legumes, grains and spices to go along with it and fresh produce from the isle. As I have noted in the past, this was my earliest introduction to Indian cooking shortly after I became a vegetarian. It opened up a whole new nourishing and exciting culinary world to me that I continue to cherish and explore.

This time around, earthy mung beans are simmered in a tangy yogurt sauce. This recipe called for sprouted mung beans, which I am sure would have been just perfect, but I didn't plan ahead — mung bean sprouts take 2 to 3 days of preparation — and so came up with a version using whole mung beans that I soaked overnight and then simmered until tender.

Karhis are yogurt based dishes that are usually served with rice. Often they contain cooked or sprouted legumes, sometimes dumplings and vegetables. This one is on the tangy side of the spectrum and I went with a thicker gravy that is popular in Northern India. Depending on the yogurt you use, a karhi sauce might be slightly sweet, thinner, with a consistency like a soup or a thick gravy. I experimented with the original recipe and came up with this treasured vegetarian main that I served with buttered Jasmine rice. You may want to consider serving up yellow lemon rice with fried cashews as a side for some extra flair and tart flavor.


mung beans in karhi sauce

Mung Beans in a Golden Karhi SauceMung Beans in a Golden Karhi Sauce
Recipe by
Adapted from Lord Krishna's Cuisine: The Art of Indian Vegetarian Cooking
Cuisine: Indian
Published on May 17, 2013

Sweet and colorful mung beans simmered in a creamy, fragrant, spicy and tangy seasoned yogurt sauce

Print this recipePrint this recipe

Ingredients:
  • 1 1/4 cup whole mung beans (3 1/2 cups cooked)
  • 3 1/2 tablespoons chickpea flour (besan), sifted
  • 1 cup coconut milk
  • 1/2 cup water
  • 2 cups whole fat yogurt, whisked
  • 1 1/2 teaspoons sea salt
  • 1 teaspoon turmeric
  • 1 teaspoon ground coriander
  • 1/2 teaspoon fenugreek seeds
  • 1/2 teaspoon chili powder
  • 1/2 teaspoon paprika
  • 1/4 to 1/2 teaspoon cayenne, to taste
  • 2 tablespoons ghee, butter or oil
  • 1 1/2 teaspoons cumin seeds
  • 3 to 4 green chilies, seeded and finely chopped
  • 1/2 teaspoon asafetida
  • 1 inch piece cinnamon stick
  • generous handful of dried curry leaves
  • 1/4 cup fresh parsley or cilantro
  • fresh cracked black pepper to taste
Instructions:
  • Rinse the mung beans and soak in several inches of water for 6 hours or overnight. Drain and rinse, then transfer to a large saucepan and cover with several inches of fresh water. Bring to a boil, reduce heat to medium-low, cover. and simmer for 40 to 50 minutes or until the beans are tender but not falling apart. Drain and set aside.
  • Place the chickpea flour in a large bowl and slowly whisk in half of the coconut milk. Whisk in the remaining coconut milk, water, yogurt, salt, turmeric, ground coriander, fenugreek seeds, chili powder, paprika and cayenne.
  • Pour this mixture into a large heavy-bottomed sauceapn, place over medium heat, and bring to a boil. Stir and simmer until the mixture begins to thicken. Add the cooked mung beans to the pan and continue to simmer for another 10 minutes, stirring often. Add more water if necessary to achieve your desired consistency.
  • Heat the ghee, butter or oil in a small saucepan over medium heat. When hot, toss in the cumin seeds, green chilies, asafetida, cinnamon stick and curry leaves, and stir for a minute or two or until the cumin seeds darken a few shades. Pour into the beans, quickly stir once, and cover. Let sit for 5 minutes. Discard the cinnamon stick, stir in most of the fresh parsley or cilantro (reserving some for garnish).
  • Serve hot or warm garnished with the remaining parsley or cilantro, with hot fresh cooked buttered rice and/or Indian flatbreads on the side.
Makes 4 to 6 servings
mung bean curry

More mung beans dishes you are sure to enjoy from Lisa's Vegetarian Kitchen:
Indian-Style Spicy Mung Beans (Moong Dal)
Mung Bean Paneer
Spicy Mung Beans
Sour Mung Bean Soup

On the top of the reading stack: Chekhov

Audio Accompaniment: street noise

IDLI UPMA RECIPE | LEFTOVER IDLI RECIPES

idli upma bowl
Idli upma is my most favourite South Indian tiffin recipes.If u ask me, i would say it is the tastiest breakfast/dinner recipe in this world Winking smile . I can have it all through the day.I can live with it. My mom makes it specially for me (by reserving some idlies)in the evenings or the next day morning with left over idlis. I like to have it with less oil , more onions & dals and mildly spiced.I love my mom’s upma very muchSmile..Some people make it yellow in color adding turmeric powder but we make it white.. I should say about my MIL here. She knows i am crazy about this upma.So she used to prepare it for me every alternate days when i was pregnant. She adds coconut oil as her own touch.I am really blessed to have such a caring & loving MIL like my mom(Touchwood Winking smile ).Now after tasting this upma from my mom& mil’s hands, i feel bad to try on my own Eye rolling smile.. But i wanted to post my favourite recipe in my blog. So i prepared it yesterday for breakfast and enjoyed every mouth to the core Open-mouthed smile.Please refer “Note’ for variations..Adding more onions gives a nice taste :)

idli upma1

INGREDIENTS
  • Left over idli – 5 nos
  • Big onion – 2 nos OR small onion – 20 nos.
  • Green chilli – 1 no (slit)
  • Ginger – 1/2 inch piece
  • Curry leaves – few
  • Salt – as needed
To temper
  • Cooking oil or coconut oil – 1 tbsp
  • Mustard seeds – 1 tsp
  • Urad dal – 2 tsp
  • Chana dal – 1 tbsp
  • Red chilli – 1 no (pinched into 2)
METHOD
  • Crumble the idlies well and set aside.
  • Usually left over Idlies are slightly dry.. For crumbling easily, just dip the idli in water for just 3 seconds and then try. U can easily crumble and it will be soft too..
  • U can also freeze the leftover idlies in an air tight box for easy crumbling.But after crumbling sprinkle some water & add salt to make it soft..
  • One more way is just crumble the idli well ( without freezing) and sprinkle some water over it . It helps to keep it soft... Add salt to it, mix well and set aside. My mom follows this method..
  • In an iron wok, add mustard seeds .Let it splutter completely. Then add the urad & channa dal and saute till golden brown..Now add the pinched red chilli ,finely chopped onions , ginger , slit green chilli and curry leaves.Saute till onion turns transparent.
idli upma tile1
  • Lastly add the crumbled idli and mix well. Keep it in low flame for 10 minutes till it forms a burnt layer in the bottom. ( We call it as adai/ porukku).. It tastes very nice and crispy ..But adai/ porukku forms only if u use iron or aluminium kadai not in the non-stick pan..
  • Check for salt and switch off the flame. Garnish with coriander leaves if desired!
idli upma tile2
Serve hot !!

NOTE
  • For variations u can add turmeric powder while sautéing onions.U’ll get a nice yellow colored upma.
  • One of my friends suggested me to sprinkle idli podi for an extra spicy punch.
  • To make it more healthy , add finely chopped or grated carrots , peas , potato etc..
Technorati Tags: ,,,,,,,