الأربعاء، 29 فبراير 2012

No Croutons Required - The Winner for February and the Theme for March


The challenge for February was to come up with a vegetarian soup or salad featuring fresh herbs. Congratulations to Karen of Lavender and Lovage who submitted this tempting Wild Garlic, Lemon & Lovage Soup.


I will be hosting the March edition of No Croutons Required. It is my birthday month and as I am a spicy gal, I am asking for vegetarian soups and salads with a kick of spice. Choose any cuisine you like, so long as spices enhance the flavour of your dish. And, because it is my birthday month, tell me what else you would serve on the menu with links to your creations that can be found on your blog.

Inji Kuzhambu Recipe For Rice / Ginger Gravy

I learnt this from my MIL. Lots of ginger were lying in my fridge for long time and i was thinking how to use it. I usually make ginger pachadi . But this time i wanted to try something new and different like a gravy kind. Then my MIl told me about this kuzhambu which tastes similar to vathakuzhambu but with ginger flavor. Ginger lovers would sure love this..It was tasting great when mixed with plain rice topped by sesame oil..With papad as side, u can have a plateful of rice..Winking smileIt serves as a best side dish for curd rice and dal rice too.

INJI KUZHAMBU

INGREDIENTS
  • Ginger paste- Gooseberry sized ball
  • Tamarind- Lime sized ball
  • Sambhar powder – 1 –1.5 tsp  (Heaped) (i used 1 tsp heaped)
  • Salt –As required
To temper
  • Oil – 2 tbsp
  • Methi seeds – 1/2 tsp
  • Mustard seeds – 1/2 tsp
  • Urad dal – 1/2 tsp
  • Jeera – 1 tsp
  • Toor dal –1 /2 tsp
  • Small onion – 5 nos (chopped finely)
  • Garlic cloves – 5 nos (-do)
  • Curry leaves – few (-do-)
METHOD
  • Soak tamarind in hot water for few minutes and take the extract.
  • Grind the ginger pieces to get the gooseberry sized ball by adding little water.
  • Add the ginger paste to the tamarind extract . Add sambhar powder, salt and required water.
  • In a kadai , temper all the ingredients in the same order.Then add the tamarind extract mixture.
  • Allow it to roll boil for few minutes. Boil till the oil separates. Add liitle jaggery for taste.
  • The gravy thickens . Add water if necessary.Switch off the flame..
Enjoy mixing with plain rice adding ghee / sesame oil..
NOTE:
  1. It tastes the best from next day. Its shelf life is around 10 days when kept in fridge.
  2. Can be taken for travel too..
  3. The amount of ginger paste and tamarind paste should be equal. If needed quantity of tamarind paste can be increased . All the tastes gets blended the next day .So make the changes only next day.. (ie, adding salt ,Sambhar powder or tamarind extract)


الاثنين، 27 فبراير 2012

Spicy Adzuki Beans with Sun-Dried Tomatoes and Mushrooms

Adzuki beans, also known as azuki, red cow peas or red chori, are one of my favorite legumes. Easy to digest and fun to experiment with, most often the recipes for adzuki beans out there are for sweet treats. I prefer to use them for a main dish to go along with a grain or Indian flatbread, though I do want to try making some red bean mooncakes at some point. Popular in Asia, these cute little red beans contain a variety of minerals, iron, magnesium, potassium, zinc and folic acid. Certainly a good choice for vegetarians and vegans too.

adzuki beans Indian

I came up with this Indian-style soup that will certainly warm your toes. If you can handle the heat, add a wee bit of fire paste to the pot. This paste is like gold and I always have some on hand. Adjust the spicing according to your preferences and serve with yogurt to help with the heat if desired.

Spicy Adzuki Beans with Sun-Dried Tomatoes and MushroomsSpicy Adzuki Beans with Sun-Dried Tomatoes and Mushrooms
Recipe by
Cuisine: Indian
Published on February 27, 2012

A dark, rich and earthy spicy curry made with adzuki beans and dried mushrooms

Print this recipePrint this recipe

Adzuki beans:
  • 1 1/4 cup adzuki beans, rinsed and soaked for a few hours
  • 5 - 6 cups water
  • 2/3 teaspoon turmeric
Sauce:
  • 5 - 6 sun-dried tomatoes
  • 1/2 oz. dried mushrooms
  • 2 tablespoons ghee or oil
  • 1 teaspoon cumin seeds
  • 1 tablespoon ground coriander
  • 1/2 teaspoon ground cumin
  • 1/2 teaspoon paprika
  • 1/2 teaspoon cayenne
  • 1/4 teaspoon asafoetida
  • 1 1/2 teaspoons sea salt
  • 3 - 4 fresh green chillies, seeded and finely chopped
  • 1-inch piece ginger, peeled and finely chopped
  • 1 large tomato, finely chopped
Finish:
  • 1/2 cup fresh parsley or coriander, chopped
  • 2/3 teaspoon garam masala
Instructions:
  • Rinse the adzuki beans under cold running water and soak for 6 hours or overnight covered in several inches of cold water. Drain and rinse, then transfer to a large pot along with the water and turmeric. Bring to a boil, reduce the heat to medium-low, and cover and simmer until the beans are tender, about 1 hour.

  • Meanwhile, soak the sun-dried tomatoes and dried mushrooms in hot water for 20 minutes. Drain and chop.

  • In a frying pan, heat the ghee or oil over medium heat. Toss in the cumin seeds, and stir and fry until they darken a few shades. Add the chili peppers and ginger to the pan and stir and fry for another few minutes. Now stir in the ground coriander, ground cumin, paprika, cayenne, asafetida and salt.

  • Add the chopped chilies and ginger and stir and fry for another few minutes. Next, add the sun-dried tomatoes, fresh tomato, mushrooms and cook, stirring often, until you have a thick sauce. Stir in some of the parsley and about half of the garam masala. Simmer for another few minutes. Add the mixture to the cooked beans and simmer until the flavors are blended and the soup is thickened.

  • Garnish with the remaining parsley and a sprinkle of garam masala.

Makes 6 servings
Spicy Adzuki Beans with Sun-Dried Tomatoes and Mushrooms

More Adzuki bean recipes you are sure to enjoy from Lisa's Vegetarian Kitchen:
Spicy Adzuki Bean and Brown Rice Salad
Adzuki Bean Casserole
Adzuki Croquettes and Spicy Sesame Sauce
Spicy Adzuki Bean Risotto

On the top of the reading stack: camera instructions (god help me!)

Audio accompaniment: Mutek stuff

السبت، 25 فبراير 2012

Lemon Curd Ricotta Pancakes

lemon curd pancakes

A batch of my homemade golden lemon curd provided the inspiration for these lemon curd ricotta pancakes, and I've got to say that they really are among the most extraordinarily delicious pancakes I've ever tasted. Made from a thick batter without any added sugar except for the sweetness of the lemon curd, these are dense, sturdy and hearty pancakes with a bit of "chew" to them. At the same time, they have a beautifully delicate and almost savory lemon taste and fragrance that makes them a pleasure to nibble on even as they come off the griddle without any toppings. But they made for a lovely treat on a chilly morning covered with some extra homemade lemon curd, warmed on the stovetop, and with some whipped cream and blackberries.

They're also very easy to make and take no more than 10 minutes of preparation and 15 minutes of cooking. Of course I would suggest making your own lemon curd at home to enjoy the rich butteriness and "egg-ness" that store-bought varieties can't quite manage, but these pancakes will still be enjoyable if using the latter.


Lemon Curd Ricotta PancakesLemon Curd Ricotta Pancakes
Recipe by
Published on February 25, 2012

Thick, sturdy and hearty ricotta pancakes made with lemon curd and no added sugar, with a delicate and almost savory lemon taste and fragrance — wonderful on a chilly morning or any morning really, topped with warmed lemon curd or maple syrup, whipped cream, or your favorite berries

Print this recipePrint this recipe

Ingredients:
  • 4 large eggs, separated
  • 1 1/4 cup ricotta cheese
  • 2 generous tablespoons lemon curd
  • 1 1/3 cup all-purpose flour
Instructions:
  • In a small mixing bowl, beat the egg whites until stiff peaks form.

  • In a large mixing bowl, whisk together the egg yolks, ricotta and lemon curd. Mix in the flour and stir to combine. Fold in the egg whites.

  • Heat a buttered or greased skillet over medium heat. Scoop a 1/4 cup to 1/3 cup of batter for each pancake on to the skillet and use a wooden spoon to spread the batter into a roughly circular shape. Cook for 3 to 4 minutes or until the bottom is a golden brown. Turn over and cook for 5 more minutes or until both sides are golden brown and the pancakes are cooked through (you can test with a cake tester or toothpick).

  • Serve hot topped with warmed lemon curd or maple syrup, whipped cream or berries.

Makes four 6-inch pancakes
lemon curd ricotta pancakes

Other pancake recipes from my kitchen:
Light and Creamy Ricotta Pancakes
Vanilla Oat Pancakes
Blueberry & Cornmeal Buttermilk Pancakes
Buckwheat and Molasses Pancakes
Ginger Molasses Pancakes with Mixed Dried Fruit

On the top of the reading stack: "1000 Indian Recipes" by Neelam Batra

Audio Accompaniment: the blues

الأربعاء، 22 فبراير 2012

Staple Corner: How to Make Your Own Lemon Curd

lemon curd

My Mom was always a whiz at baking, able to whip up perfect cookies, squares, pies or tarts seemingly at the drop of a hat. As I've grown older I've lost most of my childhood sweet tooth, but I still occasionally like to try to recreate some of the flavors of my Mom's baking. One of these treats that I fondly recall is her lemon meringue pies — the intense tart and sweet "lemoniness" of the filling is a taste that still resides in my mouth's memories.

Of course a homemade lemon curd seems like a much more "grown-up" way to recapture this intense lemony flavor, especially as a lemon meringue pie filling is essentially only a lemon curd itself but made with cornstarch instead of eggs and butter. And a jar of rich buttery homemade lemon curd is wonderful to have on hand for spreading on a piece of toast or an English muffin without committing yourself to a pie — although it is wonderful for pies, tarts and cakes or as a sauce for pancakes as well. Or better yet some delicious lemon curd ricotta pancakes that I'll be sharing with you soon. It also makes a lovely gift.

Lemon curd is easy to make at home although it takes a little patience to cook over gentle heat. But the most work is in the zesting of the lemons, and a half hour should see you from start to finish. Many lemon curd recipes use only the yolks of eggs or else require straining to remove bits of cooked egg white — which also removes the lemon zest unless you're adding it at the end — but my method makes the best of both worlds by frothing the egg whites before incorporating into the curd so they cook evenly and smoothly. We definitely don't want to lose the lemon zest!

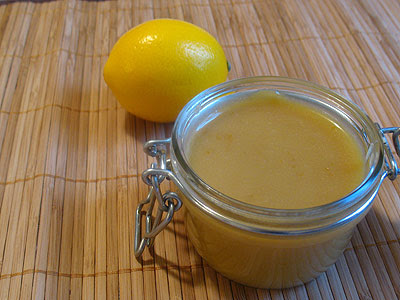
I've also gone a little against the grain by using brown sugar in addition to the customary white sugar. The addition gives this lemon curd a more rustic-looking gold color instead of the typically vibrant yellow, which is why I call it a golden lemon curd. The brown sugar also lends it a scrumptious undertone of caramel. But you may substitute the cup of brown sugar for an extra cup of white if you are looking for a more traditional result. And of course you may also try this recipe with any citrus fruit — think 5 Meyer lemons, or 4 oranges, or even 1 large grapefruit!
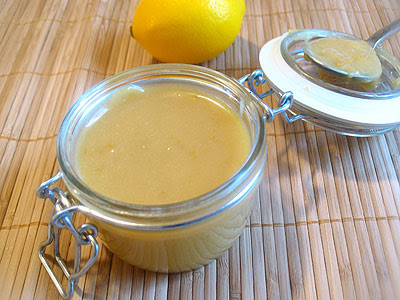

Homemade Golden Lemon CurdHomemade Golden Lemon Curd
Recipe by
Published on February 22, 2012

Homemade golden lemon curd with the intense sweet and tart flavor of lemons and with a lovely undertone of caramel — great for spreading on toast or English muffins, for pies, tarts, cakes and sauces, or for giving as a gift

Print this recipePrint this recipe

Ingredients:
  • 4 large eggs, separated
  • 1 cup white sugar
  • 1 cup brown sugar
  • fine zest and juice of 4 lemons
  • 1 1/2 sticks (6 oz) cold unsalted butter, cut into small pieces
Instructions:
  • Beat the egg whites in a mixing bowl just until the egg whites are frothy — we don't want peaks, so do not over-beat.

  • Bring a large saucepan of water to a simmer over medium heat and fit a stainless steel bowl or smaller saucepan over so that it is sitting in or just above the water but not on the bottom of the lower pan — the water should be bubbling but not boiling. (Or you can use a double boiler if you have one). In the bowl, whisk together the sugar and brown sugar, lemon juice, lemon zest and egg yolks until blended. Cook, stirring constantly to prevent curdling, for 5 minutes.

  • Give the egg whites an extra beat and fold into the sugar and lemon mixture and continue to cook, stirring constantly, until the mixture becomes thick, like sour cream. This takes about 5 to 10 more minutes, but if you find that the mixture is not thickening quickly enough, raise the temperature of the simmering water slightly.

  • Remove from heat and whisk the butter a few pieces at a time into the mixture until the butter has melted.

  • Transfer to a glass or ceramic bowl and place plastic wrap directly on the surface of the curd to prevent a skin from forming, and let cool until room temperature.

  • Pour into jars with tight-fitting lids and refrigerate. Use within 3 to 4 weeks.

Makes 3 cups
lemon curd

Other staples you will be sure to enjoy from Lisa's Vegetarian Kitchen:
Tamarind Chutney
Simple Salsa
Harissa
Shredded Mango and Coconut Chutney

On the top of the reading stack: cookbooks

Audio: Vic Chesnutt

الاثنين، 20 فبراير 2012

Egg Masala Curry in a Spicy Tomato Gravy

egg masala

Pure bliss for connoisseurs of spicy Indian food, I came up with this recipe one evening when I didn't feel like spending time on the net or reading. The result was a fantastic and fiery dish that I have every reason to be proud of — modest girl that I am. If only the local Indian restaurants cooked up a variety of dishes instead of staying with the same menu for years on end without even offering daily specials. Though there are some good Indian restaurants in London, their offerings are restricted to North Indian dishes which is a shame as I really enjoy dishes from various regions of India.

Thankfully, I have a decent knowledge of the art of vegetarian Indian cuisine and can make whatever I choose in my own kitchen. My kitchen is overflowing with spices, including homemade spice blends and pastes. Meals made at home are much better and more economical besides. A varied menu is the motto in my kitchen because your taste buds will thank you, and a well-balanced vegetarian diet should always include a variety of different legumes, grains, dairy and vegetables.

egg masala curry

For those new to Indian cooking, a masala is essentially a blend of spices, most often dry roasted, or a paste made up of spices and other ingredients. The tomato sauce with the coconut paste would also go well over rice or with dumplings or vegetables without the eggs.

Serve with rice and homemade rotis.

Egg Masala Curry in a Spicy Tomato GravyEgg Masala Curry in a Spicy Tomato Gravy
Recipe by
Cuisine: Indian
Published on February 20, 2012

Indian-style eggs simmered in a rich and incredibly flavorful spicy tomato gravy — an extraordinary lunch or dinner

Print this recipePrint this recipe

Eggs:
  • 6 large eggs
  • 2 tablespoons ghee or a mixture of butter and oil
  • 2/3 teaspoons turmeric
Sauce:
    tomato gravy indian
  • 1 teaspoon black mustard seeds
  • 1 teaspoon cumin seeds
  • 1 small onion, finely sliced
  • 1-inch piece of ginger, grated or minced
  • 3 to 4 fresh green chilies, seeded and finely chopped
  • 2 teaspoons ground coriander
  • 1 teaspoon chili powder
  • 1 teaspoon ground cumin
  • 1/2 teaspoon cayenne
  • 1/2 teaspoon curry powder (optional)
  • pinch of ground cinnamon
  • pinch of asafetida
  • 2 large tomatoes, finely chopped
  • good handful of dried curry leaves
Paste:
  • 1/2 cup coconut milk
  • 3 tablespoons plain yogurt
  • 1/4 cup raw cashews, halved
  • 1/4 teaspoon red chili and vinegar paste (optional)
  • pinch of dried mint
  • 1 1/2 teaspoons sea salt
Finish:
  • 1/2 teaspoon garam masala
  • fresh parsley or coriander leaves for garnish
Instructions:
  • Begin by hard boiling the eggs. Place the eggs in a medium large heavy bottomed pot and cover with cold water. Bring to a boil, cook for a few minutes, remove from the heat, cover and let sit for 15 minutes. Transfer to a bowl of ice water, let sit for a few minutes and peel.

  • Heat the ghee, or a combination of butter and oil in a wok or large heavy bottomed pot over low heat. When hot, add the eggs along with the turmeric and gently stir and fry for a few minutes until the eggs are slightly browned. Remove with a slotted spoon and set aside.

boiled eggs with turmeric
  • In the same pan, increase the heat to medium and toss in the mustard seeds and cumin seeds. Stir and fry until the mustard seeds turn grey and begin to splutter and pop. Now add the onion and stir and fry for another five minutes or so or until the onion begins to turn slightly brown. Next add the ginger and chilies and stir and fry for another few minutes.

  • Next into the pot are the spices. Toss in the coriander powder, chili powder, cayenne, curry powder (if using), ground cumin, cinnamon and asafetida. Stir and fry for a minute and then add the tomatoes and curry leaves. Simmer until the tomato mixture is thickened — about 10 to 15 minutes.

  • While the tomatoes are simmering, prepare the paste. In a food processor or blender, blend together the coconut milk, cashews, yogurt, red chili vinegar paste (if using), dried mint and salt. Add the paste to the tomato mixture and continue to simmer until you have a gravy that has thickened to your desired consistency.

  • Add the garam masala and eggs and gently simmer for a few more minutes, stirring occasionally.

  • Garnish with fresh parsley or coriander and serve hot.

Makes 4 to 6 servings

More egg recipes from Lisa's Vegetarian Kitchen you will enjoy:
Shahi Egg
Shakshouka
Greek Scrambled Eggs with Tomatoes and Feta
Indian-Style Fried Egg and Potato Cake

On the top of the reading stack: Nourishing Traditions: The Cookbook that Challenges Politically Correct Nutrition and the Diet Dictocrats by Sally Fallon

Audio Accompaniment: Arthur Oskan

السبت، 18 فبراير 2012

Kidney Beans with a Cardamom-Yogurt Gravy

If you are looking for a quick and easy midweek meal that is nourishing and filling, this is just the recipe for spice lovers like myself. I adapted this recipe from 660 Curries. This curry has a tart flavor despite the lack of tomatoes, lime juice and tamarind. Do cut down on the spicing if you can't handle the heat, and serve some yogurt on the side to cool the palate. This dish goes well with rice or any Indian flatbread.

kidney bean curry cardamon

Another reminder to submit your favorite vegetarian Indian recipe for a chance to win a lovely cookbook. I will except entries until the end of the month.

Kidney Beans with a Cardamom-Yogurt GravyKidney Beans with a Cardamom-Yogurt Gravy
Recipe by
Adapted from 660 Curries
Cuisine: Indian
Published on February 18, 2012

A simple, filling and nourishing red kidney bean curry with an earthy but tangy flavor

Print this recipePrint this recipe

Ingredients:
  • 3/4 cup dried kidney beans
  • 2 tablespoons ghee or oil
  • 1 small onion, finely chopped
  • 3 - 4 green chilies, seeded and finely chopped
  • 6 green cardamom pods
  • 1 cup plain yogurt
  • 1/2 teaspoon turmeric
  • 1/2 teaspoon ground cumin
  • 2 teaspoons rock salt or sea salt
  • 2 teaspoons garam masala
  • 1/2 teaspoon cayenne
  • 2 teaspoons fresh parsley or coriander, chopped for garnish
Instructions:
  • Rinse the kidney beans and soak for 8 hours or overnight in several inches of cold water with a little yogurt whey or lemon juice added. Drain and rinse. Transfer to a medium saucepan and cover with several inches of fresh cold water. Bring to a boil, then reduce the heat to low, cover and simmer for 1 - 1 1/2 hours or until the beans are tender. Drain and set aside.

  • Wipe the saucepan clean and heat the ghee or oil on medium heat. When hot, toss in the onions, hot peppers and cardamom pods and stir and fry until the onion is softened, about 5 - 7 minutes.

  • Now whisk in the yogurt and cook uncovered, stirring occasionally, until most of the liquid evaporates. This should take about 15 minutes. Take care not to burn the yogurt. Now stir in the turmeric, cumin and add 2 cups of water, the cooked kidney beans, garam masala and cayenne. Bring this mixture to a boil, lower the heat to medium and simmer, uncovered, stirring occasionally until the sauce is thickened to your desired consistency.

  • Garnish with parsley or cilantro and serve hot.

Makes 4 servings
kidney bean curry with a cardamom yogurt gravy

Other Kidney Bean dishes you are sure to enjoy from Lisa's Vegetarian Kitchen:
Cornmeal-Crusted Kidney Bean and Black Bean Chili
Kidney Bean and Quinoa Salad
Nigerian Baked Beans
Kidney Beans in a Slowly Simmered Tomato Sauce

On the top of the reading stack: 1,000 Indian Recipes by Neelam Batra

Audio Accompaniment: Vic Chesnutt

الخميس، 16 فبراير 2012

Ash-e Anar ( Persian Split Pea and Pomegranate Soup )

Herbs and fruits are frequently prominent components in Persian cooking, often used to stunning effect when combined with rice, vegetables and spices. This split pea and pomegranate soup is just such a wonderful example of a blend of contrasting ingredients and flavors — from onions and garlic to seeds and spices, and from split peas and rice to fresh herbs and pomegranate molasses — all combined to produce an astonishing result. Hot, sweet and sour at the same time, there is more going on in just this one soup that can really be properly described, but it all joins together into a perfect whole. And a scattering of colorful pomegranate seeds on top burst with a tart pop in your mouth to provide a spectacular finish on the palate.

Persian Split Pea and Pomegranate Soup

Ash-e anar is also a very simple and warming soup that's filling and nourishing at the same time. It doesn't require too much attention, making this an ideal soup for chilly evenings when you don't have a lot of time for prep work but you want something special. I like thick soups that are almost a meal unto themselves, especially at this time of year, and this recipe is written for that effect — but you can easily make this a thinner soup to be served as a starter either by increasing the liquid or reducing the quantity of split peas from 1 cup to 3/4 cup. Pomegranate molasses is a truly wonderful base for this and other soups and is a staple in Persian and Middle Eastern pantries. You can easily find it at any Middle Eastern and most Asian grocers, but if you can't find it you can easily substitute 2 cups of pomegranate juice plus a teaspoon of sugar or honey for the same amount of water or vegetable stock.

Ash-e Anar (Persian Split Pea and Pomegranate Soup)Ash-e Anar (Persian Split Pea and Pomegranate Soup)
Recipe by
Cuisine: Persian
Published on February 16, 2012

A simple sweet-and-sour Persian split pea soup bursting with the flavors of spices, pomegranate and fresh herbs

Print this recipePrint this recipe

Ingredients:
  • 1 tablespoon olive oil
  • 2 onions, chopped
  • 2 cloves garlic, minced or crushed
  • 1 cup yellow split peas, rinsed
  • 1 teaspoon fennel seeds, lightly crushed
  • 1 teaspoon turmeric
  • 1/4 teaspoon ground cinnamon
  • 1/4 teaspoon cayenne
  • 6 cups vegetable stock or water
  • 1/2 cup long-grain white rice, rinsed
  • 1/4 cup pomegranate molasses
  • 1 cup loosely packed fresh mint leaves
  • 1 cup loosely packed fresh parsley
  • 1 teaspoon sea salt, or to taste
  • fresh ground black pepper
  • 1/2 cup pomegranate seeds (garnish)
Instructions:
  • Heat a large saucepan or soup pot over medium heat. When hot, add the olive oil, wait a few moments, then swirl to coat the pan. Toss in the onions and fry for 2-3 minutes or until they begin to turn translucent. Add the garlic and stir a few times. Add the split peas and stir for 2 minutes.

  • Now add the crushed fennel seeds, turmeric, ground cinnamon and cayenne, and stir to coat the peas and vegetables. Pour in the vegetable stock or water and bring to a boil. Reduce the heat to medium-low, cover, and simmer for 45 minutes or until the split peas are just tender.

  • Add the rice, cover again, and simmer for 20-30 minutes or until the rice is cooked. Stir in the pomegranate molasses and herbs and simmer uncovered for 5 minutes to let the herbs wilt.

  • Remove from heat and season with salt and plenty of fresh ground black pepper. Ladle into bowls, scatter pomegranate seeds over top, and serve hot.

Makes 6 - 8 servings
ash-e anar

Other recipes you many enjoy:
Shakshouka ( Tunisian Tomato & Pepper Stew with Eggs )
Mesopotamian Barley, Chickpea, Lentil and Tahini Soup
Zahtar ( Dukkah )

On the top of the reading stack: The National Post

Audio Accompaniment: Sasha

Sorakkai Sweet Kootu & Paal Kootu Recipe - Bottle Gourd Recipes

Sorakkai kootu
 I learnt  Sorakkai ( Suraikai in Tamil,Sorakaya in Telugu,Bottle gourd in English,Lauki in Hindi) kootu recipe from my MIL.Whenever i buy bottle gourd,i prepare this kootu. With vathakuzhambu,it tastes divine. We make this kootu in two ways.One version tastes sweet and the other one is a spicy version. But my vote goes to the sweet version HappyLove it a lot.!! Try whichever u like.Lets see how to make Sorakkai kootu for rice..
Bottle gourd kootu

Sorakkai Kootu - 2 versions


Sorakkai Kootu - 2 versions How to make Sorakkai kootu/Bottle gourd kootu recipe
Cuisine: South Indian
Category: Side dish
Serves: Serves 2
Prep time: 10 Minutes
Cook time: 20 Minutes
Total time: 30 Minutes
INGREDIENTS
1 cup = 200ml
Sweet Version

  • Bottle gourd – 1 no (small size) or use half if it is big
  • Green chilly – 1 no ( finely chopped)
  • Salt & water – As needed
  • Powdered Jaggery – 1/4 cup (adjust )
To grind
  • Coconut – 1/4 cup
  • Rice flour – 1 tsp
  • Water – as needed
To temper
  • Coconut oil - 2 tsp
  • Mustard seeds – 1/2 tsp
  • Urad dal – 1/2 tsp
  • Red chilly – 1 no ( no need to pinch,whole chilli)
  • Curry leaves – a few
  • Milk (optional) to add at the end.
Spicy Version
  • Bottle gourd – 1 no (small size) or half if it is big
  • Moong dal - 1 tbsp
  • Sambar powder – 1 tsp
  • Salt & water – As needed
To grind
  • Grated Coconut – 1/4 cup
  • Rice flour – 1 tsp
  • Water – as needed
To temper
  • Coconut oil - 1 tsp
  • Mustard seeds – 1/4 tsp
  • Urad dal – 1/2 tsp
  • Red chilly – 1 no ( full , no need to pinch)
  • Curry leaves – a few
MILK –ADD LITTLE AT THE END
METHOD

SWEET KOOTU
  • Wash and peel off the outer skin of bottle gourd . Cut into two halves.Now remove the spongy center portion which has seeds.
  • Finely chop the hard portion and add the salt and water. Pressure cook up to one whistle.Meanwhile , grind the grated coconut,green chillies with rice flour adding little water or milk.
  • Now open the cooker and add the powdered jaggery . Mix well. Let it boil for few minutes.Finally add the ground coconut mixture and allow it to thicken .. Add milk at the end if necessary .Temper all the ingredients given above in the same order. Add to kootu .Mix well and serve with Vathakuzhambu.Enjoy !
SPICY KOOTU
  • Wash and peel off the outer skin of bottle gourd .
  • Cut into two halves.Now remove the center portion which has seeds.
  • Finely chop it and add the sambar powder,moong dal, salt and water.
  • Pressure cook up to one whistle.Meanwhile , grind the grated coconut with rice flour adding little water or milk.
  • Now open the cooker and add the ground coconut mixture and allow it to boil . Add milk at the end if necessary .
  • Temper all the items given above and add to kootu..
Enjoy with rice and papad !
For variations,add 2 green chillies while grinding coconut instead of sambar powder.


    Cooking Tips
    • Select small, tender, and firm bottlegourds (light green and fresh-looking); prick the skin, and if it's thin, it's tender. You can use tender bottlegourd with the peel and tender seeds. To use mature bottlegourd, remove the peel and seeds.
    • Taste the bottlegourds before cooking, as they can sometimes be bitter.
    • Wrap in plastic and refrigerate to keep the bottlegourds fresh.
    • Use them for curries, soups, salads, chutneys, jams or desserts. Their neutral taste lends itself to a variety of dishes, both savory and sweet..

الثلاثاء، 14 فبراير 2012

Lemon Ricotta Blueberry Biscuits

lemon ricotta scones

When will this Canadian winter ever end? Though snow in South-Western Ontario has thankfully been rather sparse, and the temperatures rather mild all things considering for this time of year, the apartment I reside in is in a lovely old house but alas, we have no control over the heating and being a rather wee girl, I suffer from the cold and drafts that older homes tend to be prone to. What better way to warm up than to make a baked treat? I always leave the oven door open after the baking is done for additional heat. Why waste that precious warmth?

These biscuits — or scones if you prefer to call them — are a delicious and even slightly savory dessert to finish off any meal. Though they are packed with blueberries, they are also an enjoyable side to go along with a vegetable soup, perfect for a light breakfast or brunch or snack. Easy to prepare and well worth the effort even considering the number of dishes baking creates. They won't last long, especially if you have an eager husband and friend wishing to fill their tummy with blueberry delights. Ricotta cheese is an ideal component to baked goods — creamy without tartness or an over-powering flavor.

I highly recommend lining your baking sheet with parchment paper. It is fine to grease the baking sheet instead, but you are more likely to come out with biscuits that are perfectly browned on the bottom if you follow my method.

Lemon Ricotta Blueberry BiscuitsLemon Ricotta Blueberry Biscuits
Recipe by
Published on February 14, 2012

Light and creamy lemon ricotta biscuits loaded with plump blueberries and just a little sweetness — great for snacks, simple desserts, or even as a dinner side

Print this recipePrint this recipe

Ingredients:
  • 2 cups unbleached white flour
  • 1/2 cup whole wheat flour
  • 1/3 cup white sugar
  • 1 tablespoon baking powder
  • 1/4 teaspoon baking soda
  • 1/2 teaspoons sea salt
  • 1/4 teaspoon lemon zest
  • 1/2 cup cold butter
  • 1 cup ricotta cheese
  • 1 large egg, beaten
  • juice of 1 small lemon
  • 1 teaspoon vanilla
  • 1 cup fresh or frozen and defrosted blueberries
Instructions:
  • Line a baking sheet with parchment paper. Alternately, you can grease the pan.

  • In a large bowl, combine the flours, baking powder, baking soda, sugar, salt and lemon zest. Cut the butter into the mixture with a pastry cutter or knife and fork until the butter is reduced to small pea-like crumbs.

  • Make a well in the center of the ingredients, stir in the ricotta, egg, lemon juice and vanilla. Stir until a dough begins to form. Fold in the blueberries and stir. With slightly floured hands, gently knead the mixture in the bowl until the dough comes together. Shape into roughly 1 inch rounds and transfer to the prepared baking sheet. Bake in a preheated 425° oven for 15 minutes or until the biscuits begin to turn a golden brown color. Let sit on the baking sheet for 5 minutes, transfer to a wire rack and let cool for a while longer.

Makes 9 to 10 large biscuits
lemon scones

Other biscuits and scone recipes from Lisa's Vegetarian Kitchen you are sure to enjoy:
Cheddar Dijon Biscuits
Quick and Easy Ricotta Biscuits
Cornmeal Biscuits
Blueberry Cottage Cheese Biscuits

On the top of the reading stack: camera tips from a few good websites

Audio Accompaniment: Mutek Podcasts

السبت، 11 فبراير 2012

Curry-Laced Potato, Carrot and Broccoli Soup

potato vegetable soup

As careful as I ordinarily am to to provide a balance of proteins, fats and other nutrients into my dinners, there are times when I just crave a little comfort food and a blissful indifference to the rest. Not that it's difficult to balance the essential nutrients, and after years of healthy vegetarian living I can do this pretty much automatically, but still… It may just be the time of year when it seems like spring really ought to be right around the corner, but it's not and we're all still just coping with the cold and dark.

That said, I'm not going to start gorging on deep-fried goodies just for the sake of comfort either. No, for me comfort is a hot bowl of a simple and creamy homemade potato, carrot and broccoli soup, just all by itself and no worries about whether I'm incorporating grains or legumes into my meal for just one particular night. I love the smell of cooked potatoes, and the little specks of bright green broccoli buds swimming on the surface of the soup is a visual treat. And no one is going to call a potato, carrot and broccoli soup unhealthy.

If you want a spicier version of this soup, consider adding more curry powder, a dash or two of cayenne and a small amount of red chili and vinegar paste.


Curry-Laced Potato, Carrot and Broccoli SoupCurry-Laced Potato, Carrot and Broccoli Soup
Recipe by
Published on February 11, 2012

A simple and warming soup loaded with comfort food vegetables for chilly evenings.

Print this recipePrint this recipe

Ingredients:
  • 1 tablespoon olive oil
  • 2 onions, chopped
  • 2 large potatoes, diced
  • 1 large carrot, sliced
  • 1 head of broccoli, stems trimmed and diced, florets broken into small pieces
  • 1 teaspoon curry powder
  • 7 cups vegetable stock or water
  • 1 cup whole milk
  • 1 1/2 teaspoons sea salt, or to taste
  • fresh ground black pepper
  • fresh grated Cheddar or Parmesan cheese for garnish (optional)
Instructions:
  • Heat the olive oil in a large saucepan or soup pot over medium heat. Add the onions and sauté for 3 to 4 minutes or until the onions are translucent. Add the potatoes, carrot, broccoli stems and curry powder and stir to coat the vegetables.

  • Raise the heat to medium-high and pour in the vegetable stock or water. Bring to a high simmer, reduce the heat to medium, and cook for 20 minutes or until the vegetables are tender. Stir in the milk and warm for 2 to 3 minutes, stirring frequently.

  • Remove from heat and purée a portion of the soup with a hand blender or in a countertop blender — purée a larger portion if you prefer a creamier soup, or a smaller portion if you prefer a chunkier soup.

  • Return to heat and season with salt and plenty of fresh ground black pepper. Add the broccoli florets and simmer for 3 to 4 minutes or until the florets have turned a bright green.

  • Serve hot in bowls with a scattering of grated cheddar or Parmesan cheese if desired.

Makes 8 servings
Other soups from my kitchen:
Cream of Potato and Turnip Soup
Curry-Laced Pumpkin and Potato Soup
Caldo Verde (Portuguese Potato and Kale Soup)

الأربعاء، 8 فبراير 2012

Bengali-Style Potatoes in a Seasoned Yogurt-Pistachio Crust

These potatoes are marinated in a fragrant seasoned yogurt blend before they are fried to create a fragrant golden-brown spice crust with delicate aromatic flavours and just enough spicy heat. They're a wonderful accompaniment to almost any northern Indian style meal — or any other meal or just snacking for that matter. As an added benefit, the easy preparation required is done hours before a meal, making the actual cooking a simple process during which other dishes can be attended to.

Bengali-Style Potatoes

This recipe is adapted from Yamuna Devi's indispensible Indian cookbook, Lord Krishna's Cuisine, which the author in turn adapted from a Bengali dish. Note that the green chilies do not need to be seeded to make the yogurt-pistachio blend — you can remove the seeds if you wish to reduce the "heat", but the potatoes are not spicy hot in any case. Please also note that the recipe calls for cardamom seeds and not the pods — an 1/8 teaspoon of ground cardamom can be substituted if you do not have the seeds on hand. Nigella seeds, curry leaves and cardamom seeds are all available at your local Indian grocer.

Also a reminder to send in one of your favorite Indian vegetarian recipes for a chance to win a lovely cookbook. Details can be found here.

Bengali-Style Potatoes in a Seasoned Yogurt-Pistachio Crust
Recipe by
Adapted from Lord Krishna's Cuisine
Cuisine: Indian
Published on February 8, 2012

Potatoes marinated in a fragrant seasoned yogurt blend and then fried to create a fragrant golden-brown spice crust with delicate aromatic flavors and just enough spicy heat.

Print this recipePrint this recipe

Ingredients:
  • 1 1/2 lb small potatoes
Yogurt-Pistachio Blend:
  • 3/4 cup plain yogurt
  • 1/3 cup raw pistachios
  • 2 green chilies, chopped
  • 1-inch piece fresh ginger, chopped
  • small handful fresh coriander or parsley leaves
  • 2 tablespoons dried grated coconut
  • 1/2 teaspoon dried red chili flakes
  • 1/4 teaspoon cardamom seeds
Finish:
  • 2 tablespoons ghee or olive oil
  • 1-inch piece cinnamon stick
  • 1 tablespoon fresh or dried curry leaves
  • 2 teaspoons cumin seeds
  • 1/2 teaspoon nigella seeds
  • 1 teaspoon sea salt
  • 1/2 teaspoon turmeric
  • juice of 1 lemon
Instructions:
  • Scrub the potatoes and cut into 1-inch or bite-sized cubes. Steam or cook the potatoes until just tender. Add the cooked potatoes to a mixing bowl and set aside.

  • Meanwhile, combine the yogurt, pistachios, green chilies, ginger, coriander or parsley, coconut, dried red chili flakes and cardamom seeds in a small blender or food processor, and process until smooth.

  • Pour the yogurt-pistachio blend over the potatoes and mix. Cover and refrigerate for 1-3 hours.

  • Heat the ghee or olive oil over medium-high heat in a large non-stick pan. When hot, toss in the cinnamon stick, curry leaves, cumin seeds and nigella seeds and fry for 30 seconds or until the spices become fragrant and the cumin seeds darken a couple of shades.

  • Stir in the coated potatoes, salt and turmeric. Reduce the heat slightly to medium. Stir occasionally and cook for 30 minutes or until the potatoes are dry and have a golden crusty surface.

  • Remove from heat and serve hot or warm, sprinkled with a little fresh lemon juice just before serving. Reheat potatoes by gently re-frying on medium-low heat for 10-15 minutes.

Makes 6 servings

Indian potatoes

Other Indian potato ideas you may enjoy:
Bengali-Style Crunchy Potatoes
Aloo Gobi
Tamarind Potatoes

On the top of the reading stack: The Cat's Table by Michael Ondaatje

Audio Accompaniment: relative silence