الخميس، 28 يونيو 2012

Lentil Salad with Walnuts, Goat Cheese and Sun-Dried Tomatoes

As much as I enjoy summer, the heat waves at times can be unbearable. Weather that has you melting into a puddle calls for simple salads that required little fuss in the kitchen. An added bonus is that this salad keeps well in the refrigerator for a few days, so you won't have to worry about cooking everyday.

lentil walnut salad with goat cheese

A delicious salad to enjoy anytime of year, I especially liked it because I was able to use some fresh herbs from my potted garden. The addition of goat cheese adds a bit of substance along with the lentils - this will fill you up but not tax your digestive system. We usually want something fairly light on those sweltering days. The dressing is so refreshing and light combining a number of my favorite oils and vinegar. Add some champagne vinegar if you have some on hand or add a dash or two of rice vinegar if desired. Serve with a whole grain for a complete and balanced meal that is especially enjoyable on a patio or deck.

Lentil Salad with Walnuts, Goat Cheese and Sun-Dried TomatoesLentil Salad with Walnuts, Goat Cheese and Sun-Dried Tomatoes
Recipe by
Published on June 28, 2012

A light and healthy but robust-tasting summer lentil and arugula salad with walnuts, goat cheese and sun-dried tomatoes

Print this recipePrint this recipe

Salad:
  • 5 sun-dried tomatoes
  • 1/2 cup walnut pieces
  • 1 tablespoon olive oil
  • 1 small red onion, finely chopped
  • 1 small clove garlic, minced or crushed
  • 1 1/4 cups French lentils
  • 1 1/4 cup water
  • 1 large bay leaf
  • 1 teaspoon fresh thyme, chopped
  • 1 teaspoon fresh rosemary, chopped
  • 4 oz (120 g) firm ripened goat cheese, crumbled
  • several handfuls of arugula, torn into pieces if the leaves are large
Dressing:
  • 1 small clove garlic, minced
  • 1 - 2 teaspoons sea salt, to taste
  • 1 teaspoon mustard powder
  • pinch of cayenne
  • 1/4 teaspoon Dijon mustard
  • 2 tablespoons balsamic vinegar
  • 2 tablespoons walnut oil
  • 3 - 4 tablespoons olive oil
  • splash of fresh lemon juice
  • fresh ground black pepper to taste
Instructions:
  • Soak the sun-dried tomatoes in hot water for 20 minutes, then drain and chop. Meanwhile, toast the walnut pieces in a medium heavy-bottomed saucepan over medium heat for 5 minutes or until slightly browned. Remove from the pan and set aside.

  • Return the saucepan to the stove and heat the oil. When hot, add the onion and stir for 5 minutes. Add the garlic and stir for 1 minute. Now add the lentils, water, bay leaf, thyme, rosemary and bring to a boil. Reduce the heat to medium-low, cover, and simmer, stirring occasionally, for 40 minutes or until the lentils are tender and the water has evaporated. Add the sun-dried tomatoes part-way through the cooking time

  • While the lentils are cooking, whisk together the dressing ingredients in a small bowl. Set aside to cool for a bit.

  • When the lentils are finished, transfer to a large bowl and add half the walnut pieces and most of the goat cheese and arugula. Pour in the dressing and toss well.

  • Serve warm or cold garnished with the remaining walnut pieces, goat cheese and arugula.

Makes 6 servings
lentil walnut salad with goat cheese

More summer salads you are sure to enjoy from Lisa's Vegetarian Kitchen:
Mixed Greens with Warm Goat Cheese and Pesto
Summer Chickpea Salad
Lazy Summer Cottage Cheese & Fruit Salad
Fried Halloumi Saganaki and Asparagus

On the top of the reading stack: "Revenge of the Vegetarian" by Jim Tilberry

Audio Accompaniment: the ceiling fan

الثلاثاء، 26 يونيو 2012

Tomato and Goat Cheese Crustless Quiche

This dish I whipped up to go along with Spicy Chickpea Patties and Vegetable Gravy for my weekend feast. It is a tradition of mine to treat my husband and my friend Basil to a special meal, unless the temperatures are too high to consider even a small amount of time in the kitchen. I suspect this weekend might be one of those times when minimal food prep is in order.

Tomato and Goat Cheese Crustless Quiche

The balance of flavors are simply sublime and this makes an excellent breakfast too, just on its own. The goat cheese is really essential in the quiche, and the other cheeses certainly compliment the rest of the ingredients, including the fresh basil from my garden and nutty quinoa. I was told this was worthy of any restaurant menu meal.

Summer is a great time to grow your own fresh herbs, peppers and tomatoes, and I have a lovely potted garden growing in the backyard. Economical, fresh and you can fetch just want you want without wasting anything.

Tomato and Goat Cheese Crustless Quiche with QuinoaTomato and Goat Cheese Crustless Quiche with Quinoa
Recipe by
Published on June 26, 2012

A simple, delicious and fresh tomato and goat cheese quiche with quinoa

Print this recipePrint this recipe

Ingredients:
  • 1/2 cup quinoa
  • 3/4 cup water
  • 6 sun-dried tomatoes
  • 2 teaspoons sesame oil
  • 1 medium onion, diced
  • 1/3 cup quinoa flour or unbleached white flour
  • 4 large eggs
  • 3 tablespoons fresh basil, finely chopped
  • 2 - 3 fresh green or red chilies, seeded and finely chopped
  • 3 medium plum tomatoes or 2 medium tomatoes, seeded and diced
  • 1/3 cup milk or yogurt
  • 5 oz (140 gram) soft goat cheese, crumbled or mashed
  • 1/2 cup fresh grated sharp Cheddar cheese
  • 1/3 cup fresh grated Parmesan cheese
  • pinch of cayenne
  • 1 teaspoon sea salt
  • fresh cracked black pepper to taste
Instructions:
  • Rinse the quinoa and soak overnight in the water in a small saucepan. Bring to a boil, reduce the heat to low, cover and cook for 15 to 20 minutes or until the water is absorbed. Set aside and let cool. Fluff with a fork before adding to the rest of the ingredients.

  • Meanwhile, soak the sun-dried tomatoes in hot water for 20 minutes, then drain and chop.

  • Grease a 9-inch pie plate or baking dish with butter or oil.

  • Heat the oil in a skillet over medium heat. When hot, add the onion and stir for 5 minutes or until the onion begins to brown. Remove from heat.

  • In a large bowl, whisk together the flour and eggs. Now add the cooked quinoa, onion, basil, tomatoes and sun-dried tomaotes, milk or yogurt, goat cheese, Cheddar cheese, Parmesan cheese, cayenne, salt and black pepper. Stir well to combine. Transfer the mixture to the greased baking dish and smooth the mixture out evenly with a spatula.

  • Bake in a preheated 350° oven for 50 minutes or until set. Let the quiche cool for 10 minutes and run a knife around the edges of the dish. Cut into wedges and serve hot, at room temperature or cold.

Makes 6 to 8 servings
Tomato and Goat Cheese Crustless Quiche

More egg dishes you are sure to enjoy from Lisa's Vegetarian Kitchen:
Baked Strawberry Ricotta French Toast
Asparagus and Feta Cheese Frittata
Cheddar and Mushroom Shirred Eggs
Devilled Curried Eggs

On the top of the reading stack: Revenge of the Vegetarian by Jim Tilberry

Audio Accompaniment: Daniel Waples

الاثنين، 25 يونيو 2012

Chettinad Style Appam Recipe Without Yeast-South Indian Breakfast Recipes

Appam recipe

I got this South Indian( chettinad style) appam recipe from here. But i did not follow the same method which was given there instead i used my mom’s method for ease n convenience.The result was fluffy,soft aapam which we had with vegetable stew. We loved it.Thanks to solai aachi for this wonderful recipe. This is sure a keeper. There are so many aapam recipes on net. Even i had posted some from my friend. Most of the recipes have urad dal , methi seeds and coconut milk.I was also making aapam using these ingredients. But my mom said that appam batter would smell more like dosa.She also said aapam has a typical coconut flavor and taste. So this time i used only rice n coconut. As my mom said , it smells and tastes great. Next time i am planning to try solai achi’s authentic method and post it HappyLets see how to make appam recipe with sweet coconut milk for breakfast !!

Chettinad Appam Recipe


Chettinad Appam Recipe Chettinad Appam Recipe Without Yeast
Cuisine: Indian
Category: Breakfast
Serves: 10-12 nos
Prep time: 10 Minutes
Cook time: 10 Minutes
Total time: 20 Minutes


INGREDIENTS
1 cup - 200ml

  • Raw rice – 1 cup
  • Boiled rice –1 cup
  • Cooked rice - 1/4 cup
  • Grated coconut – 1/2 cup
  • Cooking soda – 2 pinches
  • Salt – As needed
  • Sugar – 1 tsp
  • Coconut water – little
**  For Sweetened coconut milk
Grind 1/4 cup of grated coconut with 1/4 cup of warm water and take the first extract.Add 3- 4 tsp of sugar and 2 crushed cardamom pods.Mix well , heat for few secs. Pour it on top of appam and enjoy..
METHOD

  • Soak both the rice together for 2-3 hrs.
  • Break the coconut and take the water.Set aside.Grate it and keep aside.
Appam recipe 1
  • Grind the rice together adding the coconut water & cooked rice.
  • Add half of the required salt.After the rice starts to grind , add the grated coconut.
  • Add water if necessary. Make sure the batter is not too watery.It should be thick.Allow it to ferment overnight or 8 hrs.
  • The next day morning , add 2 pinches of cooking soda , sugar and little salt.Mix well and keep aside for 10 mins.
Appam recipe 2
  • Heat the aapam skillet (aapam chatti) and pour a ladleful of batter in the centre.
  • Now swirl the aapam skillet in a circular motion so that the sides would be thin and center portion would be thick.
Appam recipe
  • Cover with a lid and cook in medium flame for few mins.
  • The sides will raise and center portion will be cooked with holes on it.
  • Remove the aapam and enjoy with stew !!
Appam recipe without yeast
We had  appam with **sweetened coconut milk and vegetable stew.

**  For Sweetened coconut milk
Grind 1/4 cup of grated coconut with 1/4 cup of warm water and take the first extract.Add 3- 4 tsp of sugar and 2 crushed cardamom pods.Mix well , heat for few secs . Pour it on top of aapam and enjoy..

Note
TIPS from Mrs.Mallika badrinath

1. When bubbles does not form in the dosa, add little more cooking soda.
2. If the bottom of the dosa sticks to the pan and doesn’t come out well that shows coconut milk added is more than the required measure.
Enjoy soft n spongy appam with sweet coconut milk ! Tastes yummmm..
Appam recipe without yeast
 

الأحد، 24 يونيو 2012

Tamarind Sambar

tamarind sambar

Sambars are thick, spicy and fiery vegetable curries and are usually served as the first course of a traditional south Indian meal, but they also make a lovely light lunch or dinner on their own served with rice and pappadoms. This version, which I have adapted from my treasured copy of Dakshin by Chandra Padmanabhan, is easy to prepare and combines the goodness of some split dals and a generous amount of spice, complete with tart and tangy tamarind pulp to give the sambar a unique and delicious hot and sour flavor. If you like Indian hot, this is just the dish for you, followed by a rasam, and served also with a side salad and poriyal. Do serve with some plain yogurt on the side to temper the heat if desired.

Dakshin is certainly a cookbook worth having if you enjoy drool-worthy photos and valuable information and recipes from and about south India. When I first started cooking Indian cuisine, I mostly made dishes originating from northern India. But I wanted to explore native dishes from other regions and this book was certainly a pivotal turning point in my approach to Indian vegetarian cooking. I continue to explore dishes from throughout the subcontinent, dabble with fusion-style dishes, and hope my creations will inspire my readers to get into the kitchen and spice it up.

Tamarind and the other ingredients listed in this recipe are easily available at any Indian and most Asian grocers.

Tamarind SambarTamarind Sambar
Recipe by
Adapted from Dakshin
Cuisine: Indian
Published on June 24, 2012

Thick, hot and sour south Indian tamarind sambar curry

Print this recipePrint this recipe

Tempering:
  • 3 tablespoons sesame oil
  • 1 teaspoon black mustard seeds
  • 3 dried whole red chilies, broken into pieces
  • 2 fresh green chilies, seeded and minced
  • 1/2 teaspoon asafetida
  • 1/2 teaspoon fenugreek seeds
  • 1/4 teaspoon cayenne
  • 1 teaspoon toor dal, well rinsed
  • 1 teaspoon chana dal, or yellow split peas, well rinsed
  • 1 teaspoon urad dal, well rinsed
  • generous handful of dried curry leaves
Sambar:
  • 4 to 5 shallots, chopped
  • 3 teaspoons sambar powder
  • 1 tablespoon jaggery or brown sugar
  • 1 generous teaspoon tamarind pulp
  • 2 cups hot water
  • 1 1/2 teaspoons sea salt
  • 2 tablespoons chickpea flour (besan)
  • 1/2 cup water
Instructions:
  • Heat the oil in a medium heavy-bottomed saucepan over medium heat. When hot, add the mustard seeds and stir and fry until they turn grey and begin to splutter and pop. Next add the dried and fresh chilies, asafetida, fenugreek seeds and cayenne, and stir and fry for a minute. Now add the dals and curry leaves to the pan and continue to stir for a few minutes or until the dals turn a golden color.

  • Next add the shallots and sauté for a few minutes. Toss in the sambar powder and jaggery or brown sugar and stir for a minute. Now add the tamarind pulp, water and salt, and cover the pan. Simmer for 10 minutes. While the mixture is simmering, whisk together the chickpea flour and 1/2 cup of water. Add to the pot and continue to simmer for 3 to 4 minutes.

  • Remove from heat and serve hot or warm alongside a plate of hot fresh cooked white rice.

Makes 4 servings
South Indian Tamarind Sambar

More Indian recipes from Lisa's Vegetarian Kitchen you are sure to enjoy:
Bitter Melon (Bitter Gourd) Sambar
Black-Eyed Pea Sambar
Chana Saag (Chickpea and Spinach Curry)
Macaroni and Paneer Cheese

الجمعة، 22 يونيو 2012

Strawberry-Rhubarb Syrup with Ricotta Pancakes

Without any care or tending at all, rhubarb grows into enormous stalks and leaves in the corner of my backyard every year from spring right through into late summer. It must be one of the most carefree food plants that grows in this climate. Although rhubarb stems are rich in vitamin C, dietary fiber and calcium, their sour taste means that they're ordinarily stewed with sugar and used for desserts like pies and cobblers — that is why rhubarb was once known as the "pie plant" in the United States. Their sour taste also lends a wonderful tartness to strawberries with which they're commonly combined — strawberry-rhubarb pies can be found all over around here in Ontario in the spring and summer.

Once it is cooler, I am going to make a pie from the harvest in the backyard. Hubby and best friend Basil are chopping at the bit in anticipation. In the meantime, try this for a weekend breakfast.

rhubarb pancakes

This beautiful sweet and tart rhubarb and strawberry combination also makes a great syrup for using on pancakes or ice cream or in teas, milkshakes or other drinks, and the best part of making this easy syrup is that straining the stewed fruits before reducing the syrup yields a delicious compote that you may want to consider using in a pie or cobbler too. I served up this syrup and compote on my famous light and creamy ricotta pancakes with plenty of syrup left over for ice cream when the weather turns hot again this week. The compote is also excellent served with ice cream.

rhubarb sauce

Tips: choose firm and smooth rhubarb stems but avoid stems that are hard and rigid or blotched. You can also use frozen rhubarb and/or strawberries to make a syrup, but you may want to reduce the water slightly.

Strawberry-Rhubarb SyrupStrawberry-Rhubarb Syrup
Recipe by
Published on June 22, 2012

Tart and sweet homemade strawberry-rhubarb syrup

Print this recipePrint this recipe

Ingredients:
  • 1 pound fresh rhubarb, chopped
  • 1 pound strawberries, halved or quartered
  • 1 cup white sugar
  • 3/4 cup water
  • juice and zest from 1/2 lemon
Instructions:
  • Bring all the ingredients to a boil over medium-high heat in a medium saucepan. Reduce the heat to medium-low and simmer, stirring frequently, for 5 minutes or until the rhubarb is soft.

  • Strain the liquid, reserving the pulped fruits for use as a compote, and return the liquid to the pan. Bring to a simmer again and continue to simmer gently, stirring occasionally, for 1/2 hour to 1 hour or until the syrup has thickened to a desired consistency.

  • Remove from heat, pour into jars, and refrigerate for up to 1 week.

Makes 1 cup of syrup and 1 cup of compote

Light and Creamy Ricotta Pancakes Light and Creamy Ricotta Pancakes
Recipe by
First published on March 23, 2010

These light, fluffy and creamy ricotta cheese pancakes are simple to whip up

Print this recipePrint this recipe

Ingredients:
  • 4 large eggs, separated
  • 3/4 cup whole milk
  • 2 tablespoons honey
  • 1/2 teaspoon vanilla
  • 1 1/4 cups unbleached all-purpose flour
  • 1 teaspoon baking powder
  • pinch of sea salt
  • zest from 1/2 lemon
  • 1 cup whole milk ricotta cheese
Instructions:
  • Combine egg yolks, milk, honey and vanilla in a large mixing bowl. Stir in flour, baking powder, salt and lemon zest. Cover with a clean dish cloth and set aside to rest for 15 minutes.

  • Beat the egg whites until stiff peaks form. Gently fold into the batter, leaving a few white streaks. Gently mix in the ricotta, leaving small chunks of cheese in the batter.

  • Heat a non-stick griddle or cast-iron skillet over medium heat. Lightly grease the pan with butter. When the pan is hot enough to makes drops of water dance and sputter before vanishing, pour in 1/3 cup of batter for each pancake. Cook for 1-2 minutes or until small bubbles appear on the edges, then flip and cook for 2 more minutes or until the batter is set and the sides are golden brown.

  • Remove from heat and serve right away drizzled with strawberry-rhubarb syrup and with a spoonful of the compote.

Makes about 16 4-inch pancakes
rhubarb pancakes with sauce

Other pancake and syrup posts you may enjoy:
Homemade Maple Syrup from Muskoka
Vanilla Oat Pancakes
Mollie Katzen's Blueberry & Cornmeal Buttermilk Pancakes
Cottage Cheese Blintzes and Peach-Plum Compote

On the top of the reading stack: The Mr. Men Cookbook

Audio Accompaniment: Daniel Waples - Banyan Tree

الثلاثاء، 19 يونيو 2012

Asparagus Mimosa

Seasonal local asparagus is a real treat here in southern Ontario. Because of the robust and unique flavor of this treasured vegetable, it is best to keep things simple and pair it with just a handful of simple but classic flavors such as butter, lemon or salt to let the asparagus shine. The Italians know this quite well, and love to serve asparagus with eggs — hard-boiled, soft-boiled, in egg sauces or in frittatas.

Asparagus Mimosa

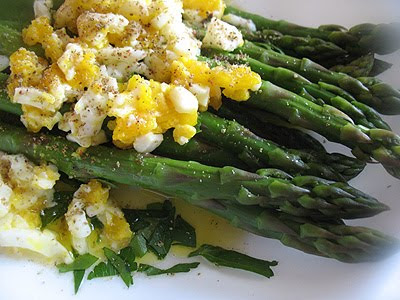
This is a variation of an asparagus mimosa, a classic Italian asparagus dish served with grated cooked egg and olive oil and often very little else except salt and perhaps a little lemon juice. Although ordinarily a hard-boiled egg is grated for this salad, I made some soft-boiled eggs instead to let a little of the yolk ooze out onto the lightly steamed asparagus — instead of grating the egg you may find it easier to finely chop the eggs instead. I used a little of the extra-virgin O meyer lemon olive oil and the wonderful dry O champagne vinegar that I received recently, both of which enhanced the asparagus beautifully. If desired, add just a 1/2 teaspoon of lemon juice to a salad olive oil, and be sure to use a very light and dry vinegar such as rice vinegar or a dry white wine vinegar.

With a little chopped fresh parsley and just a hint of sea salt and fresh cracked black pepper seasoning, this is an elegant salad to enjoy on a warm summer day, such as the days we've been having here with temperatures soaring to over 30°. I don't mind the heat really, but I don't care to be standing over a hot stove in this weather either. Unfortunately the landlady has resisted turning on the air conditioning so far — just as when she resists turning on the furnace in the winter until the temperatures are numbing! Oh well, this is a lovely apartment, indoor temperatures aside, and I don't mind making these simple salads. But one of these days, I would like to have a house of my own.

Enjoy this elegant dish on your patio or deck along with a whole grain. I am sending this off to my dear friend Jac and partner in arms for this month's No Croutons Required. The theme is to come up with a leafless vegetarian salad.

Asparagus MimosaAsparagus Mimosa
Recipe by
Cuisine: Italian
Published on June 19. 2012

Simple, classic and elegant Italian dish of asparagus served with a simple olive oil and champagne dressing and topped with grated egg

Print this recipePrint this recipe

Ingredients:
  • 2 eggs
  • 1 bunch asparagus
  • 2 tablespoons olive oil
  • 1 tablespoon champagne, white wine or rice vinegar
  • 1/2 teaspoon of sea salt or to taste
  • fresh ground black pepper
  • small handful fresh parsley, chopped
Instructions:
  • Place the eggs in a medium saucepan, cover with water, bring to a boil, and simmer for 5 minutes. Remove the eggs from the pan and set aside to cool. When cool, peel the eggs and grate with a coarse grater or chop finely.

  • Meanwhile, snap off the woody ends of the asparagus. Steam the spears for 5 minutes, or alternately place in a large pan of boiling water and cook for 2 to 3 minutes or until just tender. (You may cook the asparagus longer for more tender spears, but this dish works better with firm and just-cooked asparagus.)

  • Divide the asparagus between 4 or more serving plates. Whisk together the olive oil and vinegar, and drizzle over the spears. Sprinkle the plates with salt and pepper and scatter the chopped parsley over top. Garnish with the grated egg and serve.

Makes 4 or more servings
seasonal asparagus with eggs

More asparagus dishes from Lisa's Vegetarian Kitchen:
Warm Baby Potato and Asparagus Salad
Wild Rice and Asparagus Salad
Asparagus and Oriental Tamari Dressing with Pine Nuts
Asparagus Pesto Rice
Asparagus and Feta Cheese Frittata

On the top of the reading stack: The Hunger Angel by Herta Muller

Audio Accompaniment: silence

الأحد، 17 يونيو 2012

ALMOND COOKIES – NO EGG NO BUTTER


aLMOND COOKIES 1

This is my second post on cookies. After trying multi grain nankhatai , i got the confidence of making varieties of cookies.I got this recipe from here..Thanks a lot anu , it tasted very well Smile. We loved it so much. I have done this thrice so far. When i tried this recipe for the first time i dint have butter in hand. So i just replaced the butter with cooking oil doubtfully. But to my surprise ,it tasted great.I started making it with cooking oil every time. I halved the original recipe and tried for the first time , but then i perfected the recipe for smaller quantity.Here i’ve given the recipe for small quantity which yields around 10 biscuits. It gets finish off in no time , try this ..U’ll come to know Winking smile . Two readers from Sweet n Spicy mobile app tried this biscuit with wheat flour and liked it very much.Here is what they quoted:

"amazing.. yummy n awesome... evryone loved it... made two batches on first day itself... 4 stars" -  Ayfoona311


"Tis s my 1st cookies.. luckly i dnt ve maida @home.. i substitue wit wheat flour i added raisins too.. came out crispy n tasty.. i cant believe myself.. really wonder tat my hand done a cookies... :-):-) 5 stars" -  Krithiga2232 

INGREDIENTS
1 cup - 200ml
  1. All purpose flour /Maida – 1/2 cup
  2. Almond / Badam – 1/3 cup
  3. Sugar – 1/2 cup
  4. Cooking oil – 1/4 cup + 1 tbsp
  5. Honey – 1 tsp (optional)
  6. Vanilla essence – 1/4 tsp
  7. Salt -  a pinch
  8. Cooking soda – a pinch

METHOD
  • Take the all purpose flour in a wide bowl and mix the salt , cooking soda & vanilla extract.
  • Microwave almonds for 1- 2 mins to roast it. Almonds start to crackle and nice aroma wafts around.
  • Remove the almonds and allow it to cool. Powder it nicely. U can powder the sugar along with almonds. (ie. run the almonds and make it to a coarse powder, then add the sugar and grind it well ..)
  • Mix this mixture to the all purpose flour and add the cooking oil.
  • Make it into a soft , non sticky dough. This dough would be crumbly in texture.
  • Roll it tightly. Pinch a small ball sized dough and flatten it with ur palm. Cracks may appear. Just seal the cracks with ur fingers by patting it in the sides.
  • In the meantime preheat the oven for 10 mins in 180c convection mode.
  • Take the baking tray or cookie pan and arrange the cookies with an inch gap. Cookies will raise and spread a little.
  • Bake it in convection mode at 180c for about 20 – 22 mins. Time depends upon ur MW setting. Please have an eye after 10 mins. Remove once the top starts browning.
  • It will be very soft to touch immediately after baking. Take out the tray.Don’t try to remove the cookies. Let it cool down completely in the tray itself. Then remove it.It would become  crispy and hard..
  • Keep the remaining dough covered.Do the same procedure from steps 7-9.
  • Store it in an air tight container after it cools down.
Enjoy the cookies with tea/ coffee !!

My first attempt picture :)
almond cookies


TIPS
  1. Honey is optional to use.I used honey for the first time but then i completely forgot it the next time. There is no difference in taste or texture.
  2. U can replace honey with golden syrup as mentioned in the original recipe.
  3. If u want to use butter in place of cooking oil , add 4 tbsp ( 60 gms) of melted butter.
  4. U can reduce the oil and add little water if necessary.
  5. Please do not add milk because the cookies turns soggy the next day.
  6. Mild cracks will be there in the cookies. Its unavoidable. so don’t panic.
  7. Here i’ve ,mentioned the almonds to grind nicely. U can also coarse grind the almonds as given in the original recipe. U’ll get small pieces of almonds while eating which also tastes good. I had tried in that way too.U can c the cookies in the second picture in which i coarse ground the almonds.
  8. I added equal amount of roasted walnuts and almonds and tried once. Try if u wish. Smile


almond cookies

Chickpea Patties Smothered in Vegetable Gravy

chickpea patties

This recipe was part of a mini feast I cooked up for my husband and best friend Basil. Chickpeas are likely my favorite legume and, served with a thick spicy vegetable gravy, the meal was pronounced a "classic" according to Basil. I served this dish with a crustless quinoa quiche that I will be sharing with my readers soon.

I never can resist experimenting in the kitchen, even when the temperatures soar here in London. Factor in the humidity, and you figure there is a likelihood that you will spontaneously combust. I tend to stick with salads more often than not when it is 30°C or higher, but sometimes I get a craving and cook up something a little fancier. Really, these spicy and nourishing patties don't take long to mix up and fry, and the wonderfully fragrant fresh vegetable gravy is straightforward too, especially if you have a sous chef to help out with the prep. Thanks to hubby for helping out.

The vegetable gravy can be made ahead of time and warmed in a pan with a little added water. It will keep in the refrigerator for several days in a sealed container, and makes a wonderful addition to cooked rice or all kinds of other dishes.

vegetable gravy

Chickpea Patties Smothered in Vegetable GravyChickpea Patties Smothered in Vegetable Gravy
Recipe by
Cuisine: African
Published on June 17, 2012

Simple and nourishing spiced chickpea patties served with a thick spiced gravy made from fresh vegetables

Print this recipePrint this recipe

Chickpea patties:
  • 1 cup dried chickpeas (3 cups cooked or 2 14 oz cans)
  • 1 large clove garlic, crushed or minced
  • 1 small bunch of green onions, trimmed and sliced
  • 3 to 4 green or red chilies, seeded and finely chopped
  • 5 to 6 sun-dried tomatoes
  • 2 teaspoons ground cumin
  • 2 teaspoons ground coriander
  • 1/2 teaspoon cayenne
  • 1/4 cup fresh cilantro, chopped
  • 1 egg, beaten
  • 3 tablespoons unbleached, whole wheat or quinoa flour
  • sea salt to taste
  • fresh cracked black pepper to taste
  • sesame oil for frying
Instructions:
  • Rinse the chickpeas and soak for 8 hours or overnight covered in several inches of water with a little yogurt whey or lemon juiced added. Drain and rinse, then transfer to a large heavy-bottomed saucepan and cover with several inches of fresh water. Bring to a boil, reduce the heat to medium-low, cover and simmer for 1 to 1 1/2 hours or until the chickpeas are tender. Remove from heat and drain.

  • Meanwhile, soak the sun-dried tomatoes in hot water for 20 to 30 minutes, then drain and chop.

  • Place the cooked chickpeas in a food processor and add the garlic, green onions, chilies, sun-dried tomatoes, cumin, coriander and cayenne. Process to a coarse paste. Transfer to a large bowl and stir in the cilantro, egg, flour, salt and black pepper. Stir well to combine.

  • Flour your hands and shape the dough into 10 to 12 patties about 1/2-inch thick and 3 inches in diameter. Cover with plastic wrap and refrigerate for at least 30 minutes.

  • Heat 1/4 cup of sesame oil in a non-stick skillet over medium heat. When hot, fry the patties for about 3 minutes, flip, and cook for another few minutes until lightly browned on each side. Drain on paper towels and keep warm in a 150° oven.

  • Serve warm covered with generous spoonfuls of warm vegetable gravy (recipe below).

Vegetable gravy:
  • 2 tablespoons olive oil
  • 1/2 tablespoon butter (optional)
  • 1 small onion, finely chopped
  • 1 large clove garlic, minced or crushed
  • 2 to 3 green or red chilies, seeded and finely chopped
  • pinch of cayenne
  • 2 celery stalks, chopped
  • 1 teaspoon sea salt
  • 1/2 teaspoon dried tarragon
  • 1 teaspoon fresh thyme (1/2 teaspoon dried)
  • 2 cups vegetable stock or water
  • 3 tablespoons cornstarch
  • 2 cups mixed chopped fresh vegetables (I used zucchini, green pepper, cauliflower, green beans and white mushrooms)
  • Note: avoid using root vegetables

Instructions:
  • Heat the oil and butter in a large heavy-bottomed saucepan over medium heat. When hot, add the onion and stir for 10 minutes or until the onion begins to brown. Now add the garlic, chilies, cayenne, celery, salt, tarragon and thyme, and continue to fry for 5 minutes. Add 1 cup of the vegetable stock or water to the pan and simmer for 5 to 6 minutes.

  • Meanwhile, whisk the remaining cup of vegetable stock or water together with the cornstarch in a small bowl. Increase the heat under the pan to medium-high and stir in the whisked cornstarch and stock or water. Continue to simmer for a few minutes, and then add the vegetables. Reduce the heat to medium-low and simmer, stirring occasionally, until the vegetables are tender and the gravy has a thick consistency.

  • Refrigerate for up to 3 to 4 days in a sealed container and gently reheat in a saucepan with a little added water.

Makes 10 to 12 burger-size patties and 4 cups of vegetable gravy
spicy chickpea patties

More chickpea recipes you are sure to enjoy from Lisa's Vegetarian Kitchen:
Baked Paneer and Chickpea Cutlets
Chickpea Paneer Kofta in a Creamy Cashew Tomato Sauce
Spicy Chickpea Koftas
Chickpea Pumpkin Burgers

الجمعة، 15 يونيو 2012

Vegetarian Caesar Salad with Toasted Nuts and Polenta Croutons

As I noted in a previous post, I was one of a handful of lucky bloggers selected to participate in a contest hosted by Dave of eRecipeCards and sponsored by O Olive Oil. After much thought and a taste test, I decided to make a variation of my classic Caesar salad. The pressed extra-virgin olive oil made with California Mission Olives with Meyer Lemons crushed together along with a bottle of their elegant Champagne Vinegar seemed perfect for a Caesar salad. I often add fresh lemon juice when making my Caesar salad, but the lemon olive oil was even better. I cut down on the mayonnaise, omitted the red wine vinegar, and was sparing with the garlic because I wanted the oil and vinegar to shine in this dish. And it did.

Vegetarian Caesar Salad

To make the salad extra special, I roasted some mixed nuts and baked a batch of polenta croutons. The result was a rather bold salad, but subtle at the same time in the sense that the aftertaste pleasantly lingered in your mouth. Certainly, I will be wanting more oils and vinegars from O Olive Oil in the future. I have already make an asparagus dish with eggs and the oil and vinegar, in addition to testing the products with fresh bread and goat cheese.

I am grateful for the opportunity to have tested these fine products and for the chance to participate in the contest. The inspiration was a welcome challenge. I know my husband was savoring my culinary exploration.

vegetarian Caesar salad with roasted nuts

Thanks again to Dave and O Olive Oil. Do be sure to visit their respective sites. I know my discerning readers will be most impressed.

Vegetarian Caesar Salad with Toasted Nuts and Polenta CroutonsVegetarian Caesar Salad with Toasted Nuts and Polenta Croutons
Recipe by
Published on June 15, 2012

A tangy and zesty vegetarian Caesar salad with a lemon olive oil and champagne vinegar dressing and tossed with toasted nuts and polenta Parmesan croutons

Print this recipePrint this recipe

Salad:
  • a handful or two of polenta Parmesan croutons (recipe below)
  • 1/2 cup slivered almonds
  • 1/2 cup walnut pieces
  • 1/2 cup pecan pieces
  • 1 large bunch Romaine lettuce
Dressing:
  • 3 - 4 tablespoons O meyer lemon olive oil*
  • 3 tablespoons O champagne vinegar*
  • 2 small cloves garlic, crushed or minced
  • 1 1/2 teaspoons Dijon mustard
  • 1/4 cup mayonnaise
  • fresh cracked black pepper to taste
  • 2/3 cup fresh grated Parmesan cheese
Instructions:
  • Toast the nuts in a heavy-bottomed skillet over medium heat, stirring often, until lightly browned. Meanwhile, wash the lettuce and break into pieces.

  • To make the dressing, whisk together the olive oil, vinegar, Dijon mustard, mayonnaise and black pepper. Add the Parmesan cheese and whisk for another minute. This may be made ahead of time and refrigerated in an air-tight container or jar until ready to use.

  • Toss the Romaine leaves with the toasted nuts, dressing, and a handful of baked polenta Parmesan croutons (recipe below).

  • Serve with some crusty bread for a delightful hot summer day lunch.

Makes 4 to 8 servings

*Substitute a salad olive oil and a teaspoon of lemon juice for the meyer lemon olive oil if necessary
*Substitute a dry vinegar such as a white wine vinegar for the champagne vinegar if necessary

Polenta Parmesan CroutonsPolenta Parmesan Croutons
Recipe by
First published on May 11, 2008

Dense and delicious polenta croutons baked with Parmesan cheese

Print this recipePrint this recipe

Ingredients:
  • 3 cups water
  • 1 1/2 cups yellow cornmeal
  • 1 teaspoon cayenne
  • 1 teaspoon sea salt
  • 2 teaspoons olive oil
  • fresh cracked black pepper to taste
  • 1/4 cup fresh grated Parmesan cheese
Instructions:
  • Bring the water to a boil in a medium saucepan. Reduce the heat to medium-low, and pour in the cornmeal, stirring constantly. Simmer for about 10 minutes, stirring often, until the mixture is thickened. Remove from heat, and stir in the cayenne, salt, olive oil and black pepper.

  • Grease an 8 × 8 baking pan. Transfer the polenta into the pan and spread evenly with a spatula or knife. Sprinkle with grated Parmesan cheese. Leave to cool.

  • Preheat an oven to 450° and line a baking sheet with parchment paper. Cut the polenta into small cubes and gently transfer the cubes to the baking sheet. Bake for 30 minutes or until the croutons are crisp and golden, flipping occasionally with a pair of tongs so that each side of the cubes browns evenly.

Makes about 3 dozen croutons
vegetarian Caesar salad with toasted nuts and fine quality olive oil and vinegar