الأربعاء، 31 يوليو 2013

No Croutons Required - The Winner for July

no croutons required

The challenge for July was to come up with a vegetarian legume salad. The contributions are sure to stimulate your appetite and culinary imagination. We do have to crown a winner though and the most popular this month is Rachel Cotterill's Warm Halloumi Salad with Lime Dressing. Bursting with flavour and goodness, the textures and variety in this salad are impressive. Congratulations Rachel. I can't wait to try your dish.

halloumi salad

Jacqueline will be hosting the August edition of No Croutons Required. Check back soon for the theme.

الثلاثاء، 30 يوليو 2013

LEMON RICE & POTTUKADALAI CHUTNEY– LUNCH RECIPES

Lemon-rice-recipe


Lemon rice is my most favourite among all the variety rice recipes. I can have a plateful of lemon rice without any accompaniment. But my mom makes a thick chutney with fried gram dal & coconut as a side dish. My dad never eats lemon rice without this chutney & a pickle Winking smile..I tried this once for my husband and he too liked it. Recently we went to Meenakshi amman temple in Bannergatta..We had lemon rice as prasadam and it tasted out of the world. I would say it is the best lemon rice i have ever tasted. It was mild yellow in color & i found they had raw rice & added some coriander leaves along with dals & chillies..Usually i use steamed rice for making lemon rice. But after tasting that prasadam , i too started using raw rice and add some coriander leaves whenever i have in hand.
As aadi 18 ( august 3rd) is nearing , i thought of posting this rice recipe. This is one among the 5 rice varieties ( lemon rice , puliyodharai , coconut rice , sakkarai pongal and curd rice) we offer to God on aadi perukku along with  pepper vada and payasam.. Do try this chutney & lemon rice combo , u may love it..

Lemon-rice-recipe

INGREDIENTS
1 cup - 200ml
  • Raw rice – 1/2 cup (Good quality sona masoori) OR (steamed rice , basmati rice)
  • Big Lemon –  1 no  ( adjust based on the size & tanginess of lemon)
  • Salt – as needed
  • Hing – 1/4 tsp
  • Turmeric powder – 1/4 tsp
To temper
  • Cooking oil – 1 tbsp
  • Mustard seeds – 1 tsp
  • Urad dal – 1 tbsp
  • Chana dal – 1/2 tbsp
  • Peanuts – 1 tbsp (optional)
  • Red chillies – 2 nos
  • Green chillies – 2 nos
  • Curry leaves – few
Coriander leaves – 1 tbsp ( to garnish)
Gingely oil – 1 tbsp ( to add while mixing)

METHOD
  • Pressure cook raw rice adding 1: 2.5 cups of water . Add a drop of oil before cooking.. Cook it separate & fluffy . Spread them in a plate & let it cool down.
  • In a bowl, squeeze the lemon juice removing the seeds. Add salt , turmeric powder & hing. set aside.
  • In a kadai , heat oil and temper the mustard seeds . After it splutters completely , add the dals & peanuts. Fry till they turn golden brown. Then add the pinched red chillies & slitted green chillies, curry leaves and a pinch of hing.
lemon rice tile1
  • Saute well , add the lemon juice , switch off the flame immediately & transfer to a bowl. Add 2 tsp of water in the kadai, give a swirl and add to the lemon juice mixture..
  • Add this mixture & gingely oil to the rice , mix well. Check for salt. Garnish with coriander leaves..Initially it tastes more tangy..But all the taste blends well when it rest for 30 mins to 1 hour before serving ..
lemon rice tile2

NOTE
  • The water quantity may differ based on the quality of rice..If u used basmati , use 1:2 cups of water..
  • u can add also add the lemon juice directly in the rice instead of adding to the tadka..
  • Addition of peanuts is optional. I dint use here.  i dint add coriander leaves as it was out of stock.But addition of coriander leaves gives a nice taste..
  • Add gingely oil while mixing the rice.

POTTUKADALAI CHUTNEY / FRIED GRAM DAL CHUTNEY FOR LEMON RICE

dalia - chutney


INGREDIENTS
  • Dalia/fried gram – 1/4 cup
  • Grated coconut – 1 tbsp
  • Green chillies – 2 nos
  • Salt – As needed
  • Garlic cloves – 2-3 nos

METHOD
  • Grind all the above ingredients to a thick paste adding less water..Serve !
dalia chutney tile

lemon rice - plate

الاثنين، 29 يوليو 2013

Sweet Potato Chickpea Soup

sweet potato chickpea soup

After a week of high temperatures and humidity, there is again a chill in the air and a fair amount of rain. A hot bowl of this colorful and gently spiced homemade sweet potato and chickpea soup is just the thing to heat the body up and raise the spirits. So simple to make, the act of putting together and simmering a pot of comforting soup to warm and nourish yourself and your loved ones is sure to brighten your day and table, and the tender pieces of sweet potato have a wonderfully sunny disposition, don't you think?


 Sweet Potato Chickpea Soup Sweet Potato Chickpea Soup
Recipe by
Published on July 29, 2013

Simple, warming and nourishing soup with chickpeas, sweet potato and gentle spices

Print this recipePrint this recipe

Ingredients:
  • 1 cup dried chickpeas (3 cups cooked or 2 14 oz cans)
  • 2 tablespoons olive oil
  • 1 large onion, chopped
  • 1 jalapeño, seeded and chopped
  • 1 clove garlic, minced or crushed
  • 1 teaspoon fresh ginger, minced or grated
  • 1 teaspoon ground cumin
  • 1/2 teaspoon ground coriander
  • 1/2 teaspoon paprika
  • 1 large potato, diced
  • 1 sweet potato, diced
  • 1 celery stalk, sliced
  • 3 cups vegetable stock or water
  • 1 teaspoon sea salt, or to taste
  • fresh ground black pepper
Instructions:
  • Rinse the chickpeas and soak in several inches of water for 8 hours or overnight. Drain and rinse, then transfer to a large saucepan and cover with at least 4 cups of fresh water. Bring to a boil, reduce heat to low, cover, and simmer for 1 to 1 1/2 hours or until the chickpeas are tender. Drain and reserve 2 cups of the cooking liquid.

  • Wipe the saucepan dry and add the olive oil. Heat over medium heat, then add the onion, jalapeño and garlic, and stir for 3 to 4 minutes or until the onion is soft. Toss in the ginger, stir for 30 seconds, then stir in the spices. Add the potato, sweet potato and celery, and stir to coat the vegetables with oil and spice.

  • Pour in the reserved chickpea cooking liquid and vegetable stock or water, raise the heat to medium-high, and bring the soup to a low boil. Reduce the heat to medium-low, cover, and cook for 20-30 minutes or until the vegetables are tender.

  • Remove from heat and season with salt and black pepper to taste. Serve hot or warm. Reheat leftover soup on medium-low heat and thin with a little extra water.

  • Note: If using canned or already cooked chickpeas, increase the amount of vegetable stock or water in the recipe to 5 cups.

Makes 4 to 6 servings
chickpea vegetable soup

Other warming soups that you will enjoy from Lisa's Vegetarian Kitchen:
Black-Eyed Pea and Vegetable Soup
Chickpea and Cabbage Soup
Hearty Italian Bean and Pasta Soup
Spicy White Bean and Turnip Soup

On the top of the reading stack: Affliction by Russell Banks

Audio Accompaniment: the washing machine

POONDU KUZHAMBU– LUNCH RECIPES


Poondu kuzhambu bowl
Poondu kulambu , an easy to make yet flavouful dish for rice.I tried this recipe from “ The hindu ” magazine. This recipe was given by a chef. So i tried it confidently. It came out very well and was finger-licking good Smile. We all loved it. Bachelor’s can also try this recipe. U can store it for 2-3 days.The taste improves day-by-day.Sambar powder is not necessary for this recipe.

Poondu kulambu bowl


INGREDIENTS
To make puree
  • Tamarind – A big gooseberry size
  • Tomato – 1 no
To add in the puree
  • Red chilli powder – 1.5 tsp
  • Turmeric powder – 1/4 tsp
  • Salt – As needed
  • Water – 2 cups

To saute in oil
  • Gingely oil – 2 -3 tbsp
  • Mustard seeds – 1 tsp
  • Fenugreek seeds – 1/2 tsp
  • Urad dal – 1 tsp
  • Green chillies – 1 no
  • Red chillies – 2 nos
  • Curry leaves – few
  • Garlic cloves – 1/8 cup ( 20 cloves)
  • Small onion – 10 nos Or 1 big onion ( cube cut)
Grated Jaggery – 1 tsp ( to add in the end)

METHOD
  • Soak tamarind in little warm water & grind it along with a tomato. Make it a puree. To this puree , add salt , 2 cups of water , red chilli powder & turmeric powder.
  • In a kadai , heat oil and temper all the above said ingredients one by one in the same order. Then saute onions and garlic cloves till they change golden brown and emits a nice smell.
poondu kuzhambu tile1
  • Now add the tamarind puree mixture , stir well and allow it to boil in medium flame till the gravy reduces to half & thickens. Lastly before switching off the flame , add the grated jaggery, add little more salt if necessary..
poondu kuzhambu tile2
  • Switch off the flame, transfer to a serving bowl and close it with a lid.
  • Serve after 30 minutes..Tastes great with plain rice and papad !!
poondu kuzhambu tile3
It thickens to a paste when it cools down.It tastes the best when served the next day Winking smile. So u can make in large quantity , store in an air tight bottle , refrigerate it and enjoy for few days !

poondu kuzhambu plate


الجمعة، 26 يوليو 2013

Pinto Bean and Avocado Burritos

burritos

Summertime is perfect for easy meals that can be enjoyed on the patio. Mind you, these zesty and creamy pinto bean burritos would be delicious any time of year but wrapping up vibrant Mexican-spiced goodness in a handheld burritos seems especially suited to warm summer days. Apart from a bit of chopping and cooking the beans, this fresh-tasting burrito filling with avocado, corn and cilantro all comes together in very little time. Vegans may leave out the cheese and sour cream, of course, and the results would still be most pleasing to serve up. Spicy and cooling, and packed full of flavor, this one comes highly recommended from my kitchen.

So, what did I make to please my husband and best friend so much?

pinto bean burritos with avocado

Pinto Bean and Avocado BurritosPinto Bean and Avocado Burritos
Recipe by
Cuisine: Mexican
Published on July 26, 2013

Vibrant, zesty and creamy fresh-tasting pinto bean burritos with avocado, cilantro, corn and spices — refreshing on a warm summer day

Print this recipePrint this recipe

Beans:
  • 1 1/4 cups dried pinto beans
  • 1 ancho (dried poblano) chili
  • 1 bay leaf
  • 1/2 red onion
  • 1 avocado, peeled and chopped or diced
  • juice from 1 lime (2 tablespoons)
  • 1/4 cup cilantro, leaves and stalks, chopped
  • 8 7-inch flour or corn tortillas, warmed
Sauce:
  • 2 teaspoons olive oil
  • 1 large shallot, finely chopped
  • 1 teaspoon cumin seeds
  • 1 to 2 jalapeños, seeded and finely chopped
  • 1 teaspoon chili powder
  • 1/2 teaspoon paprika
  • pinch or two of cayenne (optional)
  • 2 large plum tomatoes, partially seeded and finely chopped
  • 1 cup fresh or frozen corn
  • 1 1/2 teaspoons sea salt, or to taste
  • fresh ground black pepper to taste
  • 1 cup fresh grated extra-old Cheddar cheese
  • 2 tablespoons sour cream
Instructions:
  • Rinse the beans and soak for 8 hours or overnight in enough water to cover. Drain and rinse, then transfer to a medium saucepan and cover with several inches of fresh water. Add ancho chili, bay leaf, and onion, and bring to a boil. Reduce heat to low, cover, and simmer for 1 hour or until the beans are tender. Drain and transfer to a large bowl to cool. Discard the onion and bay leaf. Scoop out the seeds from the ancho chili and set aside.

  • When the beans have cooled, gently toss in the avocado, lime juice, ancho chili seeds and fresh cilantro.

  • Heat the oil over medium heat in a heavy-bottomed medium saucepan. When hot, toss in the shallot and stir for 2 to 3 minutes to soften. Add the cumin seeds, jalapeños, chili powder, paprika and cayenne if using, and continue to stir for another minute.

  • Now add the tomatoes and cook, stirring often, for 10 to 15 minutes until the sauce has thickened. Stir in the corn and cook for another 10 minutes. Season with salt and pepper and then stir in the Cheddar cheese and sour cream.

  • Taste for seasoning and stir the mixture into the beans and avocado.

  • Serve wrapped in warmed 10-inch flour or corn tortillas with sour cream, hot sauce, chili powder or cilantro as garnish, or serve as a dip with crunchy baked tortilla chips.

Makes 8 7-inch burritos or 4 servings
Mexican burritos

More pinto bean dishes you are sure to enjoy from Lisa's Vegetarian Kitchen:
Corn and Pinto Bean Dip
Roasted Corn and Jalapeño Cheese Soup
Refried Beans with Sun-Dried Tomatoes
Vegetarian Three Bean Chili with a Cashew-Pistachio Sauce

On the top of the reading stack: various stacks

Audio Accompaniment: Aes Dana

MANGALORE BONDA – SNACKS RECIPES

Mangalore-bonda
I wanted to try bonda for my daughter’s evening snacks. As i have already tried aloo bonda and mysore bonda , i thought of trying something different and interesting.So i quickly went through my cook books and tried this mangalore bonda recipe given by Mrs.Mallika badrinath.As the name says , Mangalore bonda is a famous karnataka tea time snacks recipe.. I made an instant version by adding sour curd to the dough.. It was very  nice n crispy.Sen & Raksha loved it a lot. One thing u should keep in mind while making this bonda is “It should be served hot” to enjoy its actual taste Winking smile.Do try this snack in this weekend and let me know how it turned out Smile.

Mangalore-bonda-recipe

MANGALORE BONDA RECIPE


MANGALORE BONDA RECIPE Instant mangalore bonda recipe -Yummy evening snacks recipe.Kids would love it!!
Cuisine: Indian
Category: Snacks
Serves: 10 nos
Prep time: 40 Minutes
Cook time: 10 Minutes
Total time: 50 Minutes


INGREDIENTS
1 cup - 200ml
  • Maida – 1/2 cup
  • Rice flour – 2 tbsp
  • Rawa/ sooji – 1/2 tbsp
  • Big onion – 1 no (chop finely)
  • Finely chopped green chillies – 1 no
  • Finely chopped coriander leaves , curry leaves – 2 tbsp
  • Thick sour curd – 1/2 cup
  • Cooking soda – A pinch
  • Salt – As needed
  • Water – 1- 2 tbsp ( if needed)

  • Cooking oil - To deep fry
METHOD

  • Mix all the ingredients given above except cooking soda. Keep it closed for 30 minutes to 1 hour.. ( actual recipe called for 5 to 6 hours of soaking).. Do not add water while making the dough. If needed add 1 tbsp maximum.. Use only the curd to hold the dough..
    Mangalore-bonda-tile1
  • After an hour , add cooking soda & mix well..  Heat oil , take a medium sized ball  from the dough & deep fry them till golden brown..DO NOT OVER FRY, IT MAY CHANGE THE TASTE..

Mangalore-bonda-tile2
 
Serve hot with coconut chutney !

mangalore-bonda

الأربعاء، 24 يوليو 2013

VERMICELLI PAYASAM RECIPE | SEMIYA PAYASAM - PAYASAM RECIPES


Vermicelli - payasam
This is my favourite payasam.I made it yesterday for my birthday Winking smile and i enjoyed every mouth to the coreSmile with tongue out.. Its very easy and can be made in jiffy. Many variations can be made to this payasam recipe by adding finely chopped nuts or badam powder or saffron milk , condensed milk and it tastes more delicious. Its a simple but rich dessert.. I hope most of u have this post in ur blog. I do have this recipe in my Kerala Onam sadya post using milk.. Here i have shared the basic method .Do try n let me know ur feedback..

semiya--payasam

INGREDIENTS
1 cup - 200ml
  • Vermicelli – 1/2 cup ( roasted or unroasted)
  • Sugar –  1/2 cup
  • Water – 2- 2.5 cups
  • Milk – 1 cup
  • Ghee – 1 tbsp
  • Elachi powder/ Rose essence –  1/4 tsp / Few drops
  • Cashewnuts - few
Adjust the quantity of milk from 1/2 to 1 cup based on the consistency u need as this payasam thicken when it cools down..

METHOD
  • Roast cashews in a tsp of ghee and set aside..Add the remaining 2 tsp ghee in a pan and roast the vermicelli till golden brown. ( I skipped this part as i used MTR Roasted vermicelli)
  • In a wide bowl , take the  water and roasted vermicelli and allow it to cook for 10-15 minutes till it becomes soft to touch and breakable.There should be some water left with the semiya.
semiya payasam tile1
  • Now add the sugar and mix well till sugar dissolves completely.Let it boil in low flame for few seconds. Then add the elachi powder or rose essence and milk.Stir well , Give a boil an switch off the flame.
semiya payasam tile2
Serve hot or cold ( refrigerate it) !!

Yummy payasam is ready !!

Semiya---payasam

الثلاثاء، 23 يوليو 2013

No-Bake Lemon Cherry Cheesecake

cherry cheesecake

No-bake is just about right at the moment, with temperatures soaring over 30 degrees in addition to the humidity which steps things up another 10 degrees here in southwestern Ontario. I never mind the heat, really, but even for me, who was freezing to the point of sickness for the duration of a never-ending long Canadian winter, it's a bit much. Perhaps more surprising is that this savory girl wanted to make a dessert in the first place, but sugar in moderation isn't going to hurt you and this cake has some healthy additions besides.

cherry cheesecake

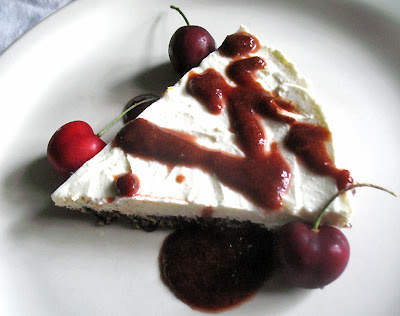
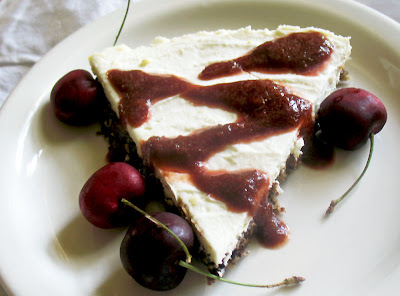
This recipe appealed to me in particular because it didn't have a graham cracker base, but a blend of oats, walnuts and dried fruit. The original recipe called for raisins, but I used a combination of dried cherries and cranberries instead. Either way, you are in for a treat, especially when fresh cherries are in season for a wonderful fresh-tasting no-cook cherry sauce served over top.

cherry cheesecake

No-Bake Lemon Cherry CheesecakeNo-Bake Lemon Cherry Cheesecake
Recipe by
Adapted from The No-Cook No-Bake Cookbook: 101 Delicious Recipes for When It's Too Hot to Cook
Published on July 23, 2013

Easy, rich and creamy no-bake lemon cheesecake with a healthy nut and dried fruit crust served with a delicious fresh no-cook cherry sauce

Print this recipePrint this recipe

Base:
  • 1 1/2 cups rolled oats
  • 1/2 cup walnuts
  • 2/3 cup dried cherries
  • 1/3 cup dried cranberries
  • 1/4 cup grapeseed or canola oil
  • 1-inch piece fresh ginger, grated
Cheesecake:
  • 8 oz (225 g) cream cheese, room temperature
  • 3/4 cup ricotta cheese
  • 1/2 cup powdered sugar
  • 1 1/2 teaspoons grated lemon zest
  • juice from 1 lemon (3 tablespoons)
Cherry sauce topping:
  • 1 1/4 cup pitted sweet cherries
  • 2 tablespoons honey or agave
  • 1 teaspoon pure vanilla
  • 1/4 teaspoon almond extract (optional)
  • 1/4 teaspoon ground cloves
Instructions:
  • Line the bottom of a 9-inch or 10-inch springform pan or cake pan with parchment paper.

  • Pulse the oats and walnuts together in a food processor to achieve a fine blend. Add the dried cherries and cranberries, oil and ginger, and continue t pulse until you have a well combined moist mixture. Press this mixture evenly and firmly into the prepared pan. Chill in the refrigerator while you prepare the cheese filling.

  • In a large bowl, cream together the cream cheese, ricotta, sugar, lemon zest and juice until smooth. Transfer to the base and spread evenly with a spatula. Chill in the refrigerator for a few hours.

  • Next prepare the cherry sauce. Combine the cherries, honey or agave, vanilla, almond extract (if using) and cloves in a food processor or blender and process until smooth. If desired, strain to remove pieces of cherry skin.

  • To serve, drizzle some cherry sauce over slices of the chilled cake.

Makes 6 to 8 servings
no-bake cherry cheesecake

More cakes from Lisa's Kitchen you are sure to enjoy:
Ricotta Cheesecake with Mixed Berries and Balsamic Vinegar
Blueberry Ricotta Cheesecake
Goat Cheese Cheesecake with Ricotta Cheese
Pineapple Upside-Down Cake

On the top of the reading stack: Affliction by Russell Banks

Audio Accompaniment: silence