الاثنين، 30 يونيو 2014

Roasted Eggplant Tomato Curry (Baingan Bharta)

roasted eggplant tomato curry

Eggplant is one vegetable that I never really used to enjoy at all until I learned how to appreciate its finer qualities. Despite having little flavor in itself, it does take on the flavors of the other components of dishes it appears in and very much acts like a sponge to soak up spices and seasonings as it does in this curry. Although it is the star ingredient, consider serving this one up to those who think they don't enjoy eggplant because the textural element it adds here combined with the tomato, peas and seasonings makes for an ideal side and you might not even guess that eggplant is what brings everything together.


Roasted Eggplant Tomato Curry (Baingan Bharta)Roasted Eggplant Tomato Curry (Baingan Bharta)
Recipe by
Cuisine: Indian
Published on June 30, 2014

Simple roasted eggplant curry simmered in a fragrant spiced tomato sauce

Print this recipePrint this recipe

Ingredients:
  • 1 large eggplant (aubergine)
  • 2 tablespoons oil
  • 1 medium onion, diced
  • 2 cloves garlic, minced
  • 1-inch piece fresh ginger, finely chopped
  • 2 to 3 green chilies, seeded and minced
  • 2 teaspoons ground coriander
  • 1 teaspoon turmeric
  • pinch of asafetida (optional)
  • 3 medium tomatoes, diced
  • 2/3 cup green peas, fresh or frozen
  • 1 teaspoon sea salt, or to taste
  • 1 teaspoon garam masala
  • 1/4 cup fresh parsley or cilantro, chopped
Instructions:
  • Begin by roasting the eggplant. Grease a baking sheet with oil. Cut the eggplant in half lengthwise, brush with oil, and sprinkle with a little salt. Let sit for 20 minutes. Turn the eggplant cut side down on the baking sheet and place under a broiler until the skin is blackened and charred and the flesh is tender — 20 minutes. Let cool before removing the skin and scooping the flesh into a bowl. Mash the eggplant with a fork or potato masher and set aside.

  • Heat the oil in a large non-stick skillet over medium heat. When hot, add the onion and sauté until it begins to brown — about 5 to 6 minutes. Stir in the garlic, ginger and chilies and continue to sauté for another few minutes. Stir in the ground coriander, turmeric and asafetida if using, and stir for another minute.

  • Add the tomatoes to the pan and simmer until thickened — about 10 minutes. Stir in the peas and simmer until just tender, adding a little water if necessary.

  • Now stir in the eggplant, garam masala and salt. Gently simmer for another 5 minutes. Stir in the parsley or cilantro and cook for another minute.

  • Serve as a side, garnished with more parsley or cilantro and a sprinkle of garam masala if desired.

Makes 4 side servings

Baingan Bharta

Other eggplant recipes from Lisa's Vegetarian Kitchen:
Baked Eggplant Stuffed with Curried Vegetables
Stuffed Eggplant Poriyal
Eggplant Quinoa Bites with Pesto

On the top of the reading stack: Vegan Eats World: 300 International Recipes for Savoring the Planet

Audio Accompaniment: Brain Eno

EASY PANEER BIRYANI RECIPE–PANEER RECIPES


Paneer biryani was in my try list for long time.Usually i make biryani in Sunday.So i tried it for the first time yesterday and we loved it a lot.For this recipe,I quickly googled and found this easy recipe.I made slight changes as per my family’s taste and tried it.It came out very well.As it has no grinding and less chopping works,u can try this biryani in weekends to finish ur cooking quickly and enjoy spending time with ur family members.Also u can try even during weekdays in busy morning hours for your lunch box as it is very easy to prepare.I don’t think marination is a must here.But anyways i followed the original recipe as this is my first attempt.The taste,texture everything was good but Sendhil told me to put paneer pieces smaller in size when i make it next time because he told this rice tastes even better when had with paneer pieces in each mouth.So i have given the method  accordingly.Ingredients list may seem lengthy but the procedure is very simple and quick.Try this exotic paneer biryani recipe, everyone would love this Smile.Lets see how to make this yummy paneer biryani..


Easy Paneer Biryani Recipe


Easy Paneer Biryani Recipe Delicious paneer biryani in an easy way - No grinding and less chopping !
Cuisine: Indian
Category: Lunch
Serves: Serves 3
Prep time: 30 Minutes
Cook time: 20 Minutes
Total time: 50 Minutes


INGREDIENTS
To marinate
  • Paneer cubes – 1/2 cup (cut into small bite sized cubes)
  • Red chilli powder – 1 tsp
  • Black pepper powder – 1/2 tsp
  • Turmeric powder - 1/4 tsp
  • Biryani masala powder - 1/2 tsp
  • Curd - 1/3 cup
  • Kasoori methi - 1/4 tsp(optional)
  • Ginger garlic paste - 1 tsp
  • Mint leaves - 10 nos
To Soak in water
  • Basmati rice - 1 cup
  • Water - 2 cups
To saute
  • Cooking oil + ghee - 2 tbsp
  • Cinnamon – 1 inch
  • Cloves – 2 nos
  • Cardamom – 1no
  • Star anise – 1 no
  • Bay leaf – 1 no
  • Fennel seeds – 1/4 tsp
  • Green peas – a handful
To saute till golden brown
  • Cooking oil + ghee – 1.5 tbsp
  • Big onion - 1 no
  • Salt - as needed
  • Mint leaves & coriander leaves – few

METHOD

  • First cut the paneer into small bite sized cubes smaller than the ones in picture.Take it in a wide bowl and add all the ingredients given under “to marinate”.Let it marinate for 20 minutes.
  • In the mean time,wash and soak the basmati rice in 2 cups of water for 30 minutes.Chop onions into slices.
  • Heat oil+ghee in a kadai and saute the onion till golden brown and set aside.
Paneer biryani step1
  • In the same kadai,heat oil & ghee and saute cinnamom,cloves,cardamom,star anise and bayleaf.Saute for a second.Add fennel seeds,saute till it sizzles and add the peas.Saute for a minute.
Paneer biryani step2
  • Now add the marination mixture along with paneer pieces.Mix well and cook in low flame till the peas is 3/4th cooked and oil floats on top.Add little water if necessary while boiling.Add the salt required for biryani.
Paneer biryani step3
  • Now add the soaked rice along with water and check for salt.Add more if needed.Transfer everything to a pressure cooker.
Paneer biryani step4
  • Add some finely chopped mint & coriander leaves in water.
  • Close the lid and pressure cook in low flame for one whistle( It takes 10-12 minutes)
  • After the pressure is released,open the cooker and fluff the rice with a fork,Add the fried golden brown onion slices.Mix well .
Paneer biryani step5
Serve with onion raita !


Note

  • If u want to make this biryani very quickly,then skip marination and add all the ingredients given under “to marinate” one by one after u saute the whole spices & peas.But keep the paneer pieces immersed in hot water till use to stay soft.
  • U can make the entire process in pressure cooker base or even in electric rice cooker.But i used kadai & transferred to cooker.
  • Always use ghee+oil for more flavour.Fry onions till golden brown and do not over fry them.Add it at the end before serving.It gives a nice taste.
  • Adjust the quantity of spices as per ur taste 

This was our simple Sunday lunch.Paneer biryani,Onion raita,Curd rice & rose milk Smile

الجمعة، 27 يونيو 2014

EASY CHAKKA PRADHAMAN/JACKFRUIT PAYASAM RECIPE–KERALA ONAM SADYA RECIPES


jackfruit payasam
Two weeks back we had a trip to Kumbakonam & we went to Sendhil’s periappa’s house in Manakkarai .They gave us a big jackfruit from their backyard.We brought that to Bangalore & we waited for a week to become fully ripe.Last weekend,myself and Sendhil cut & cleaned this jackfruit for the first time in our life.We watched some youtube videos on “How to cut jackfruit” & we spent nearly two hours to take out all the pieces. It was a good time pass for us Smile with tongue out.As there were nearly 150 pieces,i distributed most of them to all my apartment residents and reserved few for us.After so many years,i enjoyed eating my favourite jackfruit Smile.But still i had so many pieces leftover in my pantry.When i was thinking how to make use of it effectively,this Kerala style chakka pradhaman striked my mind.As i wanted to include this payasam in my next onam sadya menu,i thought to give this a try.For the recipe, i asked my malayali ex-neighbour Mrs.Prema who is the only source for all the kerala recipes i posted in my blog Smile.She always suggests me the easiest method of making.This time too,she told me an easy way to prepare this payasam.As i had store bought coconut milk powder in hand,i made this payasam in just 10-15 minutes.In this method,u don’t have to pressure cook jackfruit pieces and u can add thick coconut milk or plain milk at the end instead of taking 2,3 coconut extract and if u have readymade coconut milk powder at home,making this payasam would be even more easy.Taste & texture comes out awesome Thumbs up. Though this is not the authentic method of making chakka payasam,its sure a quick fix to make an easy dessert in minutes Smile.

Indian express article


Last but not the least,I have a happy news to share with u all.Today, my blog got featured in Indian express-Indulge!.This is the first time an article being published for my blog & I am so happy for it.At this instance, i thank all my fellow blogger friends and readers for your  continuous encouragement and support Smile. And the above picture is the screenshot of the article Smile. So this post is a kind of celebration post for me Party smile.

Chakka pradhaman


Chakka pradhaman Yummy,delicious jackfruit payasam / Chakka pradhaman - Kerala style
Cuisine: Indian
Category: Dessert
Serves: Serves 4
Prep time: 5 Minutes
Cook time: 20 Minutes
Total time: 25 Minutes


INGREDIENTS

  • Ripe jackfruit pieces - 12 nos
  • Grated Jaggery - 1/2 cup
  • Grated coconut - 1 cup or readymade coconut milk powder – 4-5 tbsp or Milk – 1 cup
  • Water – 1/2-1 cup
  • Cashews - few
  • Roasted coconut pieces - 2 tbsp
  • Ghee – 1-2 tbsp
  • Salt – a pinch
METHOD

  • Wash the jackfruit pieces,remove the seeds & brown colored skin.Then grind the it to a paste.Add some water while grinding but don’t worry even if its coarsely ground.It tastes good to have those pieces while drinking the payasam.(No need to pressure cook before grinding,refer “notes” for more details)
Chakka pradhaman step1
  • Take the grated jaggery in a wide bowl and add 1/4 cup of water to cover it.Melt it to make the syrup.Strain it and take the syrup in a bowl.
Chakka pradhaman step2
  • To this, add the ground jackfruit pulp.Add 1/2 cup of water.Mix well and allow it to boil well till raw smell of jackfruit and jaggery emanates completely.Add a tsp of ghee at this stage.It takes 5-10 minutes.Keep the flame medium.Check for water and add more if necessary.Take care else it will burn.
  • In the mean time,take 3 tbsp of coconut milk powder and mix in 1 cup of water to make thick first milk and prepare second coconut milk by adding 1.5 tbsp of coconut milk powder in 1 cup of water.Set aside. If u are using fresh coconut,grind 1 cup of coconut adding 1 cup warm water,strain and take thick milk.Again add 1 cup of water and take the second milk.
Chakka pradhaman step3
  • Add second milk to the payasam and allow it to to boil well for few minutes.
  • Lastly add the first coconut milk and give one boil.Do not boil for long.Check for sweetness and add more sugar or jaggery syrup if needed.
Chakka pradhaman step4
  • Heat ghee in a pan and roast the cashews and chopped coconut pieces till golden brown.Add it to the payasam and mix well.
Chakka pradhaman step5
PS : If u want to make this payasam quickly,add one cup of thick coconut milk at the end instead of adding first n second milk OR skip coconut milk & add boiled n cooled milk at room temperature. But don’t forget to add at the end after switching off the flame.
Enjoy !


Note

  • There is no need to pressure cook the jackfruit pieces before grinding if they are fully ripe and soft.Just grind it to a smooth paste or little coarse.If the jackfruit is hard,then u have to pressure cook it before u grind.
  • Never add milk or coconut milk in the beginning.If u want u can add third coconut milk which should be very thin or else the mixture will separate and give a curdled look.
  • U can replace coconut milk by plain boiled n cooled milk too. But add it after u switch off the flame.
  • Adjust the quantity of jaggery as per the sweetness of jackfruit.
  • If u find sweet is lesser at the end,add sugar and compensate it.

Tasty n easy chakka payasam is ready to serve !
Chakka pradhaman kerala


الخميس، 26 يونيو 2014

BEGUN BHAJA RECIPE – BENGALI STYLE


Begun-bhaja-recipe
As i mentioned in my Chaler payesh post,here comes the second Bengali recipe for this week,begun bhaja which i made for lunch thali.Begun bhaja means (shallow) fried eggplants(aubergine).Bengalis serve this as an accompaniment for rice,rotis or just as a snack.They make varieties of bhaja with potato, bitter gourd etc & there should be at least one bhaja in their  authentic lunch menu for sure.Usually bengali bhaja is made in a very simple way by slicing and marinating bigger sized brinjal with turmeric powder,salt and a pinch of sugar & shallow fried in oil.But being a south indian girl,i wanted it to be little spicier.So i just tweaked the actual recipe according to my taste bud Smile with tongue out.When i googled,I saw many variations for this bhaja recipe like adding garam masala,dusting the begun in poppy seeds,rice flour,wheat flour or maida before frying to avoid oil consumption and to get a beautiful brown layer on top.But i did not want to deviate much from the original bengali style and so i followed this simple one.I referred many websites and Sanjeev kapoor’s video for this recipe.
As i am a big fan of brinjal,i loved this bhaja very much and i started making this bhaja for our South Indian sambar & Rasam rice too Winking smile.Its so easy to make and u can prepare it within 10-15 minutes including marination time.I strongly recommend all the brinjal lovers to try this recipe at least once.U will love the simplicity of this recipe and of course the taste . But one thing,u should drain the brinjal in a tissue paper well before u eat else u may have to consume a week’s calorie in one meal Winking smile.Ok , Lets proceed how to make this easy bengali style begun bhaja recipe ..
Bengali style begun bhaja recipe

Begun bhaja recipe


Begun bhaja recipe Bengali style begun bhaja recipe – Pan fried aubergine slices
Cuisine: Indian
Category: Sidedish
Serves: Serves 3
Prep time: 10 Minutes
Cook time: 5 Minutes
Total time: 15 Minutes


INGREDIENTS

  • Medium sized Begun/Aubergine/brinjal - 1 no (the one we use for baingan bharta)
  • Turmeric powder - 1/2 tsp
  • Red chilli powder - 1 tsp (optional)
  • Salt - as needed
  • Water - as reqd
  • Sugar - a pinch
  • Cooking oil - 3-4 tbsp
METHOD

  • Wash and slice the big brinjal into one inch slice.Keep it immersed in salt water till use( It helps to remove the bitterness in brinjal if any)
  • Mix turmeric powder,salt,red chilli powder and sugar and set aside.Remove brinjal pieces from water and sprinkle this powder.Make sure the powder coats the brinjal well.Let it marinate for 5 minutes.
begun bhaja step1
  • Heat oil in a pan for shallow frying.Fry the brinjal pieces in batches for 5 minutes in medium flame. Flip it once in the middle.Fry till brinjal is cooked well and soft without losing its shape. It turns golden brown.Drain the brinjal in a tissue paper and remove the oil.
begun bhaja step2
Serve with dal ad rice OR with sambar ,rasam.

Enjoy !

Note


  • U can make it more flavourful by adding garam masala pwd .
  • Skip red chilli powder if u want to try the authentic bengali version.
  • If u are conscious about oil absorption, dust brinjal slices in rice flour or wheat flour before frying.
  • The thinner u slice the brinjal,it gets cooked quickly but do not slice less than 1 inch else brinjal will become crispy.
  • Use big variety brinjal which has less seeds and more flesh for best results.I used small purple ones here.I think u can it find out from the picture.
  • Soaking brinjals in salt water is optional but it helps to remove the bitterness in brinjal if any.
  • Adjust salt while adding turmeric and red chilli powder.Do not add more.
  • Check the flame and keep turning the brinjals till it gets a nice brown color and it should be cooked till soft.Do not over cook it.
  • Add oil whenever necessary while frying between batches because brinjal absorbs more oil.


Begun bhaja recipe

Enjoy begun bhaja with roti,dal rice or sambar sadam or rasam! Tastes great with anything & everything Smile
Bengali style begun bhaja

Do check out my other related posts for this recipe

الأربعاء، 25 يونيو 2014

KUSKA BIRYANI RECIPE/KUSKA RICE-PLAIN BIRYANI RECIPE

Kuska biryani recipe


I am a big fan of kuska biryani.Before marriage we used to have this rice from a nearby restaurant at least twice in a month during weekends.My appa calls this as”pattai sadam”.In hotels,they usually serve kuska with onion raita and salna or ennai kathirikai.I love that combo Smile.
Kuska,this term might be new to some you.I will tell u what it is.Kuskha is nothing but the plain rice cooked n flavoured with masalas without adding vegetables or meat.Usually muslim people do this for all their marriages and festivals.In urdu,”Kushk”means plain.It is very famous in Hyderabad and Tamilnadu.Thanks to Spiceindiaonline from where i got these details.In Tamil nadu,u get kuska mostly in small hotels or mess.In some big hotels,they serve chicken or mutton biryani as kuska just by removing the pieces.So my dad always buys it from vegetarian hotels.Its my long time dream to recreate kuska at home.I have tried several recipes but they were not satisfactory.Recently i was chatting with my reader Kirthiga devi in facebook.More than a reader,i should say she is like my sister.She calls me fondly as akka Smile.When we were talking,i just asked her about kuska biryani and she immediately shared her recipe with detailed steps.She suggested me pressure cooker as well as Dum method.I chose pressure cooker method as i felt it easy.She also said that this is the recipe of muslim style kuska.Then, what else i need to try this??.I tried it for my lunch today.It was awesome.I got the same taste as i expected.Thank u so much kirthiga Smile.Friends,whenever u run short of veggies,do try this kuska rice.Bachelor’s & working women can make this easy rice for their lunch box during busy mornings .Its a no grinding & less chopping rice variety .Just one onion, half tomato & biryani spices is enough to prepare this delectable dish for two people Smile.U can use either jeera rice or basmati rice as per ur liking.Lets see how to make Tamil nadu style kuska biryani.

Kuska recipe

Kuska biryani recipe


Kuska biryani recipe How to make kuska biryani recipe at home easily.
Cuisine: Indian
Category: Lunch
Serves: Serves 2
Prep time: 10 Minutes
Cook time: 15 Minutes
Total time: 25 Minutes


INGREDIENTS

  • Jeera rice or basmati rice - 1 cup
  • Water+coconut milk or water+milk - 2 cups
To add in the rice
  • Cinnamom - 1 small piece
  • Cardamom - 1 no
  • Cloves - 1 no
  • Bayleaf - 1no
  • Mint leaves – 10 nos 
  • Ghee – few drops
To saute
  • Cooking oil - 2 tbsp
  • Cinnamom - 1 small piece
  • Cloves - 1 no
  • Bayleaf - 1 no
  • Kalpasi/black stone flower – 1/2 tsp( click here to see the picture in stepwise pics)
  • Cardamom - 1 no
  • G&G paste – 1 tsp
  • Big onion - 1 no
  • Tomato - 1/2 no
  • Green chillies - 2 nos
  • Red chilli powder – 1/2 - 1 tsp (adjust)
  • Dhania powder - 1/2 tsp
  • Curd – 1 tbsp
  • Mint leaves – 15nos (chopped)
  • Coriander leaves -  2 stalks (chopped)
METHOD

  • Wash the rice and take it in a bowl.To this rice,add the spices mentioned under”to add in rice”.Add equal quantity of water+milk or water+coconut milk and soak the rice for 10-15 minutes. ie Rice and water+milk ratio should be 1:2.( u can soak only in water too if u don’t want to add milk or coconut milk)
  • In the mean time,finely chop onions,tomatoes,mint leaves and coriander leaves.
  • Then in a pressure cooker base,heat oil and add all the spices,saute for a second.
Kuska recipe step1
  • Then add onions,g&g paste and saute till raw smell leaves it.
  • Add tomato pieces and saute till mushy.Now add red chilli powder,dhania powder and saute for sometime.Kuska recipe step2
  • Add mint,coriander leaves.Mix well.Now add the curd,soaked rice with water and spices.
Kuska recipe step3
  • Add the required salt.Check for taste and pressure cook in low flame for one whistle or 10 minutes.Open the lid after the steam is released.Mix with a fork once.Check whether rice is done else add 1/4 cup of water and allow it to cook for 1 whistle in high flame or keep it for 3-4 minutes in high flame.
Kuska recipe step4
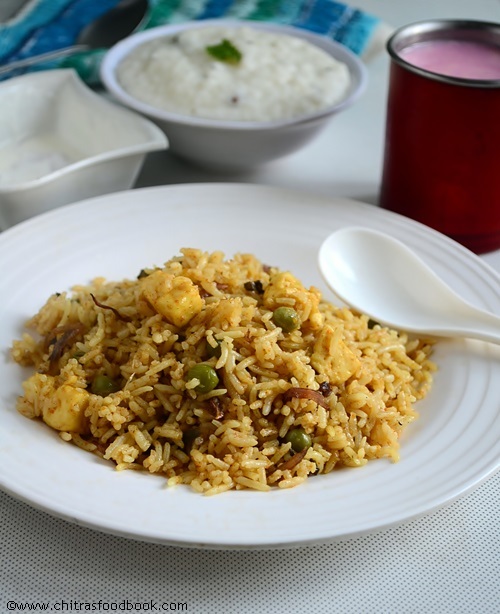
Serve with onion raita and Enjoy !


Note

  • Rice takes longer time to cook in milk + water combo.So add more water and less milk if u want it to be quickly done.
  • U can add 1/4 tsp of fennel seeds while sauting spices.Its optional though.
  • Kuska i had tasted from hotels looks reddish orange in color.I think they add orange food color.But i used only red chilli powder to bring this color.So add food color if u wish.
  • For variations,u can add coconut milk instead of plain milk OR use water alone.
  • Remember the ratio of rice n water should be 1:2 even if u soak for 30 minutes.
  • If u use jeera rice,soak only for 15 minutes else rice will turn clumpsy after cooking.If u soak for more time,add 1.5 cups of water instead of 2 cups.

Kuska-biryani-recipe

Easy n tasty Kuska biryani is ready ! Smile
Kuska-biryani