Usually i make Kootu with sorakkai(Suraikai,sorekai in tamil,sorakaya in telugu,Lauki in Hindi,Bottle gourd in English).But this time for a change i tried dosa with bottle gourd as suggested by my MIL.She usually adds it while grinding rice flour dosa/verum arisi dosa or in paruppu adai to make the dosa very soft.But i added some spices along with rice & bottle gourd to make a spicy,flavorful dosa like adai.My friend Shalini used to tell me about her Karam dosa recipe.So i just used those spices for grinding this batter.It came out very well with a nice color as i expected.With
coconut chutney as side dish,we loved it a lot.I was very happy that i could make a spicy,yummy,flavorful dosa variety adding a healthy vegetable.Friends,if you buy bottle gourd/Sorakkai,don’t forget to try this dosa.You can enjoy it for your breakfast and dinner as well.Ok,lets see how to make bottle gourd dosa with step by step pictures.
Here is my
Sorakkai Kootu Recipe – 2 versions,check it out !

Sorakkai Dosa/Bottle gourd dosa Recipe
 Spicy,soft dosa made of bottle gourd.
 Cuisine: Indian
Category: Breakfast
Serves: 15nos
Prep time: 120 Minutes + Fermentation
Cook time: 5 Minutes
Total time: 125 Minutes
INGREDIENTS
1 cup = 200ml
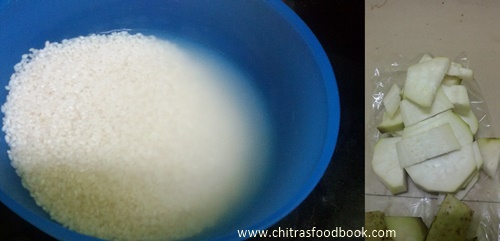
- Idli rice - 2 cups
- Sorakkai/Botlle gourd - 1 cup (chopped)
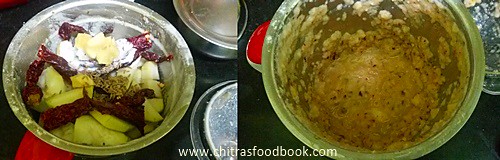
- Red chilli - 8 nos ( I used Byadge chilli to get bright red color)
- Ginger - 2 inch piece
- Cumin seeds/Jeera - 2 tsp
- Hing/asafetida - 1/4 tsp
- Salt & water - as needed
|
METHOD
- Wash and cut the bottle gourd.Scrape the outer skin and discard it.Now slit the bottle gourd into two pieces and remove the central soft,spongy part.Discard it.Chop the remaining bottle gourd into pieces and add to batter.
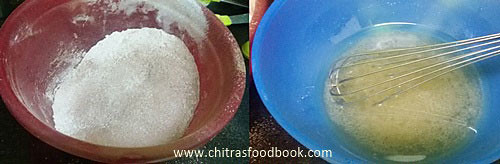
- Wash and soak the idli rice for 2 hours.After 2 hours,take the big mixie jar and add the chopped bottle gourd flesh part,red chillies,cumin seeds,hing and ginger piece.Grind it to a smooth paste.Now add the rice draining the soaked water and required salt & water.Grind it to a smooth paste.
-
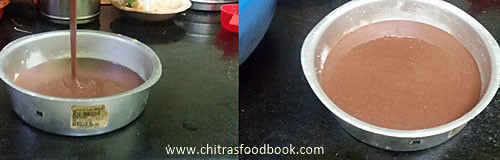
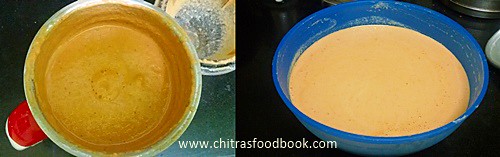
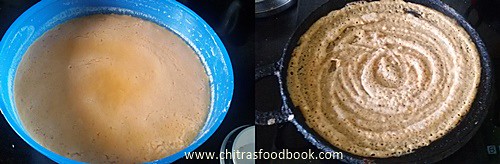
Transfer the batter to a bowl and let it ferment for 8 hours or over night. The next morning,mix the batter well and add some water if its very thick.Heat dosa pan and pour a ladleful of batter.Spread it thin and drizzle a tsp of oil around the dosa.Cook the dosa in medium flame and flip the other side.Cook for few minutes and remove.Serve hot with coconut chutney.
|
Note
- If you don’t want to flip the dosa,cover & cook the dosa for few minutes,fold it and serve.
- I used byadge chillies to get more color and less spicy taste.Please adjust the quantity of chillies as per your need.
- If you wish to make this dosa as thick adai adding lentils,soak 1/4 cup of toor dal and 1/4 cup of chana dal with rice and grind the batter.
|
Enjoy this yummy,colorful,healthy bottle gourd dosa with coconut chutney & Idli podi !!

 .Puffed rice ( Arisi pori in Tamil,Mandakki in Kannada,Murmura/bhel in Hindi,Borugula in Telugu) is the star ingredient for this recipe.As i haven’t tried any puffed rice recipes other than Kara pori,I got tempted to try this dosa & tried it on the same day.This dosa is not an instant version.Its batter needs to be fermented really well to enjoy its best taste.As Suchi said,dosas came out very well,very soft and spongy with lots of holes in it.I usually make sponge dosa adding poha/aval & methi seeds.But this recipe does magic just with the puffed rice.You can grind the batter easily in a mixie.With garlic chutney as side dish,it tasted great!! I will share the recipe for garlic chutney tomorrow.Now lets see how to make this soft,sponge dosa using puffed rice/arisi pori.
 How to make soft,spongy dosa using puffed rice - Yummy breakfast recipe


 .As the chef says,the masala used in this recipe can be used to make Bharwa Shimla mirchi, Bharwan Karela and even stuffed tindora.And this stuffed bhindi fry would be a great side dish for roti/chapathi , simple Veg pulao or any paratha. But i loved to have it as a snack
 .Lets see how to cook bharwa bhindi recipe with step by step pictures.


 Print this recipe


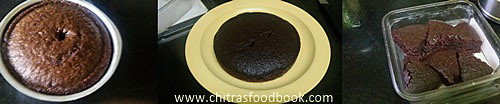
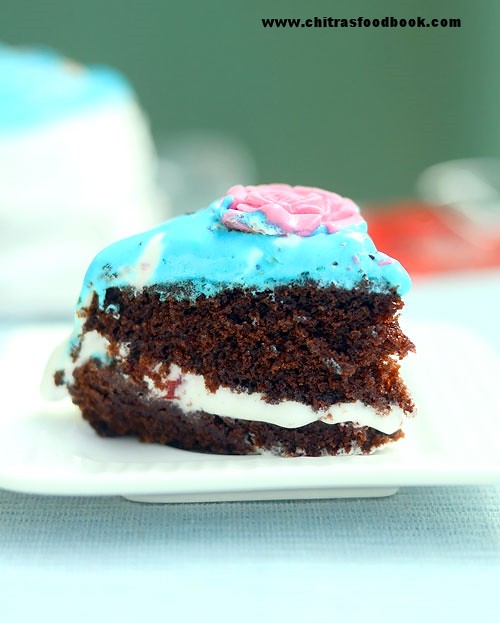
 .I must learn to do it perfect.But the cake base was a super hit at home.I have tried eggless chocolate cake with condensed milk for my
  .This was the best complement i’ve ever received for my baking.And now i am happily sharing this fool proof recipe with you all.Try it for your family and take the credits.Ok,lets see how to make this eggless,spongy,moist chocolate cake recipe using oil.