السبت، 31 أغسطس 2013

PARUPPU URUNDAI KUZHAMBU – LUNCH RECIPES

paruppu kuzhambu
I got this recipe from Aval vikatan’s supplementary . Recipe was given by “Mrs.Revathy shanmugam”. So i tried it confidently.I had already tried milagu kuzhambu/pepper kuzhambu from that book and it was a hit in my home . Usually paruppu urundai kuzhambu is made by cooking lentil balls in tamarind sauce adding sambar powder & other spices. This recipe is also very similar but it has chettinad touch..I’ve used soambu/saunf here. U can always omit the saunf & try. There will not be much difference in taste & flavor.We loved the urundai a lot.It was soft yet firm.This gravy tastes great when mixed with plain rice adding ghee.I made the gravy slightly thick ..Adjust the consistency as per ur need..Do try n let me know how u liked it.
paruppu-urundai kuzhambu

INGREDIENTS
For paruppu urundai/Lentil balls : 1 cup - 200ml
  • Toor dal – 1/2 cup
  • Red chilli – 2-3 nos
  • Hing – 1/4 tsp
  • Jeera – 1/2 tsp
  • Curry leaves – few (finely chopped)
  • Small onion/big onion – 10/1 no (finely chopped)
  • Garlic cloves – 4 nos (-do-)
  • Coriander leaves – few (-do-)
  • Rice flour – 1 tsp
  • Salt – as needed
For gravy
  • Tamarind – Medium lemon size
  • Tomatoes – 2 nos
  • Onion – 1/4 cup (finely chopped)
  • Garlic cloves – 8 nos (-do-)
  • Curry leaves – few
  • Sambar powder – 1 tbsp (OR) Red chilli powder – 2 tsp & dhania powder – 1 tsp
  • Rice flour – 1 tsp
  • Salt & water –as needed
To grind
  • Grated coconut – 3 tbsp
  • Big onion – 1 no
  • Pepper corns – 1/2 tsp
  • Jeera – 1/4 tsp ( optional)
To temper
  • Cooking oil – 2 tbsp
  • Mustard seeds – 1 tsp
  • Methi seeds – 1/4 tsp
  • Jeera – 1/2 tsp
METHOD
  • Wash & soak the dal for 2 hours.Drain all the water & set aside.
  • In a mixie jar, grind the red chillies , hing ,salt , saunf (1/4 tsp,optional) , jeera & coconut coarsely.Now add the dal & grind it to a coarse , thick paste without adding water.
urundai tile1
  • To that paste , add finely chopped onions , garlic cloves , curry leaves, rice flour & coriander leaves.Mix well and make big gooseberry sized balls out of it.Set aside.
urundai tile2
  • In  a kadai , heat oil and splutter mustard seeds ,methi seeds , jeera .Then add the finely chopped garlic cloves & onions. Saute well for a minute. Now add the chopped tomatoes & saute till mushy. Add turmeric & sambar powder. Mix well , boil for a minute in low flame.
urundai tile3
urundai tile4
  • Then add the tamarind extract , salt with 2 cups of water.Allow it to roll boil for 5 minutes. Now drop the lentil balls one by one into the gravy.Do not stir immediately. Let the gravy boil for 2-3 minutes in low flame.Now stir the gravy carefully so that the balls are not broken.
urundai tile5
  • Cover & cook it in medium flame for 5-8 minutes till the balls get cooked & float on top.Take a ball,break it & see whether it is cooked completely.Now add the ground coconut paste , stir well & allow it to boil for 5 minutes. This gravy thickens as time proceeds. So add water accordingly..
urundai tile6

Transfer to the serving bowl & enjoy with plain rice adding a drop of ghee !

NOTE
  • For variations , u can add  1/4 tsp of jeera  or saunf while grinding along with coconut.
  • Beginners who dont want to cook the lentil balls directly in the tamarind sauce can steam the balls in an idli pot and add them at the end..

urundal kulambu plate


الجمعة، 30 أغسطس 2013

Cherry Pudding Cake

cherry pudding

This warm, soft pudding cake dessert has been an old and favorite stand-by in my family for years. It's perfect for assembling when you want to make a treat on short notice, without too much thought or preparation — if you have fresh or frozen fruit on hand, all the other ingredients are almost certainly to be staples in your pantry, and it's so ridiculously easy to put together that even people who don't bake can make this one. Soft, spongy and with a delicate golden-brown sugar crust, the pudding cake is surrounded by warm, bubbling fruit juices and smells just heavenly.

I hadn't made it myself for a good while, but browsing through my old recipes and seeing a bag of fresh sweet cherries just waiting to be used up had me craving this comfort food again. You can use two cups of any combination of berries instead of cherries if you like — blueberries, blackberries, raspberries or strawberries — next time I think I'll use strawberries and some rhubarb. You can also prepare the pudding cake well ahead of time and simply reheat it in the oven for 20 minutes to serve hot, although it's delicious at room temperature or even right out of the refrigerator.

Cherry Pudding CakeCherry Pudding Cake
Recipe by
Published on August 30, 2013

Easy, soft and moist cherry pudding cake — a simple and comforting dessert

Print this recipePrint this recipe

Ingredients:
  • 2 cups fresh or frozen cherries, pitted and chopped
  • 1 teaspoon ground cinnamon
  • 1 teaspoon lemon juice
  • 1 cup unbleached white flour
  • 2/3 to 1 cup white sugar or coconut sugar
  • 1 teaspoon baking powder
  • 1/2 cup milk or plain yogurt
  • 3 tablespoons unsalted butter, melted
  • 1 tablespoon cornstarch
  • 1 cup boiling water
Instructions:
  • Preheat an oven to 350° and butter or grease an 8-inch baking pan.

  • Toss the cherries with the cinnamon and lemon juice in a mixing bowl and pour into the prepared baking dish.

  • In another mixing bowl, combine the flour, half of the sugar and baking powder. Stir in the milk and butter. Spoon the batter over the berries.

  • Combine the remaining sugar and cornstarch in a small bowl and sprinkle over the batter. Slowly pour the boiling water over the entire dish.

  • Bake for 45 to 50 minutes or until the pudding has risen and the top is golden brown. Serve hot or warm.

Makes 4 to 6 servings
cherry pudding cake

More easy desserts you will enjoy:
Blueberry-Raspberry Pudding Cake
Cherry Clafouti
Rum Plum Clafouti
No-Bake Lemon Cherry Cheesecake

On the top of the reading stack: We by Yevgeny Zamyatin

Audio Accompaniment: relaxing ambient music on a lazy Friday afternoon

الأربعاء، 28 أغسطس 2013

OATS MASALA MORE – SPICED BUTTERMILK RECIPE


masal oats more copy

Last month when i went for grocery purchase , i happened to see this recipe in quaker oats packet.I memorized the recipe & came home  Smile..But i couldn’t try immediately.Yesterday,suddenly i reminded about this & tried with the recipe i had in my mind vaguely.I am not sure whether this is the exact recipe given in the packet.But it came out very flavourful , yummy & tasty.So i thought of posting here.Addition of oats made it more healthy.Do check out my Neer more/spiced buttermilk recipe in interested.

masala more cup copy


INGREDIENTS
1 cup - 200ml
  • Instant oats – 1/4 cup 
  • Thick curd – 1 cup
  • Water – 3 - 4 cups ( add more if needed)
  • Roasted jeera powder – 1/4 tsp
  • Salt – as needed
To grind
  • Ginger – 1 inch piece
  • Mint leaves & coriander leaves – 2 tbsp  (together)
  • Green chilli – 1-2 nos
To temper
  • Mustard seeds – 1/2 tsp
Coriander leaves – to garnish

METHOD
  • Grind all the ingredients given under “to grind “ to a smooth paste adding required water.Dry roast oats for 2-3 minutes & powder well.
oats more tile1
oats moreoats more tile2
  • In a wide bowl,take the powdered oats , curd , salt , ground paste , jeera powder and water. Mix it well with a whisk..Temper mustard seeds ..
Garnish with coriander leaves if desired ! Serve chilled !

Note
  • For variations u can use either coriander leaves or mint leaves alone for grinding.
  • Adjust the amount of curd & water as per ur liking.
  • U can also add more chillies if u want it more spicy.

Corn and Green Pea Tomato Curry

corn and pea tomato curry

I've grown tomatoes in planters in the backyard for the past several years, but this year the plants are yielding the most abundant crop yet. This of course means that I currently have an excess of tomatoes, so I am trying to focus on them when making meal plans. I may just have to dry them or preserve them in jars for the winter if they keep coming off the vine as fast as they have been lately.

In the meantime, my husband enjoys cutting the juicy fruits into slices and eating them sprinkled with sea salt and a little freshly cracked black pepper. And I have been adding tomatoes to salads, curries, salsas and dips and include them whenever in anything I can where they might be appropriate. The night that I made this simple vegetable curry was an oppressively hot and humid day when all I wanted was a light refreshing meal — especially after having eaten a rather large and heavy brunch. The occasion of having some beautiful local fresh sweet corn and garden peas was just the inspiration I needed to, for a light but zesty and extraordinarily flavorful dinner. The lovely contrasts in color are matched by the layers of sweet, tangy and spicy flavors and the pop-in-your-mouth bites of fresh corn and peas in a smooth and zesty tomato sauce.

I cooked up some quinoa to go along with the curry and served it all up with a few poppadums for a perfect light summer meal that made good use of local produce too. Feel free to included whatever vegetables you may have on hand, adjusting the liquid component and cooking time accordingly.

Corn and Green Pea Tomato CurryCorn and Green Pea Tomato Curry
Recipe by
Cuisine: Indian
Published on August 28, 2013

Simple, light and zesty Indian-style tomato and vegetable curry with fresh sweet corn and peas popping in your mouth

Print this recipePrint this recipe

Ingredients:
  • 2 ears fresh corn or 2 1/2 cups frozen corn
  • 2 teaspoons oil or butter
  • 1 large shallot or small onion, finely chopped
  • 1 medium carrot, diced
  • 3 red or green chilies, seeded and finely chopped
  • 1-inch piece fresh ginger, minced or grated
  • 2 teaspoons ground coriander
  • 1 teaspoon ground cumin
  • 1 teaspoon turmeric
  • 1/2 teaspoon Kashmiri or other chili powder
  • 1/4 teaspoon cayenne
  • pinch of asafetida
  • 1 large tomato, partially seeded and finely chopped
  • 1 cup fresh or frozen peas
  • generous handful of fresh parsley or cilantro, trimmed and chopped
  • 1/2 teaspoon garam masala
  • 1 teaspoon sea salt, or to taste
Instructions:
  • If using fresh corn, lightly roast the ears in their husks in a preheated 425° oven for 15 minutes. Cool and then pare the kernels from the cobs. Alternately, you can boil the ears for 5 minutes or until the corn is just tender. Set aside.

  • Heat the oil or butter in a medium saucepan over medium heat. When hot, add the shallot or onion and stir for 2 to 3 minutes to soften. Add the carrot and stir for another 2 to 3 minutes. Toss in the chilies and ginger, and continue to stir another 2 minutes.

  • Add the ground coriander, cumin, turmeric, chili powder, cayenne and asafetida to the pan and stir for 30 seconds. Add the tomato. If using fresh peas, add them now as well. Cook, stirring occasionally, for 5 to 7 minutes or until the tomato starts to thicken.

  • Now add the corn and half of the parsley or cilantro. If using frozen peas, add them now. Continue to simmer for another 3 to 4 minutes, stirring often, until the corn and peas are tender but still plump.

  • Stir in the garam masala and sea salt, and let simmer for another minute.

  • Stir in the remaining parsley or cilantro. Remove from heat, cover, and let stand for 5 minutes before serving.

  • Serve hot with fresh cooked white rice or quinoa.

Makes 4 servings
vegetable curry

Other corn creations from Lisa's Kitchen you are sure to enjoy:
Tomato Corn Chowder
Roasted Corn and Jalapeño Cheese Soup
Corn and Roasted Red Pepper Soup
Quinoa Soup with Corn

On the top of the reading stack: Baking by Hand : Make the Best Artisanal Breads and Pastries Better Without a Mixer by Andy and Jackie King

Audio Accompaniment: various sounds

الاثنين، 26 أغسطس 2013

Southern-Style Pinto Beans with Rice and Fried Eggplant

southern-style pinto beans with eggplant

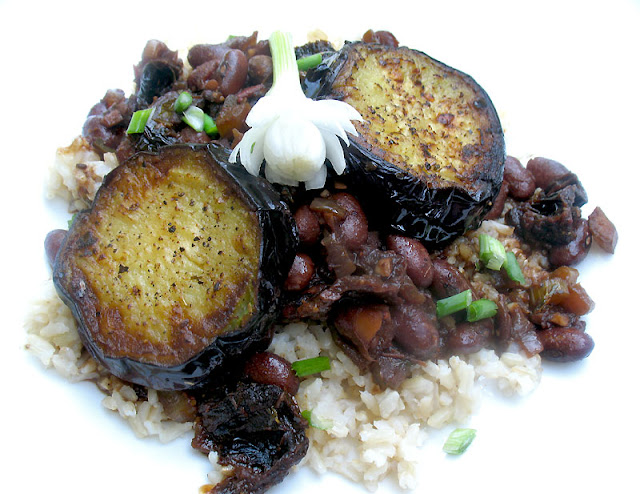
Simmered in a rich, zesty and tangy spiced sun-dried tomato sauce seasoned with a little liquid hickory smoke, these pinto beans are so hearty and packed with rich barbecue flavor that even your most barbecue-crazy carnivorous friends won't miss the meat on the grill with this dish. They won't even miss the grill at all, as it's all done on the stove-top. They'll probably be amazed that it's not only vegetarian, but vegan too.

As if the beans aren't delicious enough by themselves, they're also topped with extraordinary eggplant slices tossed with a dry-rub spice and herb seasoning and fried in hot oil. Complete the experience by serving the beans and eggplant on a bed of hot freshly cooked brown rice for a thoroughly nourishing and tasty dinner that will have your family and friends asking for seconds. I made up about 1 1/2 cups dried rice that yielded about 4 cups cooked rice for the quantity of beans that this recipe gives.

This incredible beans and eggplant dish is adapted from a recipe in a book that I recently received called "The Southern Vegetarian" by Justin Fox Burks and Amy Lawrence. Not just a collection of meat-free adaptations of American Southern classics — a cuisine that most of us don't associate with vegetarian-friendly food — Burks and Lawrence use Southern ingredients and techniques to come up with dozens of truly unique and creative vegetarian recipes with a modern Southern flair. This is one of the most exciting cookbooks to cross my path for some time now, and I'm looking forward to trying ideas like strawberry-basil shortcake sliders, sweet potato pancakes with peaches and pecans, green pea hummus, vegetarian gumbo, curried cauliflower soup, peach and tarragon pesto pizza, and plenty more. I'm getting hungry just writing this!

(Note: I received a copy of The Southern Vegetarian for review, but the opinions expressed above are entirely my own.)

Now without further ado, let's get cooking.

pinto beans, rice and eggplant

Southern-Style Pinto Beans with Rice and Fried EggplantSouthern-Style Pinto Beans with Rice and Fried Eggplant
Recipe by
Adapted from The Southern Vegetarian Cookbook
Cuisine: American South
Published on August 26, 2013

Hearty pinto beans simmered in a rich, tangy and spicy barbecue-style tomato sauce with hickory smoke flavoring

Print this recipePrint this recipe

Beans:
  • 1 1/2 cups dried pinto or romano beans
  • 5 1/2 cups vegetable stock or water or more as needed
  • 2 bay leaves
  • 1 1/2 tablespoons white vinegar
  • 1/2 teaspoon balsamic vinegar
 
  • 1 cup sun-dried tomatoes
  • 2 tablespoons butter or olive oil
  • 1 onion, diced
  • 2 celery stalks, diced
  • 3 fresh hot peppers jalapeño, cayenne or serrano), seeded and finely chopped
  • 1 tomato, chopped
  • 2 cloves garlic, minced
  • 1 teaspoon paprika
  • 1/2 teaspoon ground cumin
  • 2/3 teaspoon dried thyme
  • 1/4 to 1/2 teaspoon cayenne
  • 2 teaspoons Dijon mustard
  • 1/2 to 1 teaspoon liquid hickory smoke, to taste
  • 1 1/2 teaspoons sea salt, or to taste
  • fresh ground black pepper
  • sliced green onion for garnish (optional)
Eggplant:
  • 4 tablespoons olive oil
  • 1 medium eggplant, trimmed and cut into 1-inch thick slices
  • 1/2 teaspoon dried thyme
  • 1/4 teaspoon dried basil
  • 2/3 teaspoon dried red chili flakes
  • pinch of paprika
  • pinch of cayenne
  • 1/2 teaspoon sea salt
  • fresh ground black pepper
Instructions:
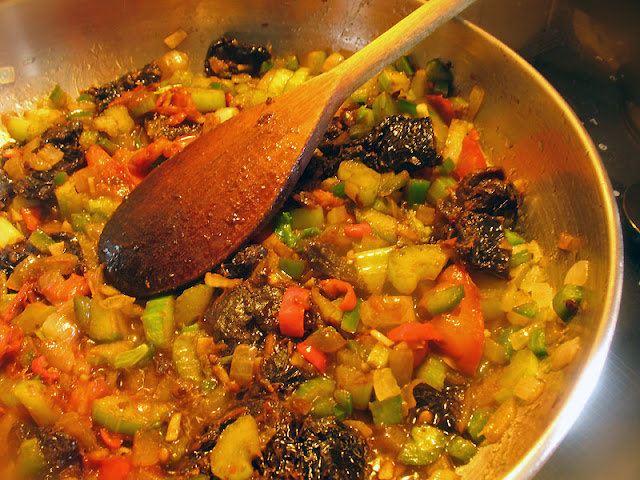
  • Rinse the beans and soak for 8 hours or overnight in several inches of water. Drain and rinse, then transfer to a large heavy-bottomed saucepan. Pour in the stock or water and add the bay leaves and vinegars. Bring to a boil, reduce heat to medium-low, cover, and simmer for 1 hour or until the beans are tender. Add more water as needed — the beans should not be too dry.

  • Meanwhile, soak the sun-dried tomatoes in hot water for 20 to 30 minutes, then drain and chop.

  • Heat the butter or oil in a large skillet over medium heat. When hot, add the onion and stir for 5 minutes or until softened and beginning to brown. Stir in the sun-dried tomatoes, celery, hot peppers, tomato and garlic, and continue to cook for another 5 minutes or until the vegetables have softened, stirring often. Now stir in the paprika, cumin, thyme, cayenne, mustard and liquid smoke, and to stir for 1 more minute.

  • Pour the vegetable and spice mixture into the cooked beans. Simmer for 10 to 15 minutes to allow the flavors to blend. Add more water as needed. You don't want a soupy consistency, but there should be enough liquid to serve as a sauce. Season with sea salt and black pepper to taste.

  • To make the eggplant, combine 2 tablespoons of oil with thyme, basil, red pepper flakes, paprika, cayenne, salt and black pepper in a large bowl or plastic bag. Toss the eggplant slices with the seasoning to coat evenly. After removing the eggplant slices, use your fingers to gently rub in the seasonings.

  • Heat another 2 tablespoons of oil over high heat. When the oil starts to smoke, add the seasoned eggplant slices and cook until charred on each side — about 1 to 2 minutes per side. Remove from the pan, drain on kitchen towels, and repeat with the rest of the eggplant. Add more oil to the pan as necessary. (Note: The hot oil will splutter and pop out of the pan when the eggplant is added, so take care).

  • To serve, spoon some rice onto a serving plate, top with a generous portion of beans and finally lay a slice or two of the eggplant over top. Garnish with green onion slices if desired.

Makes 6 servings
southern_style beans with eggplant

More pinto beans recipes you are sure to enjoy from Lisa's Vegetarian Kitchen:
Refried Beans with Sun-Dried Tomatoes
Pinto Bean and Avocado Burritos
Corn and Pinto Bean Dip
Pinto Bean and Zucchini Hummus

I'm sharing this with Jac's Bookmarked Recipes and also Ricki's Wellness Weekend.

On the top of the reading stack: various cookbooks

Audio Accompaniment: Lux by Brian Eno

UPPU SEEDAI RECIPE / SALT SEEDAI RECIPE–GOKULASHTAMI RECIPES


seedai-uppu picture

Uppu seedai is my doter’s favorite snack..Whenever we visit AAB , we buy a packet of seedai without fail. I have tried many times to bring white color but i have not succeeded yet..But i’ll keep trying till i get it.Winking smile..Friends, do give ur suggestions for white seedai . I’ll try for sure..This is my MIL’s recipe. I usually follow this every year . It comes out very well without bursting.Along with the normal round seedai we also make 2 small rod shaped “Seepankuzhal” for baby krishna ..Do refer my sweet seedai if interested ! Watch out the full video recipe for uppu seedai making with homemade processed flour and roasted urad dal flour preparations !

Uppu seedai - Video recipe


seedai - salt

INGREDIENTS
1 cup - 200ml
  • Processed rice flour OR store bought rice flour – 1 cup
  • Roasted urad dal flour – 1 tbsp
  • Unmelted Butter – 1 tbsp ( soft, at room temperature)
  • Salt & water – as needed
  • Hing – 1/8 tsp
  • Black sesame seeds – 1.5 tsp
  • Grated coconut – 1 tsp

METHOD
  • Grind the grated coconut in a dry mixie jar & make a powder.
  • If u are using homemade rice flour,first u should dry roast the flour for few minutes in low flame till vapour starts to come.Its a must & should step to get seedai without bursting.
  • Take the roasted rice flour & urad flour in a bowl & sieve once or twice.Add sesame seeds , hing & ground coconut powder..Lastly add the butter & blend it well with the flour using ur fingers. Do not give too much of pressure to the flour.
uppu seedai tile1
  • Add water & make a non-sticky dough.Make sure there are no cracks. Roll the dough into small balls roughly in a paper or cloth. Do not roll very tightly. Use first three fingers to make balls..
uppu seedai tile2
uppu seedai tile3
  • Allow the balls to dry for 20-30 mins before frying.Heat oil in a kadai & deep fry them in batches in medium flame.Keep tossing the seedai to get a uniform color..
uppu seedai tile4
uppu seedai tile5 
  • Remove when all the bubbles cease.Store in a box after it cools down..

 uppu seedai piece

NOTE
  • Dry roast the wet rice flour for few minutes slightly if u are using homemade processed rice flour.
  • First important thing to avoid bursting is to “SIEVE” the flour once or twice.. U should sieve all the flour ( urad dal flour , rice flour & gram flour if u use). Sieving the flour properly reduces 90% of bursting..
  • Secondly u should not roll the seedai very tightly. U should roll it to a loose ball using three fingers.No problem if it not a proper round..
  • Dry the seedai in a paper or towel for 30 minutes before frying..If u want to deep fry immediately prick the seedai with a small needle to avoid bursting.. Most of the time pricking may not be necessary because by the time u finish rolling all the dough , seedai would have dried..
  • Beginners can try deep frying few seedai in “small tempering kadai” .If it comes out well , proceed in a big kadai.Color variations may be there slightly. But u can check whether it bursts or disperses in oil..
  • If this seedai breaks or dissolves in oil , it means fat  ( ghee / butter) content may be more or oil temperature is too high or too low.
  • If Seedai bubbles too much after u drop into oil ,it shows the ghee or butter or oil  content is more..So add more rice flour to the dough & make again..
  • The color of seedai depends on the color of urad dal flour. If u roast the dal to golden brown  , seedai will also turn brown.
  • Uniform heating is also important. In my observation, low to medium flame is sufficient to get a well cooked , nice color seedai..Keep tossing every now and then..
Technorati Tags: ,,,,,,,,

السبت، 24 أغسطس 2013

VELLA SEEDAI | SWEET SEEDAI RECIPE - GOKULASHTAMI RECIPES

seedai picture
( Recipe updated with video)

I never knew about vella seedai till my marriage and now this has become my favourite.Every year i follow my MIL’s recipe for vella seedai and uppu seedai & it comes out very well without bursting Smile .Please refer the “Note” section for tips to avoid bursting..Usually we make the size of this seedai bigger than uppu seedai..We also make 2 “Seepaankuzhal “ (small rod shaped) in each variety which is specially meant for baby krishna .I give this to my daughter every year Smile ..Every year i make seedai with homemade processed rice flour . This year , for a change i tried with store bought rice flour which i use for making idiyappam. I followed same recipe for both & I din’t find any big difference in taste & color.Deep frying part is important to get a nice color & uniform browning.I have given in detail under “Method”.But cracks are unavoidable Eye rolling smile.First picture is with home made rice flour & the second one with store bought rice flour . Check out the full video recipe below !

Do check out my uppu seedai recipe too !


seedai sweet

INGREDIENTS
1 cup - 200ml
  • Processed rice flour  OR Store bought rice flour – 1 cup
  • Roasted urad dal flour  – 2 tsp
  • Soft butter at room temperature - 1/2 tbsp ( optional)
  • Grated jaggery – 1/3 -1/2 cup ( adjust based on ur taste)
  • Grated coconut – 1 tbsp
  • Sesame seeds – 1 tsp
  • Salt – a pinch
  • Cardamom – 2 nos
  • Water – just to cover jaggery ( around 3-4 tbsp)

METHOD
Click this LINK for processed rice flour

  • In a pan dry roast the flour till vapour comes out lightly.Do it in low to medium flame.Do not over roast the flour. Sieve & set aside.. 
  • In a bowl , take 1 cup of  roasted rice flour & 2 tsp of urad dal flour..Sieve them once or twice. ( This step is very important to avoid bursting) .Grind the grated coconut finely to a coarse powder..
  • In a pan take the grated jaggery & add little water to cover it. Heat & melt it to make a thin syrup. No need to boil it. Remove & filter the syrup to discard the impurities.
vella seedai tile1
  • Strain & add this syrup to the flour , cardamom powder , sesame seeds & grated coconut, softened butter. Mix well to make a dough.. Make sure the dough should be not be sticky.It should not have cracks.It should be thick..Add syrup accordingly. Sometimes syrup itself would be sufficient to make the dough OR u may have to add little extra water to make the dough..
vella seedai tile2
  • Make small balls out of the dough & deep fry them in batches.Allow the balls to dry for 15-20 mins before frying..  
  • Before deep frying check the heat of oil by dropping a pinch of dough. If it rises immediately , oil temperature is just right. Lower the flame to low & drop the seedai 4 to 5 at a  time.After u drop the seedai , do not disturb it for few seconds.( stand 2 feets away from the kadai for safety ,luckily it dint burst for me so far).If u start to stir immediately , seedai may break & dissolve in oil..After few seconds,turn it once to prevent sticking.. 
vella seedai tile3
  • Always deep fry in low to medium flame to get a nice color . Keeping the flame high turns the seedai black & inside portion will not be cooked properly.U don’t have to wait till all the bubbles cease. Once the seedai turns golden brown , remove & drain in a tissue paper.
  • Initially it tends to be soft , but it hardens & becomes crispy when it cools down..
vella seedai tile4

Crunchy Sweet seedai is ready..

seedai raksha


NOTE
  • First important thing to avoid bursting is to “SIEVE” the flour once or twice.. U should sieve all the flour ( urad dal flour , rice flour & gram flour if u use). Sieving the flour properly reduces 90% of bursting..
  • U must roast the flour slightly for few minutes in low flame if u are using homemade rice flour.
  • Secondly u should not roll the seedai very tightly. U should roll it to a loose ball using three fingers.No problem if its not a proper round..
  • One more tip is to prick the seedai with a small needle to avoid bursting..Dry the seedai in a paper or towel for 20 mins before frying..
  • Beginners can try deep frying few seedai in “small tempering kadai” .If it comes out well , proceed in a big kadai.Color variations may be there slightly. But u can check whether it bursts or disperses in oil..
  • If sweet seedai breaks or dissolves in oil , it means jaggery may be more or oil temperature is too high or too low.
  • If Seedai bubbles too much after u drop into oil ,it shows the fat ( ghee or butter or oil) content is more..So add more rice flour to the dough & make again..
  • The color of seedai depends on the color of urad dal flour. If u roast the dal to golden brown ,seedai will also turn brown.
  • Uniform heating is also important. In my observation , i feel low to medium flame is enough to get a nice color  & crispy seedais.
Do check out my uppu seedai recipe too !

sweet-seedai-recipe copy