الاثنين، 30 سبتمبر 2013

RANGOLI SUNDAL | MULTI GRAIN MASALA SUNDAL RECIPE – NAVRATRI RECIPES

rangoli sundal copy

Rangoli sundal ,is this title sounds attractive and unique? ;) . I tried this recipe from a magazine just by seeing this title . As the name suggests it came out so colorful .Raksha became very happy to see this multi colored sundal and asked me to serve her a bowl. It was not only colorful but also very tasty.In this sundal , i have added freshly ground spices and little lemon juice which made the sundal spicy , tangy and flavorful.As i wanted to make this sundal instantly,i chose grains like white lobia , brown channa,sweet corn and green peas which need not be soaked.I soaked peanuts in hot water for an hour and i roasted chana,lobia and pressure cooked all the grains together for 3-4 whistles in low flame.Everything was cooked perfectly.Do try this sundal recipe for this Navaratri and njoy !!

Multi grain sundal


Multi grain sundal- Rangoli sundal


Multi grain sundal- Rangoli sundal Healthy and colorful multigrain Rangoli sundal recipe for Navratri !
Cuisine: Indian
Category: Snacks
Serves: Serves 4
Prep time: 8 Hours
Cook time: 20 Minutes
Total time: 8H20Mins
INGREDIENTS
1 cup - 200ml

  • Peanuts/Verkadalai – 1/8 cup
  • Black eyed beans/lobia – 1/8 cup (white or brown)
  • Sweet corn – 1/4 cup
  • Carrot – 1 no (finely chopped)
  • Green peas – 1/8 cup (refer notes)
  • Brown or white chana – 1/8 cup
  • Salt & water – as needed
  • Grated coconut – 1/3 cup
To temper
  • Cooking oil – 2 tbsp
  • Mustard seeds – 1 tsp
  • Urad dal – 1 tsp
  • Ginger paste – 1/2 tsp
  • Curry leaves – few
  • Asafetida/hing – 1/4 tsp
  • Lemon juice – Few drops
To roast n grind
  • Cooking oil – 1 tsp
  • Dhania – 1 tsp
  • Channa dal – 1tsp
  • Urad dal - 1/2 tsp
  • Asafetida/hing – 1/4 tsp
  • Red chillies – 2 nos
METHOD
  • Wash and soak peanuts in hot water for an hour.In a pressure cooker base heat oil and roast the brown channa and black eyes beans till it crackle .Roast it for 3 –5 mins till u get a nice smell.To this add sweet corn kernels and peanuts.
rangoli sundal tile1

  • Pressure everything together adding required water and salt.Inside the cooker , keep a small bowl and put the green peas with 2 tbsp of water and little salt..Cook it in low flame for 3-4 whistles. It takes 20-25 minutes.Green peas gets cooked in the steam itself.(Refer notes )
rangoli sundal tile2
  • Open the cooker after the steam is released completely. Drain the excess water.. In a pan ,heat oil and roast the ingredients given under ”to roast n grind” and powder it nicely.
rangoli sundal tile4
  • In the same pan heat 2 tbsp of oil and temper mustard seeds , urad dal , ginger paste , red chilli , hing ,curry leaves and chopped carrot. Saute well and add the cooked pulses. Mix well. Lastly add the grated coconut and ground masala powder.Mix well and saute for few minutes.
rangoli sundal tile3
Enjoy !
Note
  • U can add any number of pulses/grains to make it more colorful.U can replace brown channa by rajma..As i din’t have rajma in hand , i din’t use it.
  • If u use white channa and rajma, u have to soak it for 8 hours.So i dint use both.
  • I have used green peas.So i din’t soak in advance. If u use dried peas,soak it overnight  or for 6 hours in hot water..
  • U can try this recipe without adding the masala powder.It also tastes good.U can try this way for kids.

No Croutons Required - The Winner for September

no croutons required

The challenge for September was to come up with a vegetarian soup or salad showcasing mushrooms. The roundup was short this month but all of the entries are dishes that I would happily serve up in my kitchen. A winner we must choose though and the most popular this month is Shaheen's Chestnut Mushroom and Barley Broth. The balance and blend of flavors and ingredients surely makes for a perfect one pot meal. Congratulations Shaheen and thanks for sharing your lovely recipe.

mushroom broth

Jacqueline will be hosting the October 2013 edition of No Croutons Required. Check back at the beginning of the month for the theme.

الأحد، 29 سبتمبر 2013

EASY KARAMANI SWEET SUNDAL RECIPE – NAVRATRI RECIPES

karamani sweet sundal recipe

This week i have planned to share some interesting sundal varieties in my blog. Let me start with this easy karamani/lobia /black eyed beans sweet sundal with jaggery.For any sundal , pulses/grains should be soaked, cooked and tempered.  And for sweet sundal, cooked pulses should be mixed with jaggery syrup.This is the usual procedure..Last year i posted green gram sweet sundal using the same method . But this sundal is much much easier to make than that one. We don’t have to soak the lobia/karamani and no need to make jaggery syrup too. Doesn’t it sound simple, quick and easy friends ? :) .I got this recipe from one of my cookbooks.Normally we don't temper for sweet sundal but in this recipe i have seasoned with mustard and chilli as we do for sweet mango pachadi. It tasted great and flavorful  :) We loved it a lot.If u want u can skip tempering and add cardamom powder.. Do try this sundal for first day of Navaratri and enjoy !!
karamani-- sweet sundal


Karamani sweet sundal recipe


Karamani sweet sundal recipe How to make Karamani sweet sundal/Lobia sweet sundal recipe for navratri
Cuisine: Indian
Category: Sweet
Serves: Serves 2
Prep time: 10 Minutes
Cook time: 20 Minutes
Total time: 30 Minutes


INGREDIENTS
1 cup - 200ml

  • White or brown black eyed beans/karamani – 1/2 cup
  • Grated jaggery – 4 tbsp ( add 2 - 3 tbsp for less sweet)
  • Cardamom powder – 1/4 tsp(optional,i dint use)
  • Cooking oil – 2 tsp (to roast karamani)
  • Grated coconut – 4 tbsp
  • Salt & water – as needed
To temper
  • Cooking oil – 1 tbsp
  • Mustard seeds – 1/2 tsp
  • Urad dal – 1tsp
  • Red chilli – 1 no
  • Curry leaves - few
METHOD
  • In a pressure cooker base, heat 2 tsp of oil and roast the karamani for 5-7 minutes in medium flame till u get a nice roasted smell.Add the required water and pressure cook it in low flame for 2 whistles adding salt.It takes nearly 15-20 minutes
karamani sundal tile1

  • Open the cooker after the pressure is released.Drain the excess water & reserve the cooked lobia/karamani. In a pan , heat oil and temper mustard seeds , urad dal , curry leaves.
karamani sundal tile2

  • Add the cooked lobia and mix well.Now add the grated jaggery and mix well till the jaggery melts and mixes with sundal.Stir for sometime and lastly add the grated coconut.Mix well and switch off the flame.
karamani sundal tile3
karamani sundal tile4
  • Close the kadai with a lid and let the sundal sit in the kadai for sometime.Initially the sundal looks slightly mushy but it separates when time proceeds. So prepare 30 minutes before serving
Enjoy !
Note
  • If there is mud in jaggery , u have to make syrup , strain it and add to the sundal.Click here to know how to make sundal adding jaggery syrup.
  • Soaking black eyed beans is not necessary.But u have to roast well before pressure cooking.If u want to soak karamani , u have to roast in oil before soaking . Otherwise sundal smells raw.
  • Normally we don't temper for sweet sundal but in this recipe i have seasoned with mustard and chilli as we do for sweet mango pachadi. It tasted great with mildly spiced and flavorful  :) We loved it a lot.If u want u can skip tempering and add cardamom powder & grated coconut.


sweet-sundal recipe-002

السبت، 28 سبتمبر 2013

Quinoa Nut and Fruit Protein Bars

vegan protein bars

Often I don't want to fuss with breakfast, or should I say most of the time, meaning a quick alternative must be on hand for not only morning grazing, but also healthy bites to satisfy cravings whenever they hit. Energy bars have always been a good choice, though most of the store-bought varieties are filled with artificial sweeteners and are just too sweet and stale tasting. Did I mention how costly they are?

The solution is to make your own energy bars at home, for a fraction of the cost, with total control over what you are adding into the mix, and with very little investment in time. As a health conscious vegetarian, I find that these are especially handy for road trips. Pizza, bland oily salads and bagels just don't satisfy hunger when you need a real energy fix on the road. Packed with protein, homemade energy bars are also a great snack to take to work or school. What I particularly like about these homemade bars is that there is no added sweetener — just the goodness of dried fruit and some unsweetened apple juice. Feel free to mix and match your favorite staples. You really can't go wrong with this recipe.

I've adapted this recipe from Power Hungry, a new release by Camilla V. Saulsbury devoted to energy bars. Spanning over 150 pages, there are plenty of ideas for homemade healthy snacks and treats. "Super-Natural Knock-Offs", "Activity Bars", "Endurance Bars", "Protein Bars" and "Raw and Almost Raw Bars" are offered up for our consideration, complete with an informative and comprehensive pantry section. All of the recipes are easily adaptable for vegans as most are dairy-free, and can easily meet gluten-free requirements. The book is also soy-free. If you are looking for ways to incorporate more seeds, nuts, dried fruits and grains into your diet, then I would highly recommend this book. I know already that this recipe is only the first of many that I will try. I'm already planning to make cherry pie bars, black bean protein brownies, citrus seed fruit bars, chickpea champion bars, Greek yogurt muesli bars and many other ideas from the book.

And now a treat for my readers. I am delighted to offer my readers in the US and Canada a chance to win a copy of this invaluable book. All you need to do is leave a comment on this post, indicating your favorite healthy snack. Please do ensure that you leave an email address along with your comment if you don't have one associated with your blog or do not have a blog so that I can contact you should you win. This giveaway will run until October 12th. I will then choose a random winner using a random number generator.

*Note: I received a complimentary copy of Power Hungry for possible review and provided with an opportunity to host a giveaway. The opinions expressed here are my own.
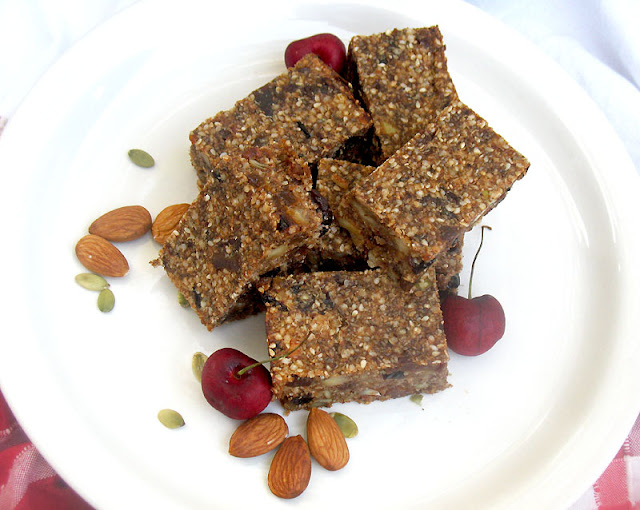
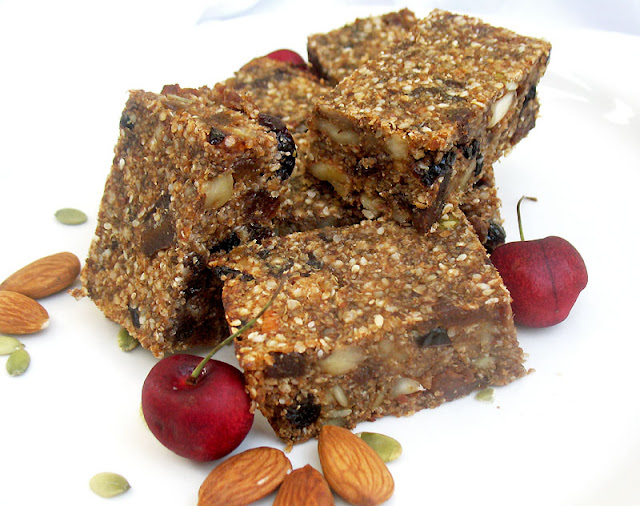
fruit and nut protein bars


Quinoa Nut and Fruit Protein BarsQuinoa Nut and Fruit Protein Bars
Recipe by
Adapted from Power Hungry: The Ultimate Energy Bar Cookbook
Published on September 28, 2013

Easy homemade energy bars packed with protein and flavor from nuts, seeds, dried fruit and spices

Print this recipePrint this recipe

Ingredients:
  • 1/2 cup dried dates, pitted and roughly chopped
  • 1/3 cup prunes, pitted and roughly chopped
  • 3/4 cup unsweetened apple juice
  • 1/3 cup chia seeds
  • 1/4 cup hemp seeds (optional)
  • 1 tablespoon pure vanilla extract
 
  • 2 tablespoons coconut oil
  • 1 1/2 cup quinoa flakes
  • 1/2 cup walnuts, chopped
  • 1/2 cup almonds, chopped
  • 1/2 cup sesame seeds
  • 1/4 cup pumpkin or sunflower seeds
  • 1 teaspoon ground cinnamon
  • 1/2 teaspoon ground ginger
  • 1/2 teaspoon ground cardamon
  • 1/2 teaspoon sea salt
  • 1 cup dried apricots, roughly chopped
  • 1/4 cup dried cranberries
  • 1/4 cup dried cherries
Instructions:
  • Line a 9-inch square baking pan with parchment paper. Set aside.

  • In a blender or food processor, combine the dates, prunes and apple juice and let stand for about 10 minutes to let the fruits soften. After 10 minutes, blend until mostly smooth. Add the chia seeds, hemp seeds and vanilla and briefly process to combine. Let this mixture sit for another 10 minutes or so.

  • As this mixture is sitting, heat the oil in a large skillet over medium heat. When hot, add the quinoa flakes, walnuts, almonds, sesame seeds and pumpkin or sunflower seeds. Cook, stirring often, for about 5 minutes or until the mixture is fragrant and golden brown. Stir in the spices and salt, and stir for another minute or so. Transfer to a large bowl.

  • Stir in the apricots, cranberries and cherries into the nut and quinoa mixture. Using a spatula, stir in the prune and date mixture until everything is well combined.

  • energy bars
    Transfer everything to the prepared pan. Press down evenly and firmly with the spatula or the back of a spoon. It is important that the mixture is firmly compacted so it doesn't fall apart when removed from the pan.

  • Bake in a preheated 350° oven for 20 to 25 minutes until the edges are browned and the top of the pan begins to dry out. Remove from the oven, transfer to a wire rack, and let cool completely.

  • Lift the bars out of the pan using the sides of the parchment lining and slide onto a cutting board. Cut into squares or thin bars about 2 inches long and 1 inch wide.

  • Eat at room temperature or refrigerate for up to a week.

Makes 15 bars
energy bars

Other healthy snacks you are sure to enjoy from Lisa's Vegetarian Kitchen:
Peanut Butter Carob Balls
Cocoa Fruit Treats
Peanut Butter Cookie Dough Bites
Quick and Easy Peanut Butter Balls

On the top of the reading stack: Running in the Family by Michael Ondaatje

Audio Accompaniment: Carbon Based Lifeforms

I'm sharing this with Ricki's Wellness Weekend

الجمعة، 27 سبتمبر 2013

PARUPPU IDIYAPPAM– BREAKFAST RECIPES


paruppu--idiyappam

Paruppu idiyappam is Sendhil’s favourite among all the other idiyappam varieties..I learnt this from my MIL.She makes it very well.With the flavour of coconut oil and crushed jeera it tastes yum…Smile Do try this. U’ll love it very much..This can be given for people recovering from illness. Its very light, mildly spiced and healthy too..

paruppu idiyappam front-001

INGREDIENTS
1 cup - 200ml
  • Cooked idiyappam – 3 cups
  • Moong dal – 1/4 cup
  • Big onion – 2 nos (finely chopped)
  • Green chillies – 3 nos (slitted)
  • Cumin seeds/jeera – 1.5 tsp (coarsely crushed)
  • Coconut oil – 1 tbsp
To temper
  • Cooking oil – 1 tbsp
  • Mustard seeds – 1 tsp
  • Urad dal – 2 tsp
  • Asafetida/hing – 1/4 tsp
  • Curry leaves - few
METHOD
  • Make idiyappam and loosen it lightly using ur hands or fork..Usually i cook the dal while making idiyappam in the idli pot itself. For that, inside the idli pot , place the dal in a small bowl and add the required water .By the time u finish making idiyappam , dal would have been cooked and blossomed.It takes nearly 10 mins.Remove the dal and set aside.Make sure dal should not be mushy.
paruppu idiyappam tile
paruppu idiyappam tile1
  • In a kadai ,heat oil and temper all the ingredients given above in the same order.Then add the big onions , green chillies and saute till transparent.Add the required salt. Mix well .Lastly add the blossomed moong dal. Mix for a minute and set aside.
paruppu idiyappam tile2
paruppu idiyappam tile3
  • Add this dal mixture to the cooked idiyappam and mix well. Add coconut oil and coarsely ground jeera.
paruppu idiyappam tile4
  • Mix well and serve !!

paruppu idiyappam picture

الخميس، 26 سبتمبر 2013

LEMON IDIYAPPAM / LEMON SEVAI – BREAKFAST RECIPES

lemon idiyappam-001 copy
We usually make varieties of idiyappam like sweet idiyappam(with jaggery) , milagu jeeraga idiyappam  , lemon , paruppu and puli idiyappam . Sweet idiyappam is a must and should recipe for guest. In addition to this we make any one of the above said varieties.Among all these varieties , i love lemon and puli idiyappam the most ..We make puli idiyappam whenever we have excess pulikachal in hand. Otherwise we usually make lemon and paruppu idiyappam for our dinner..It is very easy to make , colorful and a tasty breakfast/dinner recipe.
Lemon idiyappam bowl-001

INGREDIENTS : 1 cup - 250ml
  • Cooked idiyappam – 1 cup
  • Lemon juice – 2 tbsp
  • Green chillies – 3 -4  nos (slit)
  • Turmeric powder – 1/4 tsp
  • Hing – A big pinch
  • Salt & water – as needed
To temper
  • Cooking oil or gingely oil  - 1 tbsp
  • Mustard seeds – 1 tsp
  • Urad dal – 2 tsp
  • Channa dal – 1 tbsp
  • Asafetida/hing – 2 big pinches
  • Red chilli – 1 no (pinched)
  • Curry leaves – few
METHOD
  • Squeeze the lemon and extract the juice. Add turmeric powder , salt , hing and set aside.In a kadai , heat oil and temper all the ingredients given above in the same order.Add the lemon juice at the end , mix well and switch off the flame. Transfer this juice to a bowl.Lemon juice is ready.
lemon idiyappam tile1

  • Make idiyappam and loosen it lightly using a fork or ur hands.Add this lemon juice along with seasoning. As soon as u add the juice , idiyappam will be wet and it will get separated by itself. So just mix using a ladle. Add  a tbsp of gingely oil .mix well .Initially it tastes little tangy but the idiyappam will absorb and tastes even while u eat. so always prepare 30 minutes in advance..
lemon idiyappam tile2

Tasty lemon idiyappam is ready to serve !


lemon-idiyappam-001

الأربعاء، 25 سبتمبر 2013

SWEETENED MILK ( WITH COCONUT AND JAGGERY) FOR IDIYAPPAM - IDIYAPPAM SIDE DISHES


Sweet milk - idiyappam recipe

I usually make sweetened coconut milk ( with sugar) for idiyappam as served in restaurants.I make coconut milk with jaggery only for vendhaya dosai.When i was talking to my friend Shalini , she told me about this milk . She told it tastes great for idiyappam and also there is no need to extract coconut milk.So this milk is less in calories too.But it tastes more like coconut milk .Also it takes lesser time to prepare than extracting coconut milk. What else i need to try this recipe. I tried on the same day for breakfast.It was superb. Sen loved it a lot. Thank u so much dear , i have got a tasty sweet accompaniment for idiyappam and appam other than the usual coconut milk.Friends , do try this milk for a change. U’ll make it often.Smile

sweet milk-jaggery

INGREDIENTS
1 cup - 200ml
  • Boiled Milk – 1.5 – 2 cups
  • Grated coconut – 2 tbsp
  • Fried gram dal /pottukadalai – 2 tsp
  • Grated jaggery – 1/2 cup
  • Cardamom – 2 nos

METHOD
  • In a mixie jar , grind the grated coconut , fried gram dal and elachi to a smooth paste adding required milk.
idiyappam milk tile1
  • Add this paste to the remaining boiled milk. Mix well and allow it to boil for few minutes say 5-8 mins.It will thicken slightly.
idiyappam milk tile2
  • In the mean time , in another bowl , heat and melt jaggery . Strain the syrup.Boil the syrup for few minutes till it becomes frothy and slightly thick.
idiyappam milk tile3
  • Add the required syrup to the boiling milk.Simmer the flame completely and mix well.Leave it for a minute and switch off the flame.Add more milk to adjust the consistency based on the sweetness.Adjust the quantity of syrup as per the sweetness u require.
idiyappam milk tile4
Serve with idiyappam.
Note: Do not roll boil the milk after adding the syrup. It will curdle.Just heat in low flame for 1 minute.

Pour this milk on top of idiyappam and enjoy eating . Its delish!

sweet milk - -pour