الأربعاء، 30 يوليو 2014

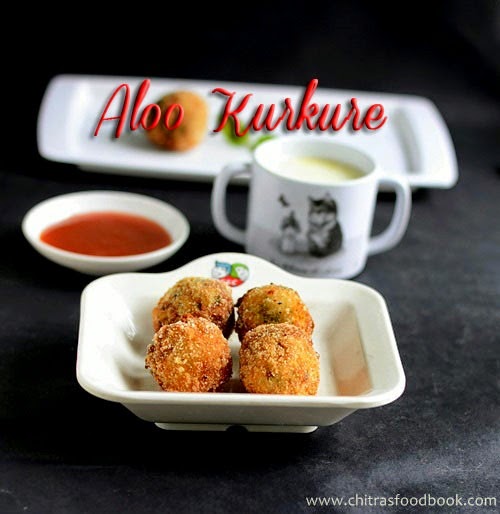
ALOO KURKURE RECIPE-EASY KIDS SNACKS RECIPES


aloo kurkure recipe

Do u have Potato,poha and a handful of mint leaves in hand ? Then u can make this yummy kids snack recipe in the next 15 minutes Batting Eyelashes.Its sooo easy to make and tastes super crispy.I am sure ur kids won’t stop with one.I tried this recipe from Tarla Dalal’s site with slight modifications.Last week Raksha was asking for some evening snacks after coming back from school.I usually make some bajji,bonda varieties as it can be made in minutes easily.But this time, i even felt bored of making the same and wanted to try something different.And i reminded about this recipe which i bookmarked long back from her site as the title “Aloo kurkure” sounded different & attractiveRaised Eyebrow.I never expected such a crispy exterior for just the coating of poha/rice flakes.U can call this as potato-mint croquets too.It was really tasting great with minty flavour.Its sure a crowd pleaser and u can make this snack for get together & birthday parties.It stays crispy for long time.Lets see how to make this yummy aloo kurkure recipe.
aloo-kurkure

Aloo kurkure recipe


Aloo kurkure recipe Aloo kurkure - A deep fried snack with minty flavoured potatoes coated with rice flakes!.
Cuisine: Indian
Category: Snacks
Serves: 10nos
Prep time: 10 Minutes
Cook time: 10 Minutes
Total time: 20 Minutes


INGREDIENTS
For balls
  • Boiled Potato/Aloo - 2 nos ( 1/2 cup mashed)
  • Mint leaves - a handful
  • Green chillies – 2-3 nos small sized,(finely chopped)
  • Lemon juice - 1/2 tsp
  • Roasted cumin powder - 1/4 tsp
  • Garam masala powder Or Chat masala pwd  - 1/4 - 1/2 tsp
  • Salt – as needed
For coating
  • Maida - 1/2 cup
  • Poha/Beaten rice flakes - 3/4 cup 
  • Water - as needed
  • Cooking oil - for deep frying
METHOD

  • Wash and pressure cook the potatoes in high flame for 3-4 whistles adding required water.Peel the skin and mash it well.
  • To this mashed potatoes,add finely chopped mint leaves,all the spice powders,salt & lemon juice. ( use crushed cumin seeds if u don’t have roasted cumin powder)
aloo kurkure step1
  • Mix well.Powder the rice flakes slightly coarse & take it in a plate.Set aside.Mix maida,little salt and water & prepare the batter for outer covering.The consistency of batter should be such that it should be able to coat the balls well.Do not make the batter very thick or thin.It should fall like a ribbon.
aloo kurkure step2
  • Make big lemon sized balls out of the potato mixture and coat it in the maida batter.Again roll it in the ground poha which u kept in the plate.Do it twice for better binding.
aloo kurkure step3
  • Heat oil to deep fry.Add a pinch of ball.If it rises immediately,oil temperature is just right.Now drop the balls in batches and deep fry them till golden brown.
aloo kurkure step4
It tastes crispy outside and soft inside!!
Enjoy with tomato sauce !


Note

  • Grind poha to a slightly coarse powder to make the balls coat well.Deep fry in medium to high flame.As we are using boiled potatoes,these balls gets cooked quickly.So remove when the outer cover changes to golden brown.
  • U can use bread crumbs if u don’t have poha in hand.
  • U can add 1/4 tsp of ginger garlic paste to the above masala.
  • Make sure u have prepared enough maida batter & ground poha to cover the balls well.It takes more quantity.


Yummy,crispy Aloo kurkure is ready to gobble with tomato sauce Surprise!!
Aloo kurkure


Check out my other easy kids snacks recipes


Raw Peanut Butter Cocoa Maple Squares

Raw Peanut Butter Maple Squares

I am now a convert to raw treats, especially when the sweetness comes from natural ingredients rather than refined sugars that produce a processed high. I'm all for purity, even when it comes to decadence. Being summer here, although not a particularly warm one, raw is also optimal to limit oven sessions.

Looking to feed my insatiable craving for peanut butter, I consulted Rawsome Vegan Baking which is by far one of the choicest books I have received this year because I have discovered a fellow nut fan in author Emily von Euw. I mixed things up just a little bit to suit my fancy, subbing peanut butter for the cashew butter called for in the original recipe. I've no doubt they would have been just as delicious, but I did have a particular craving to satisfy.

For me, peanut butter and chocolate make for the most exquisite pairings. Here, almonds and dates, sweetened with golden maple syrup come together in three layers of goodness. Rich, creamy, with some nutty texture and, yes, decadent, if you fail to resist the urge to eat a queen-sized portion of the pan — otherwise, they are pretty darn good for you.

peanut butter nut squares

Do be sure to check out Rawsome Vegan Baking if you get a chance. I am literally "un-baking" my way through the entire cookbook. Stunning are the vegan and wholesome takes on old classics that nourish while satisfying sweet teeth at the same time. Pretty much all of the recipes include staple pantry ingredients, and with a food processor, nothing more is needed than a bit of motivation to whirl everything together and assemble the creations. The pictures that pair with each recipe are enough to fuel food dreams for years to come and inspire you to recreate, enlarge upon and feast on fine treats for many years to come. Sophistication need not be complicated.

Raw Peanut Butter Cocoa Maple SquaresRaw Peanut Butter Cocoa Maple Squares
Recipe by
Adapted from Rawsome Vegan Baking: An Un-cookbook for Raw, Gluten-Free, Vegan, Beautiful and Sinfully Sweet Cookies, Cakes, Bars & Cupcakes
Published on July 30, 2014

Simple, raw peanut butter and cocoa squares that are just as rich and decadent-tasting as a sugary peanut butter chocolate bar, but healthy because they're loaded with nuts and coconut oil and sweetened only with dates and a little maple syrup

Print this recipePrint this recipe

Crust:
  • 1 cup raw almonds
  • 1 cup pitted dried dates
Middle layer:
  • 1/2 cup natural peanut butter
  • 1/2 cup coconut oil
  • 1 cup pitted dried dates
  • 1/4 teaspoon sea salt
  • 1 teaspoon vanilla
  • 1/2 cup dried grated unsweetened coconut
Top layer:
  • 1/3 cup coconut oil
  • 2 tablespoons cocoa
  • 1/4 cup maple syrup or other liquid sweetener
Instructions:
  • Line a 8 × 8 inch baking pan with parchment paper. In a food processor, pulse the almonds into a flour. Add the dates and process until the mixture begins to stick together. Transfer to the prepared pan and evenly spread the base, pressing down firmly with the back of a spoon. Refrigerate while you prepare the next layer.

  • In the food processor, blend all of the ingredients for the middle layer until smooth. Spread this mixture evenly onto to the base and pop the bars back into the refrigerator.

  • For the top layer, blend all of the ingredients together until smooth. Spread evenly over the other layers. Cover with foil and set in the refrigerator until firm — at least 8 hours.

  • Once set, use the sides of the parchment paper to gently lift the bars from the pan and transfer to a cutting board. With a sharp knife, cut into bite-sized pieces or larger bars if you wish. Keep refrigerated.

Makes 1 8 × 8 inch pan or 16 to 25 small bars

peanut butter nut treats

Let the peanut butter celebration continue:
Raw Peanut Butter Cookies
Cayenne Peanut Butter Cookies
Peanut Butter Cookie Dough Bites
Quick and Easy Peanut Butter Balls

On the top of the reading stack: Lord Krishna's Cuisine: The Art of Indian Vegetarian Cooking by Yamuna Devi

Audio Accompaniment: Ooze

الثلاثاء، 29 يوليو 2014

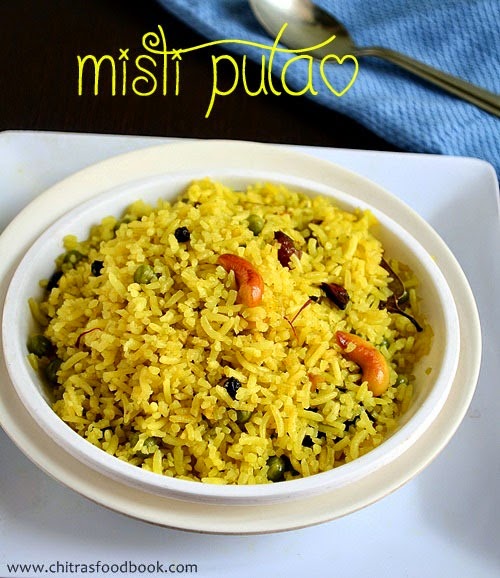
BENGALI MISHTI PULAO RECIPE/SWEET PULAO-BENGALI RECIPES


Bengali mishti pulao recipe
Eid Mubarak to all my friends and readers ! As Ramzan special post,i thought of sharing a sweet recipe with u all.So here comes a delicious Bengali special sweet rice recipe, Misti pulao/sweet pulao.This is a very easy and flavourful traditional Bengali rice recipe.It is also called as “Holud Pulao/Basanti Pulao or yellow pulao”.U can find this dish in most of the Bengali occasions & weddings.When i wanted to prepare Bengali thali,i found that sweet pulao recipe should be present in their authentic lunch menu.So i referred few blogs and finally tried it from Deepasri’s blog.It came out very well.Actually Bengalis use Gobindo bhog,a special fragrant rice variety to make this pulao.U can also substitute with jeera rice or Basmati rice.As i basically love the combination of sweet and spicy taste,i liked this rice very much when i had it with Chanar dalna(yet to post) & Begun bhaja.I read Bengalis have this rice with spicy mutton curry as accompaniment Smile.
bengali-mishti-pulao

Mishti pulao recipe


Mishti pulao Mishti pulao recipe – Bengali special sweet rice recipe!
Cuisine: Indian
Category: Sweet
Serves: Serves 4
Prep time: 10 Minutes
Cook time: 20 Minutes
Total time: 30 Minutes


INGREDIENTS

  • Gobindo Bhog Rice Or Basmati - 1 cup
  • Peas - a handful
  • Sugar - 2 -3 tbsp
  • Raisins/dry grapes - 2tbsp
  • Cashews - 2 tbsp
  • Chopped Ginger - 2 tsp
  • Turmeric powder - 3/4 tsp
  • Cinnamon- 1 no
  • Green cardamom - 2 nos
  • Javitri - 1/2 no
  • Saffron – few strands( soak in little milk)
  • Cloves - 2 nos
  • Black pepper corns - 1/2 tsp
  • Bay leaves - 1 no
  • Salt to taste
  • Ghee - 2 tbsp
  • Water - 1 cup
METHOD

  • Wash and take the rice in  a bowl draining the water.Add turmeric powder,mix well and spread the rice in a plate till use.
mishti pulao step1
  • In a broad kadai,heat ghee and saute all the spices given above.Lastly add cashews and dry grapes and fry till the cashews turn golden brown and dry grapes bulge.Then add green peas and rice & saute for few minutes.Do in medium flame.Take care nothing gets burnt.Add sugar & required salt.
mishti pulao step2
  • Now add 1 cup of water.When it comes to boil,mix well and simmer the flame.Cover the kadai with a lid and cook till the rice turns fluffy and soft.
mishti pulao step3

Enjoy !


Note

  • Adding green peas is completely optional.
  • U can use jeera rice in place of basmati rice.
  • Adjust the quantity of sugar as per ur tastebuds.
  • Do not fry rice for long time.It makes the rice firm and hard.

Enjoy this sweet pulao recipe.It tastes different and yummy !!
mishti-pulao

Do check out my other bengali recipes


الاثنين، 28 يوليو 2014

Saag Aloo (Spinach and Potato Curry)

saag aloo

Unbelievably, after a conversation with my best friend Basil, I realized that I had yet to document and share a recipe from my kitchen for saag aloo here on my space. As this potato and spinach curry is one of the most popular North Indian vegetable dishes around the globe, I am rather ashamed to just be sharing a favorite version from my kitchen just now — and that after 7 1/2 years of blogging with particular attention to Indian cuisine! I've shared many classics over the years but somehow this earthy and spicy vegetable classic got lost in the shuffle. That oversight is now corrected.

curried potatoes and spinach

Gently baked and then pan-fried until golden, the potatoes then arrive back in the scene after aromatic spices are simmered with lemon, tomato and luscious fresh spinach. This curry ought not to be too soupy as you want the potatoes to absorb the flavors in the dish, but you also don't want to turn the potatoes to mush. Patience is key here — simmer the spinach to the point where is very little moisture left in the pan for the consistency that I find is signature to this dish.

Saag Aloo (Spinach and Potato Curry)Saag Aloo (Spinach and Potato Curry)
Recipe by
Cuisine: Indian
Published on July 28, 2014

Classic dry Indian curry of potatoes and spinach simmered in tomatoes and spices

Print this recipePrint this recipe

Ingredients:
  • 4 medium potatoes, baked or boiled until just fork tender and cooled
  • 1/2 tablespoon ground coriander
  • 1 teaspoon garam masala
  • 1/2 teaspoon ground turmeric
  • 1/2 teaspoon ground cumin
  • 1/4 teaspoon asafetida
  • 1 teaspoon coconut sugar or brown sugar
  • juice from 1 lemon (3 tablespoons)
  • 2 tablespoons water
  • 5 tablespoons ghee or sesame oil
  • 1 teaspoon brown mustard seeds
  • 1 teaspoon cumin seeds
  • 2 to 3 fresh green chilies, seeded and finely chopped
  • 1-inch piece fresh ginger, minced or grated
  • 1 medium tomato, finely chopped
  • 1 lb (450 g) fresh spinach, trimmed, and roughly choppped
  • 1 1/2 teaspoons sea salt
Instructions:
  • Remove the skin from the potatoes and cut into small wedges. In a small bowl, whisk together the ground coriander, garam masala, ground turmeric, ground cumin, asafetida, sugar, lemon juice and water.

  • Heat the ghee or oil in a large heavy-bottomed non-stick skillet over medium-high heat. When hot, add the potatoes and fry until they are golden brown, gently stirring often, about 10 to 15 minutes. Remove with a slotted spoon and set aside.

  • Reduce the heat to medium and add the mustard and cumin seeds to the pan. Fry, stirring often, until the mustard seeds turn grey and begin to splutter and pop. Toss in the chilies and ginger and stir for another minute. Now add the ground spice mixture and continue to stir for another few minutes until most of the water has evaporated. Now add the tomato and simmer for another 5 minutes or until the tomato has thickened and the liquid has evaporated.

  • Stir in the spinach a few handfuls at a time, until each handful is slightly wilted. Cover and simmer for about 10 minutes, stirring occasionally. Remove the lid, stir in the salt and cook for another 5 minutes or until most of the liquid from the spinach has evaporated.

  • Reduce the heat to low, gently stir in the potato wedges, and cook for another 5 minutes.

  • Serve hot as a vegetable side.

Makes 4 to 6 side servings

saag aloo

Other potato dishes you are sure to enjoy from Lisa's Vegetarian Kitchen:
Aloo Gobi (Curried Cauliflower and Potatoes)
Aloo Mattar (Potato and Pea Curry)
Bengali-Style Crunchy Potatoes
Chickpea Vindaloo

On the top of the reading stack: Midnight's Children by Salman Rushdie

Audio Accompaniment: Opto

الأحد، 27 يوليو 2014

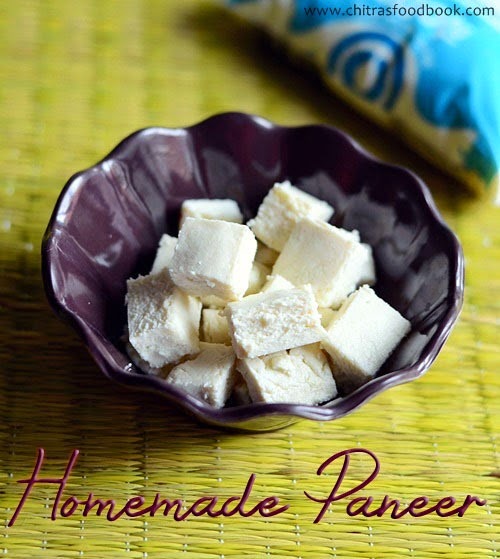
HOMEMADE PANEER RECIPE–INDIAN COOKING BASICS


homemade paneer recipe

I would like to share some yummy paneer recipes in the upcoming weeks.Before that,i wanted to post this basic homemade paneer recipe.As u all know,making homemade paneer is very easy,healthy,hygenic,nutritious as well as low in cost when compared to store bought paneer.All u need is just a litre of milk,two lemons and a cheese cloth.Generally i use low fat milk to make paneer.It comes out super soft and stays good for a week when refrigerated in an air tight box.I have been following this method from Mrs.Mallika badrinath’s cook book for long time.I have tried with curd,vinegar and lemon juice too.Every time it comes out perfect.I am yet to try with citric acid.I have shared all the tips & tricks i learnt from my experience and observation. I hope it would be useful for beginners in cooking.I will try to upload a full video recipe soon.Lets see how to make paneer at home easilySmile.

Homemade-paneer


Homemade paneer recipe


Homemade paneer recipe Homemade paneer recipe using lemon juice
 
Cuisine: Indian
Category: Cooking basics
Serves: 15 cubes
Prep time: 15 Minutes
Cook time: 2Hours
Total time: 2H15Mins


INGREDIENTS

  • Low fat milk - 4 cups
  • Lemon juice - 2 to 3 tbsp + equal quantity of water
  • Salt - a pinch
  • Cheese cloth or muslin cloth or any cotton cloth - 1 no
  • Water - 1 cup or ice cubes – few
  • Maida – 1/2 tbsp (optional)
METHOD

  • Squeeze lemon juice from 2 lemons and add equal quantity of water & set aside.
  • Boil milk till it froths & rises to the top.As soon as it starts to boil,switch off the flame and leave it untouched for 30 seconds.

homemade paneer step1

  • Now add 1 tbsp of lemon juice and stir the milk.Milk will start to curdle.Again add another 1 tbsp of lemon juice and keep stirring the milk.Milk will completely curdle and u could see the greenish whey separating from the milk.
  • To this,add 1 cup of plain water or few ice cubes and let it sit for few minutes.Whey will float on top and the chenna settles down.

homemade paneer step2

  • Take a colander and cover it with the cheese cloth or cotton cloth.I used my cotton dupatta.Pour the curdled mixture & strain it by keeping a bowl underneath the colander.Collect the whey water & set aside.U can use this whey for curdling the milk,making rotis etc.

homemade paneer step3

  • Now tie the cloth & squeeze it lightly.Be careful,it would be hot.Hang the cloth under the cupboard or in a closed tap for about 30 minutes.Now all the excess water would be removed.
  • Remove the chenna & add 1/2 tbsp of maida.Knead it well for 2-3 minutes.Paneer will become very soft.Make a square share or round shape as u desire.

homemade paneer step4homemade paneer step5

  • Keep it in the cloth again & close it.Place the cloth on a plate and keep some weight( a bowl of water) over the cloth and set aside for one hour.When u remove after one hour,paneer would be well set.Remove the extras,cut into cubes and store in a box.Stays good for a week when refrigerated !

homemade paneer step6


Note

  • U can use curd in place of lemon juice.In that case,use 1/4 cup of slightly diluted curd.Remaining procedure is the same.
  • We should add equal quantity or even little more water to the lemon juice.By doing this way,the sourness of lemon would be reduced and the paneer wont taste sour.U don’t have to wash the paneer after straining.Its optional.
  • U can follow the same procedure for vinegar too.But i guess u may have to wash the paneer after straining as the vinger smell is powerful than lemon.
  • Do not boil the milk after u add lemon juice because paneer may become hard when u over boil the milk.
  • And u must add some plain water at room temp or ice cubes after the milk is curdled completely.This will help the whey and chenna to separate.This is optional though.
  • Do not use polyester cloth for straining paneer.Its better to use thin cotton cloth.
  • Adding maida is optional while kneading.U can skip it if u don’t like.
  • I usually make paneer using 2-3 days old boiled milk by refrigerating it.


homemade paneer


الجمعة، 25 يوليو 2014

Green Pea Risotto

pea risotto

Once again a trip to the local market has to be an exercise in restraint as the bins and tables are bursting with beautiful local fresh produce of all kinds. But I can rarely resist picking up a bag of fresh garden peas in their pods, as the season for these always seems to be so short. I use frozen peas all year round, but there's nothing like the pop and sweet flavor of freshly shelled peas, and the methodical pace of shelling the peas is so calming besides.

Fresh Garden Peas

I've been especially indulgent with the garden peas this year, and although many of them are left around in a snacking bowl, I also like to take advantage of their culinary possibilities. So I combined them this time with one of my favorite dishes to come up with a simple but colorful summery risotto. Studded with fresh plump peas cooked until just tender at the very end of the cooking time, and flavored with a quick pea and fresh mint and basil purée, this creamy and classic risotto is easy to prepare, requiring only attention, and makes for a stunning gourmet way to enjoy the garden pea season.

green pea risotto

Green Pea RisottoGreen Pea Risotto
Recipe by
Cuisine: Italian
Published on July 25, 2014

Simple and delicious summer risotto with fresh tender garden peas finished with a pea and herb purée

Print this recipePrint this recipe

Ingredients:
  • 4 1/2 cups vegetable stock
  • 2 cups fresh or frozen peas
  • small handful of fresh mint leaves
  • small handful of fresh basil leaves
  • 2 tablespoons butter
  • 1 onion, finely chopped
  • 1 cup arborio or other risotto rice
  • 1/2 cup dry white wine
  • 2/3 cup fresh grated Parmesan cheese
  • 1 teaspoon sea salt, or to taste
  • fresh ground black pepper
Instructions:
  • If using frozen peas, cook for 2 to 3 minutes in a small saucepan of boiling water. Drain and set aside.

  • Bring the vegetable stock to a good simmer in a small saucepan. Transfer 1/2 cup of the stock to a small blender or food processor and add 1/2 cup of the peas along with the mint and basil. Purée until smooth and set aside.

  • Meanwhile, melt the butter in a large saucepan over medium-low heat. Add the onion and cook gently, stirring occasionally, for 10 minutes or until the onion is soft. Turn up the heat to medium, toss in the rice, and stir for 1 minute to coat the grains.

  • Pour in the white wine and cook, stirring constantly, until the liquid evaporates.

  • Now add a ladle of the simmering stock and cook, stirring constantly, until the liquid is absorbed. Continue adding the stock a ladleful at a time, stirring constantly, waiting until the liquid is absorbed between each addition. Continue until the rice is tender — this should take 20 to 30 minutes and use most of the stock (add hot water to the stock if necessary).

  • Stir in the pea purée, remaining peas and Parmesan cheese. Turn off the heat and let the risotto rest on the elements for a few minutes. Season with salt and pepper and give the risotto a stir. Serve immediately.

Makes 4 servings

green pea risotto

More summer green pea recipes you will like:
Warm Baby Potato and Pea Salad
Pesto and Egg Potato Salad
Spicy Mushroom Green Pea Curry
Spicy Urad Dal with Cauliflower and Peas

On the top of the reading stack: Midnight's Children

Audio Accompaniment: Eliot Sumner - Information (Trentemøller Remix)