الجمعة، 29 نوفمبر 2013

Beach Style Kara Pori - Snacks Recipes


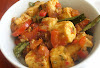
Beach style Kara Pori/Spicy puffed rice is one of the yummiest beach side snacks recipes like thenga manga pattani sundal,Milagai bajji,Roasted peanuts,Sutta solam etc etc that one should never miss tasting in beaches.Recently when my parents visited me,i bought a big raw mango to make my dad's favorite instant mango pickle.I had some left over puffed rice which i bought for making karthigai pori urundai.When i saw both in my pantry,i was tempted to try this beach style Kara Pori.As I had bookmarked my SIL’s recipe,i quickly referred it,also went through this recipe and got few suggestions from Sendhil.I modified it slightly as per our taste and tried it.I din’t add cucumber and i used very less tomatoes(as told by Sendhil) as it makes the puffed rice soggy very quickly.It came out very well & was so so nice.We enjoyed eating kara pori as well as cut raw mango coated with chilli powder & salt like we get in beach.It was heavenly Smile  !!


Beach style kara pori


Beach style kara pori Yummy, a must try beach style snack !
Cuisine: Indian Category: Snacks Yields: Serves 2
Prep Time: 10 Minutes Cook Time: 2 Minutes Total Time: 12 Minutes


Kara pori ingredients (2)


INGREDIENTS
1 cup - 200ml

  • Fresh puffed rice/Pori - 2 cups
  • Boiled peanuts - 1/2 cup
  • Grated carrot - 3 tbsp
  • Raw mango – 4 tbsp(finely chopped)
  • Big onion - 2 nos( Use 1 if too big,finely chopped)
  • Tomato - 1 no ( I used a very small one,finely chopped)
  • Turmeric powder - 1/8 tsp
  • Red chilli powder - 1- 1.5 tsp
  • Salt - as needed
  • Lemon juice – 2 tbsp ( juice of 1 big lemon)
  • Coriander leaves - 2 tbsp (finely chopped)
METHOD

  • Pressure cook the fresh peanuts adding salt for two whistles.If u use dried peanuts,soak in hot water for 2 hours & proceed as above.Chop & grate the veggies mentioned above.Keep everything ready.
  • In a wide bowl,mix all the ingredients except puffed rice & lemon juice.
  • Just before serving,add the puffed rice & squeeze the lemon juice.Check for taste and balance it.Add more lemon juice as tanginess should be more.Serve immediately.
kara pori step by step

Enjoy !


Note
  • Skip raw mangoes if u don’t get it.But it tastes great when combined with all these ingredients.
  • U have to soak the peanuts for a minimum of one hour in hot water & keep in a hot casserole if u want to cook it quickly else soak for 3-4 hours in normal water.Add salt while cooking.
  • U can also add finely chopped cucumber pieces & grated beetroots as done in some beaches.
  • Adjust red chilli powder according to ur taste.As tangy taste is more dominant than spicy taste,i used more lemon juice.Adjust as per ur liking.

Enjoy beach style kara pori as an evening snack ! u'll love it :)
2

الخميس، 28 نوفمبر 2013

Paneer Tomato Curry with Indian and Thai Flavors

paneer thai curry

More often than not, when I cook with paneer cheese it usually is an Indian-style dish, although I did once make a Thai Massaman curry with paneer cheese that certainly will be making an appearance again in the near future at the table.

This time, I went with a fusion dish, mixing up typical Indian spicing with prominent Thai flavors. It was a match made in heaven.

As I was experimenting with different flavors, I also experimented with the other components of the menu. I served it up with some north African millet patties and classic tarka dal. The sauce of the paneer curry was scooped over some of the millet patties and the tarka dal shone in the legume role. It all worked and the cook and her dining companions were more than satisfied.


Paneer Tomato Curry with Indian and Thai FlavorsPaneer Tomato Curry with Indian and Thai Flavors
Recipe by
Cuisine: Indian/Thai
Published on November 28, 2013

Tender pieces of paneer cheese simmered in a simple, tangy and zesty tomato curry seasoned with a blend of Indian and Thai seasonings

Print this recipePrint this recipe

Ingredients:
  • 14 oz (400 g) paneer cheese, cut into cubes
  • 2 tablespoon olive or sesame oil
  • 1 large shallot, finely chopped
  • 1 clove garlic, minced
  • 1 to 2 Thai red chilies, seeded and finely chopped
  • 1 teaspoon ground cumin
  • 1 tablespoon ground coriander
  • 1/4 teaspoon cayenne
  • 3 plum tomatoes, finely chopped
  • small handful of dried curry leaves, crumbled
  • 1 teaspoon dried oregano (optional)
  • 1 tablespoon red Thai curry paste, or more to taste
  • 1 red bell pepper, seeded and chopped
  • 1 tablespoon tamari (soy) sauce
  • 1/2 teaspoon sea salt, or to taste
Instructions:
  • Heat the oil in a large non-stick pan over medium heat. When hot, add the shallot, garlic and chilies to the pan. Stir and fry for a few minutes until the shallot begins to soften. Now add the ground spices to the pan and stir for another minute.

  • Add the tomatoes to the pan, along with the curry leaves and oregano if using, and simmer until the tomatoes begin to thicken — about 10 minutes. Stir in the Thai curry paste and red pepper and cook, stirring often, for another 10 minutes. Add the tamari, stir well, and then add the paneer cubes. Gently cook, stirring often, for another 5 minutes.

  • Taste for seasoning and add salt accordingly. Serve hot.

Makes 4 to 5 side servings

paneer tomato thai indo curry

Other paneer dishes you are sure to enjoy from Lisa's Vegetarian Kitchen:
Mung Beans with Paneer Cheese
Paneer Mushroom Masala
Butter Paneer Masala
Mattar Paneer

On the top of the reading stack: Gogol

Audio Accompaniment: Black Smoker by Tom Opdahl

الثلاثاء، 26 نوفمبر 2013

POORI RECIPE / HOW TO MAKE PUFFY POORI – BREAKFAST RECIPES

poori recipe
Poori/Puri is an yummy breakfast recipe that is loved by all irrespective of their ages.I usually make poori for guests and in weekends.Raksha loves to eat this more than chapati.As we all know making puffy poori is a bit tricky.It has to be puffy at the same time it should be soft.Consistency of the dough,rolling thickness,oil temperature everything matters here.I have shared the tips and tricks based on my observation & from the cookbooks i read.I have also shared a full video recipe for better understanding.Hope it will be useful for beginners.Lets see how to make puffy poori at home with a video !
Before that check out the side dishes for poori and plan accordingly :)

  1. Potato masala
  1. Onion masala without potato
  1. Chana kurma
  1. Aamras - North Indian Sweet side dish
  1. Easy Potato kurma
  1. Saravana bhavan style mixed veg kurma

Over to the recipe with a full video :)


poori recipe

Poori recipe


Poori Recipe Poori/Puri recipe- South Indian deep fried flat bread,kids favourite recipe!
Cuisine: Indian Category: Breakfast Yields: 8-9nos
Prep Time: 10 Minutes Cook Time: 5 Minutes Total Time: 15 Minutes


INGREDIENTS
 1 cup =200ml
For dough
  • Wheat flour/atta - 1 cup
  • Melted ghee - 1/2 tsp
  • Sooji/rava /Semolina - 1/2 tsp
  • Sugar – A pinch ( optional)
  • salt - as needed
  • Water - as needed ( i used around 1/3 cup)
  • Cooking oil - to deep fry
METHOD
  • In a wide bowl,take the flour.Add salt,a pinch of sugar,rava,ghee and mix well to make a crumbly mixture.Add water little by little and make the dough.Dough should not be sticky,wet or too soft like chapati dough.It should be smooth and stiff but not hard.
Puffy poori step by step
  • I used around 1/3 cup plus  1- 2 tbsp of water.It may vary based on the flour u use.Keep this as reference.Initially u may feel the dough little bit hard.knead well in between ur palms for few minutes.It will become smooth and soft.Do not allow the dough to sit for long time.Start rolling.
  • Make small lemon sized balls.Dust the balls in flour and make small sized poori of palm size.Use less flour for dusting.The thickness should be medium,not too thin like chapati.If u make it thin,puris won’t puff up.Arrange the pooris in a paper or a greased plate without overlapping each other.
poori step by step
  • Heat oil to deep fry.To check the right temperature of oil,put a small piece of dough.It will rise immediately at the same time it should not be browned.This is the perfect heating of oil.Immediately slide the poori and after a second,press it with a slotted ladle.It will puff up well.Flip it carefully and allow it to cook for few seconds till  the bubbles cease.Remove and lower the flame till u drop the next poori .Drain in a tissue paper.Keep the flame high and repeat the same for remaining pooris.
Puffy poori step by step
POINTS TO NOTE
  • Addition of ghee keeps the poori soft and gives a nice flavour.But do not add more than the mentioned quantity.
  • Adding sooji/rava is to maintain crispness.The puffed poori won’t break till u break it with ur hands.Some people soak the rava in little water before adding.If u add more quantity of rava, it would be good.But here it is not necessary as we are adding negligible quantity.U can also omit rava and try.It is completely optional.
  • Adding a pinch of sugar gives a nice golden color to the poori.But it is optional to use.
  • Dough consistency is more important.If u make it too hard or sticky,poori will be too  hard. If the dough is too soft , poori will become very soft.
  • If u feel , u have added very less water and the dough is too tight,beat the dough well for few minutes. It will become soft.Then make pooris.It will come out well.
  • Do not rest the dough.Make puris immediately else it will drink more oil.
  • Always use less flour for dusting else the dusted flour will spoil the oil and will be settled as sediments.So dust only once.U can apply oil on the rolling board and make pooris.
  • Thickness should be medium ie slightly thicker than chapati and it should be even.Else poori will puff only in some places where it is thick.Make sure there are no holes while u roll.Pooris won’t puff up if there is a hole.
  • Right temperature of oil is more important.Never allow it to fume or smoke.Poori will turn dark brown in color.Check the oil as mentioned above and proceed.
  • After u make 2 –3 puris, adjust the flame,check the oil temperature again & fry the pooris.If the oil is too hot,switch off the flame for few minutes to reduce the heat.Else add some more fresh oil to reduce the heat.By doing this way,u can make pooris of even color till the end.

Puffy poori
poori with masala


الاثنين، 25 نوفمبر 2013

Thai Coconut Mushroom Soup with Kidney Beans

Thai Mushroom Soup

Expect to see a fair number of soups offered up here for the next good while. Those who know me understand how much I detest the cold months. They also know my weakness for mushrooms. What better way to warm up than with an earthy bowl of Thai inspired goodness.

Although I am most at home with Indian cooking and spicing, over the years I have become almost as fond of Thai dishes. It's generally a spicy cuisine, as Indian is, so it's really no wonder that I gravitate toward this rich heritage of cooking. The idea of this soup especially appealed to me because in addition to coconut milk and mushrooms, the soup showcased other vegetables and, to fill it out, plump red kidney beans.

I highly recommend making your own Thai red curry paste. Many store-bought varieties are not only inferior in taste but also not suitable for vegetarians as most seem to contain elements of fish. It's easy to make besides, and will keep in a well-sealed jar in the fridge for at least a month. Depending on the heat level of your paste, adjust the quantity used in the recipe to suit your palate. I recommend adding a smaller quantity at first, taste and add more as required.

This soup was served as part of a fusion meal, featuring my classic cornbread, fried coleslaw bites with jalapeño dip, and cocoa bites for dessert. The mingling of flavors was even better than I imagined.

Thai Coconut Mushroom Soup with Kidney BeansThai Coconut Mushroom Soup with Kidney Beans
Recipe by
Adapted from The Great Vegan Bean Book: More than 100 Delicious Plant-Based Dishes Packed with the Kindest Protein in Town! - Includes Soy-Free and Gluten-Free Recipes!
Cuisine: Thai
Published on November 25, 2013

Warming and flavorful mushroom and kidney bean soup simmered in a creamy Thai-seasoned coconut broth

Print this recipePrint this recipe

Ingredients:
  • 1/2 cup dried red kidney beans (1 1/2 cups cooked or 1 14 oz can)
  • 1/2 oz (14 grams) dried mixed wild mushrooms
  • 13 1/2 oz (400 mL) can of coconut milk
  • 2 cups water
  • 2 shallots, finely chopped
  • 2 cloves garlic, minced
  • 3 lemongrass stalks, trimmed, cut into quarters and crushed with a knife
  • 2 tablespoons dried kaffir lime leaves (optional)
  • 1-inch piece fresh galangal or ginger, finely chopped
  • 1 tablespoon tamari (soy) sauce
 
  • 2 cups fresh shiitake mushrooms, washed and chopped
  • 2 tablespoons Thai red curry paste, or to taste
  • 1 cup fresh or frozen corn
  • 1 small red bell pepper, seeded and chopped
  • 1/2 teaspoon paprika
  • 1/4 teaspoon cayenne
  • juice from 1 lime (2 tablespoons)
  • 1 teaspoon sea salt, or to taste
Instructions:
  • If using dried red kidney beans, rinse and soak for 8 hours or overnight in several inches of water. Drain and rinse, then transfer to a medium saucepan and cover with several inches of fresh water. Bring to a boil, reduce the heat to medium-low, cover, and simmer until the beans are tender — about 1 hour. Drain and set aside.

  • Meanwhile, soak the dried mushrooms in hot water for 20 to 30 minutes, then drain and chop. Set aside.

  • In a large saucepan, combine the coconut milk, water, shallots, garlic, lemongrass, kaffir lime leaves if using, galangal or ginger and tamari. Bring to a boil, reduce the heat to medium, and simmer, uncovered, for 15 minutes to infuse the flavors into the broth, stirring often. Remove and discard the lemongrass pieces and kaffir lime leaves.

  • Add the dried and fresh mushrooms to the pan along with the Thai paste, corn, pepper, paprika, cayenne, kidney beans and salt. Simmer over medium-low heat for another 15 minutes, stirring occasionally. Add a bit more water if your soup is too thick. Stir in the lime juice and simmer for another minute. Taste for seasoning and adjust accordingly. Serve hot.

Makes 6 servings

thai mushroom soup

More Thai dishes from Lisa's Vegetarian Kitchen you are sure to enjoy:
Creamy Thai Coconut Mushroom Soup
Massaman Curry with Paneer Cheese
Thai Tempeh Patties with a Red Chili Dipping Sauce

On the top of the reading stack: Gogol

Audio Accompaniment: Black Smoker by Tom Opdahl

الأحد، 24 نوفمبر 2013

Easy Rasam Recipe With Easy Rasam Powder


rasam recipe
As i mentioned in my post,my appa makes rasam very well.When my father was in mumbai, he used to do this rasam.We love this rasam more than my mom’s version.So we(me & my sis) used to tell our dad to make rasam in weekends and we enjoy with mom’s potato poriyal.This is a very simple rasam recipe using  freshly ground rasam powder with just 2 ingredients.U can replace this rasam powder with store bought or your own rasam powder too.It comes out well.It can be made in few minutes.We call this as bachelor’s rasam.U can even drink this rasam.I love to mix with buttermilk & drink. The flavour of pepper and jeera waft around ur house when u make this rasam .Try this easy rasam during busy mornings.Tastes great with simple potato curry and papad !
Easy rasam powder

Rasam recipe


Rasam recipe Easy rasam recipe with freshly ground easy rasam powder
Cuisine: Indian Category: Lunch Yields: Serves 3
Prep Time: 10 Minutes Cook Time: 10 Minutes Total Time: 20 Minutes


INGREDIENTS
For rasam powder
  • Pepper corns - 1 tbsp
  • Cumin seeds - 2 tbsp
For rasam
  • Tamarind - Medium gooseberry size
  • Tomato - 1 no
  • Turmeric powder - 1/4 tsp
  • Rasam powder - 3 tsp
  • Crushed garlic cloves - 5 nos
  • Sugar - A pinch
  • Salt - as needed
  • Water - 3 cups
To temper
  • Oil or ghee - 2 tsp
  • Mustard seeds - 1/2 tsp
  • Jeera/cumins seeds - 1/2 tsp
  • Red chillies – 2 nos
  • Curry leaves - few
  • Coriander leaves - 2 tbsp (to garnish)
METHOD

  • In a bowl, soak tamarind in half cup of hot water for 5 minutes.In the mean time, prepare rasam powder by grinding the pepper corns and cumin seeds together.Store in a box.Set aside.
Rasam powder step by step
  • Extract tamarind juice using 2.5cups of water.Totally it should come to 3 cups.Add salt,sugar, turmeric powder& rasam powder.Mix well.Check for taste.U’ll feel the rasam taste.Add more salt & rasam powder if necessary.Now crush the tomatoes well using ur hands and add to this tamarind water.
Rasam recipe step by step
  • In a kadai, heat oil or ghee and temper the mustard seeds,jeera, pinched red chillies,curry leaves.Add the tamarind mixture.As soon it as starts to boil,add the crushed garlic pods.Give a full roll boil only once.
Rasam recipe step by step
  • When it becomes frothy,add chopped coriander leaves and switch off the flame.Transfer to a bowl.Close it with a lid immediately.
Rasam recipe step by step
Rasam is ready to enjoy with plain rice !

Note
  • The quantity i have given for rasam powder can be used for making rasam thrice.Store it in an air tight box and use a clean,dry spoon.
  • U can also use sakthi, priya, aachi rasam powder.Use 1 tsp for 1 cup of water.Check for taste.Add more or less based on ur need.
  • Dal water can be added for more taste.For variations, u can saute the tomato while tempering instead of adding it raw..
  • Adding Sugar gives a clear rasam.
  • Garlic cloves and coriander leaves is a must for this recipe.
  • Tempering can be done at the end too.It will give a different flavour.Using ghee is optional but it smells good while u eat.

 Easy rasam powder
Yummy , flavourful rasam is ready to eat with plain rice!
Easy rasam recipe

الجمعة، 22 نوفمبر 2013

No-Bake Coconut Oil Fudge

coconut oil fudge

I know that when most of us think of fudge, we don't think of it as necessarily being the most healthy treat, but in this case I assure you that it is. Just the goodness of coconut oil, coconut milk, raw honey, unsweetened cocoa and some vanilla with a dash of almond extract.

I've been looking for a way to incorporate more coconut oil into my diet other than just cooking with it and this recipe is key here. Just a few nibbles throughout the day and I'm getting a decent dose of this wonderful oil that has a multitude of health benefits. For a while, I tried putting some on my toast with some jam, but that just didn't do it for me. This is much tastier.

I stumbled across the recipe at The Sweet Plantain and didn't wait long before trying it. I was going to incorporate some peanut butter for a protein boost, but decided against it because I wanted to taste it with just a few heaps of cocoa and some flavoring. I'm glad I did and I suspect that I will be exploring the possibilities in the near future. Visions of mint dance in my head and maybe even dried fruit for a chunkier version.

My only complaint was my ingredients were a bit too hard because my kitchen is cold, but that has nothing to do with the recipe — the coconut oil was a bit of a pain to scoop out and my honey was rather hard too. It was worth the effort though. If you are working with colder ingredients, you just have to work with them more to get a smooth consistency.

No-Bake Coconut Oil FudgeNo-Bake Coconut Oil Fudge
Recipe by
Adapted from The Sweet Plantain
Published on November 22, 2013

Simple and healthy no-bake cocoa fudge with coconut oil and raw honey, like fudgey bites of chocolate ice cream

Print this recipePrint this recipe

Ingredients:
  • 1 cup extra virgin coconut oil
  • 1/4 cup coconut milk
  • 1/4 to 1/3 cup unsweetened cocoa powder
  • 1/4 cup raw honey or other liquid sweetener
  • 1 1/2 teaspoons pure vanilla extract
  • 1/2 teaspoon pure almond extract
  • pinch of sea salt
Instructions:
  • Line a standard 9- or 10-inch loaf pan with waxed paper or parchment paper, leaving a bit of overlap on the sides of the pan. Set aside.

  • In a large bowl, combine the coconut oil and milk. Using an electric hand blender or stand mixer, beat on high speed until the mixture is creamy and smooth — about 5 to 7 minutes.

  • Add the cocoa, honey, vanilla, almond extract and salt, and beat until everything is incorporated and smooth.

  • Transfer the mixture to the prepared loaf pan and smooth out with a spatula. Place in the freezer for about 30 minutes, until just set.

  • Lift the fudge out of the pan using the lining paper and turn out onto a cutting board. Discard the paper and use a sharp knife to cut into small 1/2- to 1-inch pieces. These will keep just fine in the freezer for a few months, though it is doubtful they will last that long.

Makes 25 to 30 pieces

coconut oil cocoa fudge

More healthy indulgences you are sure to enjoy from Lisa's Kitchen:
Cherry Nut Bars
Chia Seed Pudding
Chocolate Cocoa Brownies with Dried Cranberries and Chickpea Flour
Cocoa Fruit Treats

What's with sharing my current on the top of the reading stack and audio accompaniment, some may ask? Well, I'm a private soul and this is simply a glimpse into other mechanisms at play in addition to the food.

On the top of the reading stack: sorting through the piles and checking out the newest Food and Drink Magazine

Audio Accompaniment: Tom Opdahl - Black Smoker

No Croutons Required - Inspiration from other bloggers

Well, what can I say? The roundup is super short, and that is a disappointment but I don't think you will be disappointed by the recipes that I am about to share. The challenge this month was to submit a recipe inspired by another blogger. I think perhaps us cooks get overwhelmed with the amount of recipes we bookmark from cookbooks, fellow bloggers and the net. Personally, I have trouble figuring out a meal plan sometimes because of all the choices and ideas I cook up when I can't sleep. Thanks to Janet and Johanna for submitting their mouthwatering creations.

Let's start with Janet of The Taste Space who serves up this divine Thai Sweet Potato and Kabocha Squash Stew that was inspired by Joanne Eats Well With Others. Roasted squash and sweet potato comes together with onion, garlic, red curry paste, coconut milk, white beans, peas, soy sauce and a bit of sweetener. I can't wait to try this one as I adore Thai flavors. Certainly a balanced bowl of bliss.

Thai Sweet Potato and Squash Soup

Johanna of Green Gourmet Giraffe is up next with this lovely and nourishing Curried Red Lentil and Apricot Soup. This recipe is inspired by Janet of The Taste Space. Onion, a good amount of garlic, ginger, curry powder, sieved tomatoes, red lentils, apricots, coconut milk and coriander all come together here in this soup that would just be perfect anytime of year or day. Delicious.

curried lentil soup with apricots

As it turns out, I was also inspired by one of Janet's recipes that I had bookmarked for a while and just had to try and I surely am glad I did. I made a Sweet Potato and Hummus Soup that I spiced up. Why I hadn't thought to add hummus to a soup before is a mystery, but it was one fine comforting soup. Spicy sweet potato hummus is included in a soup with onions, carrots, almond milk, tomato, some curry powder, cayenne and lime. I was rather sparing with the spices that went into the soup because my hummus had a good kick to it.

hummus soup

Jacqueline will be hosting the December edition of No Croutons Required. Check back at the beginning of the month for the theme.

الخميس، 21 نوفمبر 2013

FOOD PANDA - Order delicious food online | Review

unnamed (1)foodpanda_large_web
Dear all,
Today I have come up with the review about FOOD PANDA, an ONLINE SITE FOR ORDERING FOOD from favourite restaurants in your Location.We can order the food in 4 easy steps. Login, Select the city/location,find ur favourite restaurant,order ur food.Food will be at ur doorstep in some minutes at discounted rates !
food-panda

They are offering attractive discounts  as well as cash back on selected cards.I was surprised to find an advertisement showing “ Buy One Briyani and get One free” Winking smile..
foodpanda
Some of the features of this Online Site which I admired are given below
1.Food panda started in March-12 just completed one and half years but marked a significant strides in the online food market internationally.
2. Where ever u are, in which part of the world u are, u can order your favourite dish from your favourite hotel nearby u.
3.It can be useful for the techies who cant afford to cook or have time to go to a restaurant of their choice.
4.It can be helpful for the retired and old persons who find cooking little difficult due to  unforeseen health problems.
5.Tourists also can use this site for ordering their favourite dish at places where they are new.
6.We housewives, can use this site for ordering food when we need a change from the routine work of cookingWinking smile.
7. During this monsoon, it will be difficult to travel to our favourite restaurants.We can use this site to order our favourite dishes.
All u have to do is just login/register into this site.Choose your favourite cuisine from your favourite restaurant in your location.Order the food and enjoy !
Here are some more screen shots of this site for ur information.

x3P8b4zG

They do have their own app for mobiles and iPhones.Download it for free and use it as needed.They provide Live chat facility apart from phone helpline.
AP
So to sum up, i can say Food Panda helps you to find restaurants. They provide the service of ordering food online and avail home delivery services.
Disclaimer : Friends,Please share your experience with Food panda if any.As i have not personally experienced their service,the above mentioned points are just my opinion. So friends, do try your own and share below.
unnamed
Thanks for visiting. Have a happy weekend.Catch u all with my recipe post on monday Smile

Technorati Tags: ,