السبت، 28 فبراير 2015

Easy Vegetable Biryani Recipe In Pressure Cooker-Sunday Lunch Recipes-8

Easy vegetable biryani in pressure cooker
When i was working,my colleague who is a bachelor used to bring this biryani at least twice in a week.It looks like a plain colored rice with vegetables here and there.Whenever we ask for the recipe,he simply says its a 10 minutes biryani using masala powder.When i was planning for this week’s Sunday Lunch recipes,this biryani flashed in my mind.I thought this recipe may be helpful for bachelors & working women to make a fatafat,simple and no grinding biryani recipe for lunch box.Actually i wanted to make this biryani in rice cooker but finally i used pressure cooker.Soon i will share a biryani recipe using electric rice cooker.I don’t want to create a hype by saying this biryani tastes awesome,rich,flavourful and all.Rather i would say,its a good biryani recipe with least spices.The result would be worthy for it and I am sure you will love the simplicity of this recipe.Just give a tryBring it on.
Check out my other pulao/Biryani recipes here !
Easy veg biryani recipe

Easy biryani recipe for Bachelors


Easy biryani recipe for Bachelors Easy vegetable biryani recipe for bachelors
Cuisine: Indian
Category: Lunch
Serves: Serves 2
Prep time: 5 Minutes
Cook time: 10 Minutes
Total time: 15 Minutes


INGREDIENTS
1 cup = 200 ml 

  • Basmati rice - 1 cup ( I used India gate) 
  • Water - 1.75 cups
  • Mixed vegetables - 1/2 cup ( 1 carrot,5 beans,1 potato & fistful
  • peas)
  • Big onion - 1 no
  • Tomato - 1 no
  • Green chillies - 1 no
  • Ginger - 1 inch piece
  • Garlic - 8 cloves OR use 3/4 tbsp of g&g paste.
  • Mint & coriander leaves - a handful( use more mint than coriander)
  • Turmeric powder - 1/4 tsp
  • Red chilli powder – 3/4 tsp
  • Dhania powder – 1/2 tsp
  • Biryani masala powder or Garam masala powder- 1.5 tsp
  • Salt - as needed
  • Ghee - 2 tbsp ( u can also use cooking oil)
METHOD

  • Wash and soak the basmati rice for 30 minutes.If u don’t have time to soak,use 2 cups of water for 1 cup of rice.Else use 1.75 cups of water.
  • Wash and chop all the vegetables into small cubes.Chop onions,tomato,ginger,garlic & green leaves.
Easy vegetable biryani
  • In a pressure cooker base,heat ghee and add the onions,ginger,garlic,mint and coriander leaves.Saute everything well for a minute.Now add the tomato along with the chopped vegetables.Saute till tomato turn mushy.Add the required salt to quicken the process.
Easy vegetable biryani recipe
  • After the tomato turns mushy,add red chilli powder,dhania powder,biryani masala powder and turmeric powder.Mix well for a minute.Lastly add the washed & drained rice and saute well for a minute.Now add the required water and pressure cook in low flame for one whistle.
Easy vegetable biryani recipe
  • Open the cooker after the steam is released.Fluff the rice with a fork.Serve it hot with raita.Enjoy !


Note
  • Adjust the quantity of biryani masala powder as per your taste.
  • You can also add 2 tbsp of curd or 1tsp of lemon juice at the end.ie before closing the cooker.
  • Mint leaves & coriander leaves gives a nice flavor to this biryani.so don’t skip it.
  • U can replace finely chopped ginger & garlic with g&g paste.
  • You can also prepare the same using electric rice cooker too.In that case,use 2.5 cups of water for one cup of rice.
Check out my other pulao/Biryani recipes here !


Try this easy peasy biryani recipe for your lunch box and enjoy with simple onion raita ! I served it with caramal-nuts payasam & raitaHappy

Easy vegetable biryani recipe


Palakura Pappu-Andhra Palak Dal Recipe

Palakura-pappu-recipe

Palakura pappu/Spinach dal is an Andhra based,simple and easy one pot recipe.It can be made under 15 minutes and its a super healthy dish packed with the nutrition of dal & palak leaves.I had tasted this once in Jayanagar,Nagarjuna restaurant.Long back,I shared this Palakoora pappu recipe tried from Sailu’s food in my Andhra Lunch Menu post.This time,i tried it by getting the recipe from my friend Megha & i modified it slightly as per our taste.As her in-laws belong to Andhra,she makes this palak dal very often.Nowadays i make this for Sendhil’s lunch box whenever i don’t have enough time to prepare in busy mornings.Its a great recipe for Bachelors and working women.You can prepare this recipe at least once in a week and have a simple n healthy lunch.My friend made it spicy but i had reduced the chillies as per my family’s taste.Also Megha told me to add little tamarind extract at the end but i used tomato here.I recently read in readers comments in Vahchef's site that palak & tomato should be not be used together.I don't know the actual reason for it.So,i am planning to use tamarind extract in place of tomato from next time.Please enlighten me if u know the correct reason.Try this easy palak dal recipe for rice and enjoy !


Palakura pappu recipe

Palakura pappu recipe


Palakura pappu recipe Andhra style dal palak - Palakura pappu
Cuisine: Indian
Category: Lunch
Serves: Serves 3
Prep time: 5 Minutes
Cook time: 10 Minutes
Total time: 15 Minutes


INGREDIENTS

  • Palak/Spinach - 2 cups ( 1 big bunch)
  • Toor dal - 1/3 cup
  • Tamarind or Tomato - Berry size or 1 no (Do not chop the tomato)
  • Salt & water - as needed
  • Big onion - 1 no
  • Green chillies – 4-5 nos
  • Turmeric powder - 1/4 tsp
  • Sugar – a pinch
  • Oil - a drop
To temper
  • Cooking oil or ghee - 1 tbsp
  • Mustard seeds - 1/2 tsp
  • Urad dal - 1 tsp
  • Garlic cloves - 5 nos ( crushed with skin)
  • Red chillies - 2 nos ( i used guntur chilli)
  • Curry leaves - few
  • Hing/Asafetida - a big pinch
METHOD

  • Wash and chop the palak leaves finely.In a pressure cooker base,take the toor dal and add 2 cups of water.Add turmeric powder,roughly chopped big onion,One full tomato(optional) slitted green chillies,salt,sugar and chopped palak leaves.{Here i used one tomato.But i read its not good to add palak & tomato together.So If u don’t want to use tomato,use 1 tsp tamarind extract after mashing the dal and boil well}
  • Let it pressure cook in low flame for one whistle.After the steam is released,open the cooker and mash everything well using a thick ladle or whisk. Boil it to bring its right consistency.( If u don’t want to use tomato,add tamarind extract after opening the cooker and boil the mixture)
Palakura pappu
  • In a kadai, heat ghee or oil and splutter mustard seeds,urad dal,red chilli and crushed garlic cloves.Saute well for a minute and add them to the boiling dal.
  • After the dal becomes slightly thick and pourable,remove it and serve hot with rice adding a drop of ghee.Enjoy !
Palakura pappu


Note
  • I read in Vahchef’s site by readers that palak & tomato should not be cooked together.I am not sure about the reason.So if u want to skip tomat,add thick tamarind extract only after cooking the dal palak mixture.
  • If using tomato,do not chop it and add to dal.Dal won’t be cooked well n mushy.So add it as whole tomato.
  • Make sure the dal is mashed well after cooking else the mixture will look watery and separate.
  • You can replace toor dal with moong dal too.
  • This palakura pappu can be done in another way.ie.Heat oil in a cooker.Temper all the spices given above and then add onions,green chillies.Saute them for a while and now add the dal and washed palak leaves.Pressure cook for one whistle.


Easy,healthy Palakura Pappu is ready to relish with hot rice n ghee !
Palakura pappu

الجمعة، 27 فبراير 2015

Mysore Rasam Recipe-Rasam Varieties

Mysore rasam recipe

In most of the South Indian houses,rasam makes it presence almost everyday for lunch.We love to make varieties of rasam recipes.Me too not an exception in this.I keep trying some new,interesting rasam recipes in my kitchen.This mysore rasam recipe was in my bookmarked list for long time.I never thought this would taste soo good,refreshing and flavourful.When i tried it last week for the first time,i felt its taste was very close to the rasam i had tasted in hotels & brahmin marriage feast here in Bangalore.My Kannadiga friends make a similar rasam using saaru pudi and they call it as “Bele saaru”.I am not sure whether this is the authentic mysore rasam recipe but it tasted really good.So I made it again for my in-laws.This recipe became an instant hit among my friends and family.Unlike our usual rasam,mysore rasam has a slightly thick consistency and it tastes spicy too.Its the freshly roasted & ground rasam powder that makes the difference.In tamil, we can call it as “Arachuvitta rasam”.For this recipe,i watched Vahchef’s video and some more websites too.Also i made few changes in the quantity of ingredients based on my family’s taste.I just loved this rasam  and i can even drink this as a soupDrooling.I’ll be surely making it very often.You too give a try and share your feedback here.Lets see how to make this super flavorful & the most popular Mysore Rasam Recipe.
Check out my easy rasam recipe using Instant rasam powder !

Mysore rasam recipe

Mysore rasam recipe


Mysore rasam recipe How to make flavorful,spicy mysore rasam
Cuisine: Indian
Category: Lunch
Serves: Serves 3
Prep time: 10 Minutes
Cook time: 15 Minutes
Total time: 25 Minutes


INGREDIENTS

  • Tamarind - Medium gooseberry size
  • Tomato - 1 no (big)
  • Sambar powder - 1 tsp
  • Green chillies - 2 nos
  • Water - 2-3 cups
  • Cooked toor dal - 2 tbsp ( dilute it)
  • Grated jaggery - 1 tsp
  • Salt & turmeric powder - as needed
To roast n grind
  • Cooking oil - 1/2 tsp
  • Chana dal - 1 tsp
  • Urad dal - 1/2 tsp
  • Curry leaves – 5 nos ( I din’t add)
  • Dhania/Coriander seeds - 2 tsp
  • Red chilli - 1 no
  • Pepper corns - 1/2 tsp
  • Cumin seeds/Jeera - 1/2 tsp
  • Grated coconut - 1.5 tbsp
  • Hing/Asafetida- a pinch
To temper
  • Ghee - 1 tsp
  • Mustard seeds - 1/2 tsp
  • Curry leaves - few
  • Coriander leaves - to garnish
  • Grated coconut - very little ( to garnish,completely optional)
METHOD

  • Reserve 2 tbsp of cooked toor dal.Mash it well by adding 1/4 cup of water.Grind tomato to a smooth paste using little water & keep aside.

  • In a wide bowl,take the tamarind extract adding 2 cups of water.To this add tomato puree,sambar powder,slitted green chillies,turmeric powder,salt & hing.Let it boil for 5 minutes.
Mysore rasam recipe
  • Heat little oil in a kadai and when it gets heated,roast & grind all the items given under”to roast n grind”.Add the grated coconut at the end of roasting.Mix well & let it cool.Grind everything to a smooth paste adding enough water.
Mysore rasam powder
  • Add this paste & cooked toor dal to the rasam.Add little jaggery and allow it to boil well.It will give a nice smell & becomes slightly thicker than usual rasam.Switch off the flame & garnish with coriander leaves.
Mysore rasam recipe
  • Temper the mustard,cumin seeds in ghee and add to the rasam.Mix well and close it with a lid to retain the aroma.
  • Give a standing time of at least 30 minutes to one hour before serving.It helps to infuse all the taste.If u want to serve it hot,u can reheat it at the time of serving.Mix it with plain rice in a bowl adding a drop of ghee.Tastes divine !
Mysore rasam

Enjoy !


Note


  • I used one big Bangalore tomato.Please use 2 nos if ur tomato is small.Make sure it is ripe.
  • Adjust the quantity of sambar powder as per your taste.U can also skip adding sambar powder & add more chillies & dhania while roasting.
  • Adding jaggery gives a mild sweet taste to this rasam and also helps to balance the tanginess.So don’t avoid it.
  • This rasam would be slightly thicker than our usual rasam.So boil it well.Hope u can find it in the next picture.

Mysore rasam recipe

A bowl of hot rice with rasam accompanied by a papad is a divine lunch me!!What say friends?? Winking


الأربعاء، 25 فبراير 2015

Parotta Recipe-How To Make Kerala Malabar Parotta(With Video)

How to make parotta
Every South Indian especially people in Tamil nadu and Kerala loves Parota.But most of us stay away from eating as well as making parotta at home just by thinking about maida & the quantity of oil used in it.Even i am a big lover of parota right from my childhood.Be it Kerala Malabar parotta or Tamil nadu road side parota,i just love it like anything.Before marriage,my dad used to buy this with salna(The most popular side dish for parotta) at least twice in a month from a small hotel nearby my house.On those days,I never mind about calories,oil etc etc and i was looking lean in spite of eating all these junk stuffs.But now,after marriage the tables turned.I have become much more health conscious & became a picky eater too.Even then i put on so much of weight which is still a mysteryThinking.So i keep restricting myself from buying frozen parottas as well as trying at home.My friends and readers who had tried my vegetable salna recipe have asked me several times whether i have a parota recipe in my blog.Whenever i get a query like this,i really feel bad to say “No”.So i was thinking to make this parotta post somehow without worrying about oil.But to my rescue,i found this awesome recipe in Asiya’s blog”Samaithu asathalam”.I was super excited when she made it with less oil when compared to the other recipes i had come across.Thanks to Asiya omar for sharing this wonderful recipe with a clear video in Tamil.The best things about this recipe is,it is eggless,dough doesn’t need much soaking time. All it needs is just 15 minutes & moreover there is no need to give oil bath to your parotaDancing.Oil is used only for greasing.It comes out super flaky and tastes absolutely soft when eaten hot.It also stays good n soft for an hour.So this recipe is a perfect choice for people who are calorie conscious but craving to eat parotta at home.It is much much better than store bought hydrogenated frozen ones.You can make it easily for weekend breakfast..Give a try and let me know friends.With the help of my MIL,i have uploaded a video on “How to roll parotta”.Hope u all find it useful !

Parotta recipe
Once u make this parotta successfully,u can try many varieties like kothu parotta,chilli parotta,Muttai parotta/Egg parotta etc.Ok,Lets see how to make this flaky parotta at homeHappy.
Check out the super hit recipe of my blog, vegetable salna – The best side dish for parotta !

Parotta salna

Parotta recipe/Kerala parotta recipe


Parotta recipe/Kerala parotta recipe How to make kerala parota recipe at home with less oil
Cuisine: Indian
Category: Breakfast/Dinner
Serves: 3 nos
Prep time: 20 Minutes
Cook time: 3 Minutes
Total time: 23 Minutes


INGREDIENTS
1 cup = 200 ml
  • All purpose flour/Maida - 1 cup
  • Salt - as needed
  • Sugar - 1/4 tsp
  • Cooking oil - 1 tbsp + 1 tbsp ( for greasing)
  • Water - nearly 1/2 cup ( 1-2 tbsp lesser)
METHOD

  • In a wide bowl,take the maida,salt,sugar and 1tbsp of oil.Mix well to spread the oil in the flour.Now add water little by little and make a slightly sticky dough( Not too sticky).Knead well for 5 minutes.Grease ur hands with a drop of oil while kneading.Apply 1.5 tsp of oil all over the dough and keep it covered for 15 minutes.
Parotta recipe
  • After 15 minutes,dough would be soft and non-sticky.Take the dough and make 3 golf sized balls.
Parotta recipe
  • Take one ball and flatten it as much as possible using a rolling pin on a greased wide board or kitchen counter.The dough should be elastic and spread it as thin & transparent as possible.Apply little oil all over the parotta while rolling.Do it whenever needed.( Never use maida for dusting.Only oil should be used)
Parotta recipe
  • Now pull one edge,move slightly forward and fold it.Do it like saree pleats.Please refer video for this.After making pleats,just stretch it & roll them.If u find it difficult to do this,u can cut the rolled parota into thin strips and place it one over the other.Roll it and make parottas.
Parotta recipe
  • After rolling and folding,give a resting time of 5 minutes.In the mean time,u can fold the other two balls.Now take the rolled ball,grease it with oil and roll it using a rolling pin.Do not use ur hands to flatten it.Layers may suppress.Do not roll it too thin.Grease with oil whenever needed.Roll it thick like stuffed paratha because thick parotta tastes soft.Thin ones will become crispy while cooking.
Parotta recipe
  • Heat an iron dosa pan ( It works best) and put the parota.When u put it,the parota may shrink.So spread it using your hands on the tawa carefully.Now drizzle 1/2 tsp of oil around the parotta.Keep the flame medium.Keep flipping and pressing the parotta with dosa flipper on both sides till u see the golden brown spots.Take care,flame should be medium and parotta should cook slowly.
Parotta recipe
  • Remove the parotta to the kitchen counter or the rolling board and using your hands,just press the sides forcefully when the parotas are hot.Do it like clapping the hands by keeping the parottas in between.This is the most important step to make it flaky.It helps to bring the layers out and make it soft.Stack the cooked parota in a hot box/casserole.Serve hot with Parota kurma or salna.
Parotta recipe
Please check the video below :))

How to make parotta


Enjoy !
Check out my vegetable salna and chilli parotta recipes


Note
  • While making the dough,add water carefully.Do not make a too sticky dough because u may need to use more oil while rolling.
  • Resting time of 15 minutes is needed for the dough.
  • U should roll and stretch the dough as much as possible to make soft parotta else it will turn hard.
  • After rolling and folding,give a resting time of 5 minutes.In the mean time,u can fold the other two balls.
  • Cook the parotta only in medium flame and not in high flame.cook it patiently by drizzling some oil around the parotta.

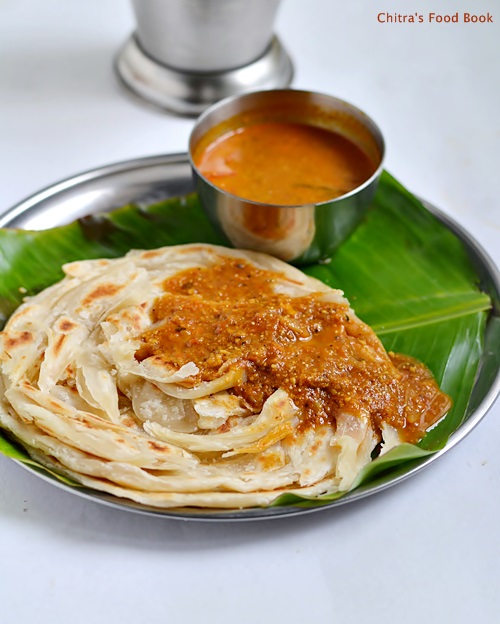
I served this yummy,flaky parota with veg salna.It was delicious !!

الثلاثاء، 24 فبراير 2015

South Indian-Style Quinoa with Potato, Pumpkin and Tamarind

quinoa, potato and pumpkin

I've been eating quinoa longer than most people I know knew how to pronounce it. Now that it's trendy, it's more expensive, but I still enjoy eating and sharing ideas for it. It really is almost the perfect grain for both taste and nutrition.

And while quinoa is not a staple of south Indian cooking, that's no reason not to pair its light nutty taste with the hot and tangy tamarind, coconut and spice flavors of the region. I will try almost anything with south Indian ingredients, for that matter! This dish combines quinoa, pumpkin, potato and peas with some of the classic south Indian flavors as well as some not-so-classic ingredients for a rich, hearty, zesty and flavorful side dish that nourishes not only the body but delights the soul.

quinoa and potatoes, Indian-style

South Indian-Style Quinoa with Potato, Pumpkin and TamarindSouth Indian-Style Quinoa with Potato, Pumpkin and Tamarind
Recipe by
Cuisine: Indian
Published on February 24, 2015

Quinoa, pumpkin, potato and peas tossed together with classic south Indian tamarind, coconut and spices

Print this recipePrint this recipe

Quinoa:
  • 1 cup uncooked quinoa
  • 2 cups water
  • 1/2 teaspoon sea salt
  • 1/2 teaspoon turmeric
Spice blend:
  • 2 tablespoons skinned urad dal, rinsed
  • 2 tablespoons toor dal, rinsed
  • 1 tablespoon coriander seeds
  • 1/2 teaspoon black peppercorns
Vegetables:
  • 4 to 6 sun-dried tomatoes, soaked in hot water for 30 minutes, drained and finely chopped
  • 2 tablespoons tamarind pulp, soaked in 1/3 cup hot water for 40 minutes
  • 2 tablespoons coconut or other oil
  • 1 teaspoon brown mustard seeds
  • 1 teaspoon cumin seeds
  • small handful of dried curry leaves
  • 1/4 teaspoon asafetida
  • 1 large potato, cubed
  • 1 cup unsweetened pumpkin purée
  • 2/3 cup fresh or frozen and defrosted peas
  • 2 to 3 green or red chilies, seeded and minced
  • 1 red bell pepper, seeded and diced
  • 1/3 cup unsweetened dried shredded coconut
  • 1/4 teaspoon cayenne
  • 1 1/2 teaspoons sea salt, or to taste
  • juice from 1 lemon (3 tablespoons)
Instructions:
  • Rinse the quinoa and soak in the water for 8 hours or overnight. Add the salt and turmeric and bring to a boil, then immediately reduce the heat to low, cover, and simmer until the water is absorbed — about 15 minutes. Let stand for 5 minutes and then fluff with a fork. Set aside.

  • Meanwhile, soak the sun-dried tomatoes in hot water for 30 to 40 minutes, then drain and chop and set aside. At the same time, soak the tamarind pulp in 1/3 cup hot water for 30 to 40 minutes. Drain, reserving the soaking water and squeezing out as much liquid from the pulp as possible. Set aside.

  • To prepare the spice blend, dry roast the dals, coriander seeds and peppercorns in an unoiled pan over medium heat until they darken a a few shades — about 3 minutes. Let cool and then grind to a powder with a spice blender or in a mortar and pestle. Set aside.

  • Heat the oil in a large skillet or saucepan over medium heat. When hot, add the mustard seeds, cumin seeds and curry leaves. Fry, stirring often, until the mustard seeds turn grey and begin to splutter and pop. Toss in the asafetida, stir once, and then add the potatoes, stirring well to combine. Cover and cook, stirring often and adding a few tablespoons of water as necessary if the potatoes stick, for roughly 12 minutes or until the potatoes begin to soften.

  • Stir in the sun-dried tomatoes, pumpkin purée, peas, chilies, red pepper, coconut, tamarind liquid, cayenne and spice blend until well combined. Cover and cook, stirring occasionally, adding more water as necessary, until the vegetables are tender — about 10 minutes.

  • Stir in the salt, lemon juice, and quinoa. Reduce the heat to medium-low and cover and heat for another 3 to 4 minutes. Remove from heat, let stand for 5 minutes, fluff, and serve. Garnish with freshly chopped cilantro if desired.

Makes 4 servings

Other quinoa recipes to try from Lisa's Vegetarian Kitchen:
Quinoa Soup with Corn
Minted Tamari Quinoa and Cauliflower with Pine Nuts
Quinoa Dolmadakia (Stuffed Grape Leaves)
Quinoa Stuffed Tomatoes

South Indian-Style Quinoa with Potato, Pumpkin and Tamarind

الاثنين، 23 فبراير 2015

Varagu Idli Recipe/Kodo Millet Idli Dosa-Millet Recipes

Varagu idli recipe

Each and every millet has its own taste & health benefits.But i love varagu/Kodo millet(Kodra/Koden in Hindi,Harka in Kannada,Koovaragu in Malayalam & Arikelu in Telugu) among all because it helps to lose weight,controls diabetes,reduces joint pains and much more.So i keep trying one or the other varagu recipes in my kitchen at least once in a week.After making thinai idli & Ragi idli successfully,i wanted to try some more idli,dosa recipes using millets.I tried kuthiravali idli but it was an utter flop.Idli was flat,sticky and too soft.I should make some improvements in the recipe and try again.So this time i prepared Varagu idli following my mixie idli recipe.It came out very well.I did not use rice here.Still my idlis were firm,soft,spongy and dosas were crispy as well.So this is completely a rice-free idli.The flavor of dosas were awesome.I just loved it.My in-laws are here with me.They too liked this varagarisi idli,dosa very much and my MIL told that she will be making it very often after going to salem.I was very happy to hear this feedback from them.Friends,try this healthy millet idli and include it in your routine breakfast/dinner.Its sure a very healthy replacement for our regular rice idli.Very soon,i will share easy varagu upma recipe.
Check out my collection of 12 idli recipes and enjoy making varieties of idli for breakfast/dinner !

Varagu dosa

Varagu arisi idli,dosa recipe


Varagu arisi idli,dosa recipe Idli,dosa recipe using varagu/Kodo millet- Healthy breakfast/dinner recipe
Cuisine: Indian
Category: Millet recipes
Serves: 15-20 nos
Prep time: 4 Hours
Cook time: 10 Minutes
Total time: 4H10Min


INGREDIENTS

  • Varagu/Kodo millet - 1.25 cups
  • Round urad dal - 1/4 cup
  • Aval/thick Poha - 3 tbsp
  • Methi seeds/Venthayam - 1/2 tsp
  • Salt & water - as needed
METHOD

  • Take all the ingredients given above except salt and wash them twice in water to remove the debris.Soak it together for 4 hours.

  • Take a big mixie jar and grind them in two batches adding enough salt & water.Please do not add more water because they can be easily ground in less water.So use water only when needed.The consistency of batter should be like our regular idli batter.If the batter is too watery,u cannot make idlis.Idli will be flat n sticky.If u add very less water,idli will be hard.So take care while adding water.
Varagarisi idli
  • Ferment it overnight or minimum 16 hours ( if it is winter).The next morning,batter would have raised in volume but not doubled.
  • Stir the batter well with a ladle and make idlis.Steam it in an idli pot for 10 minutes.Check with a back of spoon or using fingers dipped in water.If it comes out clean,idli is cooked.Remove with a spoon and serve hot with chutney !
Varagu idli

    Enjoy !


Note

  • No need to add rice in this recipe.
  • Do not add more water while grinding.
  • Idlis come out soft for varagu and dal in 5 :1 ratio.If u want even more softness,use 4:1 ratio based on the quality of dal.
  • Adding methi seeds & aval is for softness.Don’t skip it.
  • Ferment the batter for minimum 12 hours.During summer 8 hours is enough.


Steaming hot Varagu Idli Happy
Varagu idli

Enjoy this varagarisi idli.dosa with your favourite chutney or sambar.Stay healthy !
Varagu idli dosa recipe