الجمعة، 31 يوليو 2015

Chickpea Quinoa Vegetable Wraps

Chickpea Quinoa Vegetable Wraps

Vegetable and bean wraps are sometimes the perfect solution for a summer meal. Cool and refreshing, wraps involve raising very little heat in the kitchen — an optimal result when the temperatures are soaring outside. But that doesn't mean you can't enjoy some added heat in the wraps, which I like no matter the time of year.

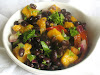
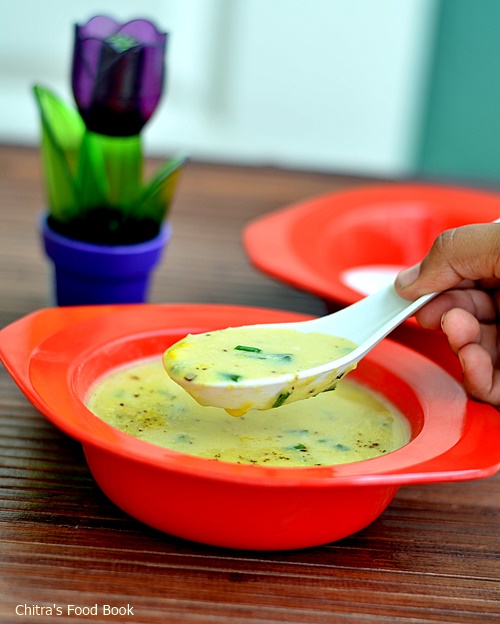
These wraps make a perfectly balanced protein-packed meal with buttery chickpeas, nourishing quinoa and crunchy vegetables combined with spices in a zesty filling made with a creamy cashew and sriracha sauce. Layers of texture and flavor abound, and serving them with chopped lettuce, pea sprouts and slices of avocado provide a wonderful fresh taste. They don't take long to prepare either, once the chickpeas and quinoa are all cooked up. I made sure not to overcook the vegetables to preserve their freshness and crunchy texture. Soggy wraps are not especially appealing! The thick and creamy cashew sauce provides an extra dose of nutrients, and it complements all of the other flavors to near perfection.

For these wraps, I made fresh homemade tortillas cooked on a non-stick skillet. A superior filling deserves a superior wrap! But do use your favorite wrap — just look for quality and freshness.

summer wraps

Chickpea Quinoa Vegetable WrapsChickpea Quinoa Vegetable Wraps
Recipe by
Published on July 27, 2015

Tender chickpeas, nourishing quinoa and crunchy vegetables combined with spices and a creamy cashew-sriracha sauce wrapped in fresh homemade flour tortillas for a nutritious and refreshing light summer meal

Print this recipePrint this recipe

Creamy cashew sauce:
  • 1 cup raw cashews, soaked in hot water for 2 hours and drained
  • 1 clove garlic, minced
  • 3/4 cup almond or hemp milk
  • 1 tablespoon sriracha or other hot sauce
  • 1/3 cup nutritional yeast
  • juice from 1 lime (2 tablespoons)
  • 1/2 teaspoon sea salt, or to taste
Filling:
  • 1/2 cup dried chickpeas (1 1/2 cups cooked or 1 14 oz can)
  • 1/2 cup dried quinoa (1 1/2 cups cooked)
  • 1/4 to 1/3 cup sun-dried tomatoes
  • 1 tablespoon olive oil
  • 1 small red onion, diced
  • 2 teaspoons chili powder
  • 2 teaspoons ground cumin
  • 1/2 teaspoon paprika
  • 1/4 teaspoon cayenne
  • 1 jalapeño, seeded and finely chopped
  • 1 plum tomato, finely chopped
  • 1 small carrot, cut into thin strips
  • 1 red bell pepper, seeded and cut into strips
  • 1/2 cup fresh cilantro, trimmed and chopped
  • juice from 1 lemon (3 tablespoons)
  • 1 teaspoon sea salt, or to taste
To serve:
  • 6 10- or 12-inch flour tortillas
  • a few handfuls of fresh alfalfa or pea sprouts
  • lettuce leaves, cut into thin strips
  • 2 avocados, sliced
Instructions:
  • Rinse the chickpeas and soak in several inches of water for 8 hours or overnight. Separately, rinse the quinoa and soak in 1 cup of water in a medium saucepan for 8 hours or overnight.

  • Soak the cashews in hot water for 2 hours.

  • Drain and rinse the chickpeas and transfer to medium saucepan. Cover with fresh water and bring to a boil. Reduce the heat to medium-low, cover, and simmer for 1 1/2 hours or until buttery soft. Drain and transfer to a medium bowl and let cool to room temperature.

  • Meanwhile, bring the quinoa and soaking water to a boil. Reduce heat to low, cover, and simmer for 15 minutes or until the water is absorbed. Remove from heat, fluff with a fork, and set aside to cool.

  • While the chickpeas and quinoa are cooking, soak the sun-dried tomatoes in hot water for 20 minutes. Drain, chop finely, and set aside.

  • Drain the cashews and transfer to a food processor. Combine with the remaining ingredients for the cashew sauce and process until smooth. The sauce should be fairly thick.

  • To make the wrap filling, heat the oil in a large non-stick skillet over medium heat. When hot, add the red onion to the pan and sauté for 5 to 7 minutes until the onion begins to soften. Now add the spices and jalapeño and stir for 1 minute until the spices are fragrant. Add the sun-dried tomato and plum tomato to the pan and cook, stirring occasionally, for another few minutes to thicken. Stir in the carrot and red pepper and simmer for another few minutes — don't overcook.

  • Stir in the chickpeas, quinoa, cashew paste, cilantro, lemon juice and salt. Cook for another few minutes to warm and then remove from the heat.

  • To assemble, spoon some of the mixture onto a tortilla and add chopped lettuce and sprouts. Wrap it up, cut in half, and serve with slices of avocado, additional lettuce or sprouts, and salsa if you like, or enjoy just as is.

Makes 6 full or 12 half servings

chickpea, quinoa wraps with avocado

I'm sharing this with Jacqueline's weekly Meat Free Mondays event.

More wraps to grace your summer tables:
Broccoli, Quinoa and Black Bean Burrito with Cashew Sauce
Pinto Bean and Avocado Burritos
Refried Beans with Sun-Dried Tomatoes

On the top of the reading stack: The Oh She Glows Cookbook: Vegan Recipes To Glow From The Inside Out

Idli Manchurian Recipe-Leftover Idli Recipes

Idli manchurian recipe
I have tried Chilli idli, Idli fry, Kaima idli even idli upma using left over idli.But Idli Manchurian is the one I wanted to make for long time.Yesterday I cooked some extra idlis just to make this manchurian.I made it for my daughter in the evening after she came back from the school.She loved it to the core and showed a big thumbs upDancing.Generally kids love any deep fried snacks.I don’t have to say about the taste of fried idlis.So this recipe would be a sure hit among the kids and adults as well.This recipe is a combo of Indian & Chinese Manchurian recipes.While I was clicking the pictures,I couldn’t resist my temptation to grab some from the plate.DroolingIt was so flavorful! Do try this idli manchurian recipe for your kids as evening snack.I am sure you won’t even get a single piece to tasteTongue.Ok,Lets see how to make fried Idli Manchurian recipe with stepwise pictures.
How to make idli manchurian recipe

Idli Manchurian recipe


Idli Manchurian recipe How to make Idli manchurian.
Cuisine: Indian
Category: Snacks
Serves: Serves 1
Prep time: 10 Minutes
Cook time: 15 Minutes
Total time: 25 Minutes


INGREDIENTS
To deep fry or shallow fry
  • Idli - 4 nos
  • Maida/All purpose flour - 2.5 tbsp
  • Corn flour – 2.5 tbsp
  • G&G paste - 1/2 tsp
  • Red chilli powder - 1/2 tsp
  • Salt- as needed
  • Cooking oil - 3 tbsp ( to shallow fry)
For sauce mix
  • Cooking oil - 2 tbsp
  • Finely chopped big onion - 1 no
  • Finely chopped capsicum - 2 tbsp
  • Finely chopped spring onion - 2 tbsp
  • Finely chopped garlic,ginger - 1 tsp
  • Tomato sauce - 1 tbsp
  • Green chilli sauce - 1/2 tsp
  • Soya sauce - 1/4 tsp
  • Red chilli powder - 1/4 tsp
  • Corn flour – 1 tsp (dilute in water)
  • Salt & pepper powder - as needed
METHOD
  • Cut the left over idlis into big cubes.To this mix maida,corn flour,salt,g&g paste,red chilli powder and mix well.Sprinkle some water to coat the idlis with batter.Mix it carefully,do not break the idlis.Let it marinate for sometime. OR follow this alternate method.ie Make a thick batter using maida,corn flour and spice powders and dip the idli pieces,deep fry in oil immediately.
Idli manchurian recipe

  • Heat oil in a pan and arrange the idli pieces to shallow fry. Roast it well in medium flame for 3-4 minutes.Flip the idli pieces and roast the other side as well.Do not cook in very high flame.Idli pieces may burn.Remove the pieces to a tissue paper.Drain the excess oil.
Idli manchurian recipe

  • In the same pan,add little more oil.Saute the finely chopped onion,garlic,ginger,spring onions and capsicum.Mix well.Add some salt,tomato sauce,soya sauce and green chilli sauce.Mix well and add red chilli powder,pepper powder.Mix well.
Idli manchurian recipe
  • Dilute corn flour in water and add this to the mixture.Let it boil for sometime and thicken.
  • Add the idli pieces at the end.Toss it well and switch off the flame.Garnish with chopped spring onions.Serve hot with ketchup! Enjoy !
Idli manchurian recipe
Note
  • You can deep fry the idli pieces instead of shallow frying.I felt shallow frying patiently gives great results than deep frying.Deep fried idlis absorb more oil.Calorie conscious people can go for baking option.
  • You can also add the idli pieces as such instead of frying them.
  • Adjust the quantity of chilli powder,pepper powder and green chilli sauce as per your taste buds.
Enjoy hot idli manchurian with tomato sauce.Tastes yum !
Idli manchurian recipe


الأربعاء، 29 يوليو 2015

Eggless Orange Cake Recipe Without Condensed Milk

eggless orange cake recipe
I usually make eggless orange biscuit cake and its our family favorite too.But this time I tried an eggless, butter less orange sponge cake recipe using fresh orange juice.This recipe is without condensed milk,curd and it’s a vegan version too.I referred this recipe and used cooking oil to achieve the softness.Cake came out very well with bursting orange flavor.I loved its color,texture,flavor and above all it was like pillow soft to touch and eat.I was completely satisfied with the result and patted myself for this successful bakingApplause.I am happy and double confident that this cake is going to be a super hit among my family members.I am waiting for Raksha to come back from school and taste it.I guess this cake can be made with wheat flour too.I must give a try.Lets see how to make this easy,low fat vegan orange cake recipe with stepwise pictures.

Eggless orange cake recipe


Eggless orange cake recipe Eggless orange cake recipe without egg,butter,cream,condensed milk and curd.
Cuisine: Indian
Category: Cake Recipes
Serves: Yields 10 pieces
Prep time: 10 Minutes
Cook time: 30 Minutes
Total time: 40 Minutes


INGREDIENTS
1 cup = 200 ml
  • All purpose flour/Maida - 1.5 cups ( Heaped)
  • Baking powder - 1/2 tsp
  • Baking soda – 1 tsp
  • Sugar - 3/4 cup
  • Orange juice - 1 cup
  • Cooking oil - 1/3 cup ( use odourless oil,i used sunflower oil)
  • Salt - a pinch
  • Orange zest - 1/2 tsp (Use grated skin)
METHOD
  • In a wide bowl,sieve the maida,baking powder,soda and salt.Mix well.Add the orange zest to it.( I grated the skin of orange and mixed with the flour) Set aside. Grease a baking pan with oil or butter and sprinkle the maida all over the pan.Keep aside.

  • In another bowl,mix the sugar,oil and orange juice. Use a whisk and stir the mixture until the sugar dissolves well.
  • Add the flour to the oil mixture and mix it with a spatula or whisk in one direction.Do not over beat the mixture. Cake will not rise.The batter should fall like a ribbon.This is the right consistency.
  • Preheat the oven in convection mode at 180c for 10  minutes.Pour the batter in the baking pan and pat its bottom once for even distribution of batter.Now bake the cake in convection mode at 180c for 30-35 minutes.Check the cake by inserting a tooth pick in the center of the cake after 30  minutes.If it comes out clean or with little crumbs,cake is done.If u find the wet batter in the tooth pick,bake the cake for 2-3 minutes more.Invert the pan in a plate after the cake is cooled down.Cut into slices and enjoy with Tea.
Note
  • Please adjust the timing based on the convection oven..
  • You can replace oil with softened butter.
  • You can also use canned orange juice.
  • No need to use water,curd or milk.Orange juice would do.
  • Do not invert the cake as soon as u bake.Cake will break.If the cake doesn’t fall off easily,bake it for 2 more minutes.


Enjoy this cake for your tea time.Tastes awesome !

الثلاثاء، 28 يوليو 2015

Sundakkai Vathal Podi,Thakkali Poricha Kuzhambu Recipe-South Indian Lunch Menu For Stomach Problems

RIP DR.APJ Abdul Kalam SirSad.
Actually I had to share a biryani recipe in my Sunday lunch series today.Sorry for disappointing you all with this post.Last 3 days I was in Rameswaram for temple visit.We had good darshan but unfortunately we all got stomach problems due to some food allergy.By God’ grace,our trip was successful and reached Bangalore yesterday.As our stomach is completely upset,we wanted to avoid spicy foods for some days.So this afternoon I made Sundakkai Vathal podi(Dried Turkey berry powder) & Spice less,no tamarind thakkali poricha kuzhambu(tomato gravy without tamarind) along with Paruppu sadam(moong dal tadka) & thayir sadam for our lunch.I guess most of you just make dal & rasam during sick days but this is our standard lunch menu whenever we recover from any health ailments.Sundakkai/Turkey berry is a good antibiotic to kill the ameoba in stomach.Pepper & cumin seeds used in this powder helps to improve appetite and aids digestion.Tomato is an energy booster basically.Coconut,cumin seeds/jeera and onions acts as a coolant for the upset stomach and helps for digestion.Moong dal and curd/buttermilk helps to cure stomach inflammations.To sum up,this South Indian Lunch menu would be soothing and tasty for an upset stomach & bitter tasting tongue.Do try this menu for a change.U may like it.Not just sick days,u can consume Sundakkai podi at least once in a week to keep your stomach clean if you eat hotel food regularly.Lets check out the recipes of sundakkai podi and thakkali poricha kuzhambu below.Last but not the least,I will surely share my biryani post sometime in this weekHappy.

South Indian Lunch Menu For Stomach Upset


South Indian Lunch Menu ideas South Indian Lunch Menu idea for persons with stomach problems
Cuisine: South Indian
Category: Lunch Menu
Serves: Serves 3
Prep time: 10 Minutes
Cook time: 20 Minutes
Total time: 30 Minutes


INGREDIENTS

SUNDAKKAI PODI/TURKEY BERRY POWDER
  • Turkey berry-20 nos 
  • Pepper corns – 10 nos
  • Cumin seeds/Jeera – 1/2 tsp
  • Garlic cloves – 2 nos
  • Salt – as needed
  • Cooking oil – 2 tsp
NO TAMARIND TOMATO GRAVY 
  • Cooking oil - 1 tbsp
  • Mustard seeds - 1/2 tsp
  • Urad dal - 1 tsp
  • Chana dal - 1 tsp
  • Cumin seeds - 1/4 tsp
  • Green chilli – 2-3 nos (slit)
  • Tomato - 3 nos( finely chopped)
  • Small onion/Big onion – 15 nos/1 no
  • Moong dal – 1 tbsp
  • Curry leaves – few
  • Turmeric powder – a pinch
  • Hing/Asafetida – a pinch
  • Coriander leaves - to garnish
  • Salt & water – as needed
To grind
  • Grated coconut- 1/4 cup
  • Cumin seeds/jeera – 1/2 tsp
METHOD
  • Sundakkai podi : Heat oil in a kadai & saute the turkey berries/sundakkai.Add cumin seeds,pepper corns and roast everything well till you get a nice smell of roasted turkey berries. Powder everything together adding salt & finely chopped garlic.Mix with plain rice adding ghee.

  • Thakkali poricha kuzhambu :Heat oil in a pressure cooker base.Splutter mustard seeds,urad dal,chana dal,cumin seeds.Saute onions,curry leaves,green chillies and tomato till it turns mushy.
  • Add water,moong dal,turmeric powder,salt and pressure cook for 2 whistles in low flame.In the mean time,grind the coconut+jeera to a smooth paste adding little water.After the steam is released from the cooker,add this paste and boil well.Gravy will thicken.So add water and salt accordingly.Serve with plain rice adding few drops of ghee.
For paruppu,pressure cook dal adding a pinch of hing,turmeric powder and mash it.Do the seasoning at the end and serve with rice & ghee.
Start your lunch with paruppu sadam continue with podi,poricha kuzhambu and finish with curd rice or drink buttermilk.Enjoy this healthy and spice less lunch menu.


Try this simple lunch menu during sick days.U can recover quickly !


الاثنين، 27 يوليو 2015

Black Bean Salad with Fresh Mango and a Chaat Masala Dressing

Black Bean Salad with Fresh Mango

Easy bean salads are a perfect choice for summer meals and quite portable too, making them a good choice for potluck dinners and outdoor picnics. When it's hot, many of us don't care to fuss too much over dinner, and this is one of those dishes that comes together in hardly any time at all. This is not a bland salad either as many of the store-bought bean salads so often are. It's no wonder that some folks say they don't like beans — it's all in the preparation and seasoning and imaginative touch that goes into the food, and bean snubbers just might change their minds after feasting on this colorful and refreshing salad.

When I came up with the idea, I had an Indian twist in mind, hence the cumin and homemade chaat masala included in the tangy and zesty lime dressing. The earthiness of the black beans also makes a nice contrast to the succulent and sweet mango and crisp red pepper. There is a medley of color and flavor in this salad and each bite is a pleasing contrast of healthy and refreshing tastes and textures.

The recipe can easily be doubled, and if there are leftovers they keep well covered in the fridge for a day or two.

Note: Chaat masala is a hot, sour and salty Indian spice blend that goes well with cool or tangy foods. It can easily be found at any Asian and Indian grocery store, but I prefer to make my own blends. They take so little time to blend up, keep well in a sealed jar in a dark cool place for a good few months, and are usually far superior and certainly fresher in taste.

Black Bean Salad with Fresh Mango and a Chaat Masala DressingBlack Bean Salad with Fresh Mango and a Chaat Masala Dressing
Recipe by
Cuisine: Indian
Published on July 27, 2015

A colorful summer salad of earthy black beans and sweet red mango salad tossed in a tangy and zesty lime, cumin and chaat masala dressing

Print this recipePrint this recipe

Salad:
  • 1 cup dried black beans (3 cups cooked or 2 14 oz cans)
  • 1 large red mango, peeled and chopped
  • 1 small red onion, cut into thin strips or diced
  • 1 red bell pepper, seeded and cut into strips
  • 1 to 2 jalapeños, seeded and chopped
  • 3 tablespoons fresh parsley, chopped
Dressing:
  • juice from 1 lime (2 tablespoons)
  • 1 tablespoon olive oil (or more as required)
  • 2 teaspoons red wine vinegar
  • 1 teaspoon ground cumin
  • 1 teaspoon chaat masala
  • 1 teaspoon sea salt, or to taste
Instructions:
  • Rinse the beans and soak in several inches of water for 8 hours or overnight. Drain and rinse, then transfer to a medium saucepan and cover with fresh water. Bring to a boil, reduce heat to medium-low, cover, and simmer for 1 hour or until the beans are tender but not falling apart. Drain and set aside to cool.

  • Combine the black beans, mango, red onion, red pepper, jalapeño and fresh parsley in a large bowl.

  • Whisk together the dressing ingredients in a small bowl. Taste for seasoning, and then pour over the salad ingredients. Gently toss everything together and then chill in the refrigerator for 10 minutes or longer before serving.

Makes 4 to 6 servings

Black Bean Salad with Fresh Mango with Chaat Masala Dressing

This is my contribution to No Croutons Required this month, alternately hosted by Jacqueline and myself. It's my turn to host this month.

Other summery salads you may enjoy from Lisa's Vegetarian Kitchen:
Black Bean and Quinoa Salad with Fresh Mango and a Chaat Masala Dressing
Vegan Potato Salad Dressed with Avocado
Summer Chickpea Salad
Chickpea and Lentil Salad with Zucchini and Sun-Dried Tomatoes

الجمعة، 24 يوليو 2015

Sweet Corn Soup Recipe-Soup Recipes

I never thought sweet corn soup is so easy to make until I try it on my own.We are a big fan of tomato soup recipe.Whenever we visit restaurants,our order would be one and only tomato soup.So I make the same at home too.I never thought of making other soup recipes.Recent days I have been getting requests to post more soup and weight loss recipes.Especially my school friend Jayarani has been urging for long time to do it.So I started with this easy sweet corn soup recipe.I referred a cook book and tried it.Sendhil and Raksha loved it a lot.I was surprised when Raksha asked me for second serving.Generally sweet corn soup is prepared with creamy canned sweet corn along with boiled vegetables.But this recipe called for fresh sweet corn alone.Its a mix of Indian and Chinese versions.I was happy that I could serve a healthy soup recipe other than the usual tomato soup.Lets see how to make this yummy soup recipe with easy steps.

Sweet Corn Soup recipe


Sweet corn soup recipe Sweet corn soup - yummy,creamy,healthy sweet corn recipe/span>


Cuisine: Indian
Category: Soup Recipes
Serves: Serves 2-3
Prep time: 10 Minutes
Cook time: 10 Minutes
Total time: 20 Minutes


INGREDIENTS

  • Boiled Sweet Corn Kernels - 1 cup
  • Water - 2 cups
  • Ginger & Garlic Paste - 1/4 tsp
  • Corn flour - 1 tsp
  • Salt - as needed
  • Butter - 1-2tbsp
  • Sugar – a pinch 
  • Pepper powder - as needed
  • Chopped Spring onion-1 tbsp
  • Boiled milk at room temperature – 1/4 cup
  • Coriander leaves - to garnish(optional)
METHOD
  • Using a knife remove the corn kernels from the cob.Pressure cook it adding 1 cup of water.Drain the excess water and reserve 2 tbsp of kernels.Grind the remaining sweet corn adding some water.It will become a smooth paste.

  • Melt butter in a pan and add the g&g paste.Careful, it splutters.Saute quickly and add the chopped spring onion and ground sweet corn paste.Saute for few seconds.Add 1 cup of water + drained sweet corn cooked water.Let it boil well adding salt & Sugar.

  • Dilute corn flour adding 1/4 cup of milk.Add this to the boiling soup.It will start to thicken slightly.Add some water or milk to adjust the consistency.Lastly add the reserved sweet corn kernels and sprinkle some pepper powder.Serve hot.

NB: Replace milk with water if you don’t like to use it.Adding coriander leaves and spring onions are optional.


Enjoy this creamy sweet corn soup by sprinkling salt n pepper !