I fondly remember making holiday treats with my mom. An addictive and fantastically easy favorite, usually made for Christmas, were classic peanut butter balls. No doubt many of us remember those chocolate-coated treats with rice crispy cereal included for added crunch and texture. I never could resist peanut butter, and it often features in my no-bake treats and energy bites.
The only trouble with the classic ones I enjoyed as a child is that they are much too sugary for my tastes now. In addition to icing sugar, mom used not-so-natural peanut butter — you know the kind that isn't simply ground peanuts but instead a sugary spread. I loved them anyway, but over the years I've searched for healthier alternatives to satisfy my sweet tooth.
I've stayed true to the simplicity of the original recipe but left out butter, and used natural peanut butter and sweetener. I even bought a box of "healthy" sprouted rice crisp cereal, although I don't think that's really necessary — I shouldn't have felt guilt if I had used Rice Krispies, to tell the truth. But I dare say that this not-so-guilty version is even tastier and just as addictive as the original, and it also happens to be vegan friendly. Happily, if the urge to over-indulge is resisted, they are good for you too.
Note: Coconut flour is more absorbent than grain flours and in this recipe it's only required if the peanut butter used is somewhat runny. When stirred in, the mixture will thicken, so let it sit after adding a bit before adding more. The mixture before shaping should be moist, but neither too dry nor sticky.
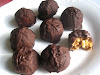 Not-So-Guilty Chocolate Peanut Butter Balls Not-So-Guilty Chocolate Peanut Butter Balls |
| Recipe by Lisa Turner Adapted from Oh She Glows Published on November 30, 2016 Sweet peanut butter and rice krispie balls coated with dark chocolate — addictive and guilt-free  Print this recipe Print this recipeIngredients:
|

Other peanut butter treats to enjoy from Lisa's Vegetarian Kitchen:
Raw Peanut Butter Fudge
Raw Peanut Butter Chocolate Nut Squares
Peanut Butter Cookie Dough Bites
Raw Peanut and Coconut Butter Fudge


 .
.